Loading...
Showing posts with label ubuntu. Show all posts

2010-06-25

How To Install Mozilla Thunderbird 3.1 (Final) In Ubuntu

Quoted Issue: How To Install Mozilla Thunderbird 3.1 (Final) In Ubuntu:

thunderbird 3.1 ubuntu

"Mozilla Thunderbird 3.1 was just released featuring faster search, quick filter toolbar, better migration assistant and many other improvements. A complete list of what's new can be found @ Mozilla's website.


There is no PPA for Ubuntu providing the latest Mozilla Thunderbird 3.1 for now and there are no plans to push an update in the existing Ubuntu versions (that means Lucid too) like it happened with Firefox so the only way to install it is manually, or by using Ubuntuzilla (it works with any Ubuntu version).

So to install Thunderbird 3.1 in Ubuntu, firstly install Ubuntuzilla. You can download a .deb file from HERE.

Once Ubuntuzilla is installed successfully, to install Thunderbird 3.1, all you have to do is run the following command in a terminal:
ubuntuzilla.py -a install -p thunderbird

During the installation, Ubuntuzilla will ask you to choose the localization you want to install, so it will install Thunderbird 3.1 in your language!

If you used the manual method to install Thunderbird 3.1 we were telling you about not so long ago, then all you have to do is select 'Check for updates' from the Thunderbird About menu."


2010-05-06

Minitube 1.0 was Released, So what is Minitube?

Minitube 1.0 was released on Tue 04 May, 2010. So what is Minitube?

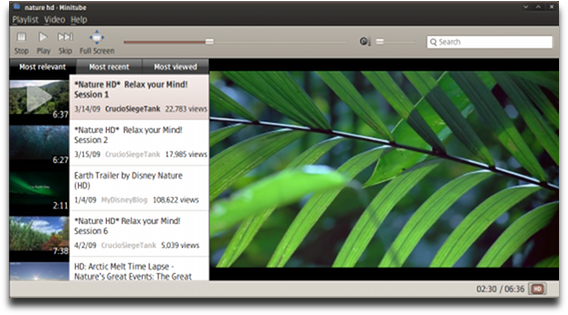
Minitube is a native YouTube client for Windows, Linux and Mac OS X. With it you can watch YouTube videos in a new way: you type a keyword, Minitube gives you an endless video stream. Minitube does not require the Flash Player.

Minitube 1.0 Released - Play YouTube Videos Without Flash [Ubuntu .deb Download]: Posted by Andrew | 05 May, 2010

minitube 1.0 ubuntu
Photo-01: Screnshot of Minitube 1.0  http://flavio.tordini.org/minitube
Minitube is not about cloning the original YouTube web interface, it aims to create a new TV-like experience.

Version 1.0 finally brings Full HD (1080p) video support, as well as other minor new features such as the ability to copy the YouTube link and the video stream URL to the clipboard.

Download
    Current version is 1.0, released on May 4, 2010. Here are the main changes since version 0.9:

  • Ability to play Full HD (1080p) videos
  • Ability to copy the YouTube link and the video stream URL to the clipboard
  • Fixed videos failing to play
  • Fixed missing caret in the search box
  • Better toolbar and icon theme integration on Linux with Qt >= 4.6
  • Completely removed tooltips
  • Romanian translation by Ovidiu Niţan
  • Greek translation by Giorgos Skettos
  • Dutch translation by Brian Keetman
  • Arabic translation by Sderawi
  • Portuguese translation by Daniel Rodrigues
  • Finnish translation by Jesse Jaara
  • Bulgarian translation by Tsvyatko Makazchiev
Full version history

Minitube comes with an Ubuntu PPA, but unfortunately version 1.0 has not been added to the PPA. However, you can download a .deb file provided by Linux Freedom For Live.

For more info on Minitube 1.0, source file and MacOS X Downloads (Windows builds are not yet ready), visit the Minitube page.

To download and install Minitube 1.0 in Ubuntu, run the following commands in a terminal:

$ wget https://sourceforge.net/projects/linuxfreedomfor/files/Minitube/minitube_1.0_all.deb/download
$ sudo dpkg -i minitube_1.0_all.deb
$ sudo apt-get install -f  #this installs the missing dependencies
$ sudo apt-get install phonon-backend-gstreamer gstreamer0.10-ffmpeg gstreamer0.10-plugins-bad #just in case
  ※ パッケージの依存関係がまだ不安定らしいので,最後の1行を忘れないほうがよい。

Alternatively, you can manually download the .deb from HERE.

Sourcecode: http://flavio.tordini.org/files/minitube/minitube-1.0.tar.gz.
You’re free to build Minitube by yourself, modify it and redistribute it according to the GNU General Public License.

Update: I replaced the download link for the .deb created by Linux Freedom For Live with new packages for Karmic and Lucid created by launchpad (I only uploaded them and used the original Minitube packaging for 0.9) so it should now work for everybody.
And don't forget to also check out Minitunes, another project by Flavio Tordini (the developer of Minitube), which we wrote about 2 weeks ago.


2010年5月6日 LinuxでYouTubeを楽しむならコイツがオススメ! "Minitube 1.0"登場 ── Linux Daily Topics:
"Appleが意地でもiPhone/iPadでのFlashサポートを拒否している件,さすがのAdobeも怒り心頭で,このままだと訴訟にまで発展しかねない状態だが,たしかにFlashってメモリ足りなめなマシンにはちょっと重たいなあ…と感じるときがなきにしもあらず。"


2010-05-05

Ubuntu Tips: How To Disable IPv6 in Ubuntu 10.04

Ubuntu 10.04 Lucid Lynx 関連の小技をひとつ。

Reference: How To Disable IPv6 In Ubuntu 10.04 Lucid Lynx:
Posted by Andrew | 03 May, 2010

I'm not sure if IPv6 in Ubuntu 10.04 Lucid Lynx is still causing issues with the Internet connection being slow and so on, but in case it does here's how to disable it.


◆ Ipv6 はデフォルトで有効になっている。チェックするには、端末を起動して、次のコマンドを与えるとよい。
To check if IPv6 is disabled, run the following command:


 baian@lucid-lynx:~$
 cat /proc/sys/net/ipv6/conf/all/disable_ipv6
  0
  0 means it's enabled and 1 - disabled.

This tweak is thanks to an old comment from Stonecut (this way you don't have to edit the GRUB).

◆ 基本的に、Ubuntu 10.04 Lucid Lynx で IPv6 を無効にするためには、/etc/sysctl.conf を編集して、以下に記述した数行を追記するとよい。

Basically, to disable IPv6 in Ubuntu 10.04 Lucid Lynx, you have to add the following lines to /etc/sysctl.conf:


 baian@lucid-lynx:~$ sudo vi /etc/sysctl.conf

# To disable IPv6 in Ubuntu 10.04 Lucid Lynx,
# add the following lines; 
 net.ipv6.conf.all.disable_ipv6 = 1
 net.ipv6.conf.default.disable_ipv6 = 1
 net.ipv6.conf.lo.disable_ipv6 = 1
     ※ typo: Above command line; $ pfexec ; correction -->> $ sudo
        mod.date: Aug/22/2011 06:37 JST.   
◆ 上述の /etc/sysctl.conf の編集作業を コマンドラインで操作するには、端末を開いて以下のスクリプトをコピー&ペーストすればよい。
To do it from the command line, paste this in a terminal:

 baian@lucid-lynx:~$ 
 echo '#disable ipv6' | sudo tee -a /etc/sysctl.conf
 echo 'net.ipv6.conf.all.disable_ipv6 = 1' | sudo tee -a /etc/sysctl.conf
 echo 'net.ipv6.conf.default.disable_ipv6 = 1' | sudo tee -a /etc/sysctl.conf
 echo 'net.ipv6.conf.lo.disable_ipv6 = 1' | sudo tee -a /etc/sysctl.conf


◆ ここで一旦システムを再起動して、本稿のはじめに記述した IPv6 チェックコマンドを与えて、IPv6 が無効になっていることを確認する。
Then reboot and check if IPv6 has been disabled with the command in the beginning of the post.


 baian@lucid-lynx:~$
  cat /proc/sys/net/ipv6/conf/all/disable_ipv6
 1 
  ※ ここで、IPv6 は無効化された。(返り値= 1)
  0 means it's enabled and 1 - disabled.

If for some reason IPv6 still shows up as enabled in Ubuntu 10.04 Lucid Lynx, you can use the method described in THIS post.

This tweak (and others) will go into Ubuntu 10.04 Start script (I don't know why I didn't think of this before).

  • To disable the DNS by IPv6 with Firefox 3.6.3 on Ubuntu 10.04 Lucid Lynx
Ubuntu 10.04 をインストール直後の FireFoxのブラウジングが異様に遅い・・・DNSの名前解決がやたら遅い。
どうやらIPv6での接続を試みて、失敗するとIPv4の接続に切り替えているようだ。

◇ 回避策として、
  1. FireFox のアドレスバーに「about:config」と入力してエンター。
    「動作保証対象外になります」という警告ダイアログのあるページが表示されるので、設定を変更する場合は「細心の注意を払って使用する」ボタンをクリックする。
  2. 設定の一覧画面が表示される。フィルター(F) 窓に IPv6 と入力する。「network.dns.disableIPv6」という設定名が検索表示される。
  3. 表示された「network.dns.disableIPv6」という設定名をダブルクリックして、値を「True」に変更する。
    こうすることで、IPv6 での名前解決が無効となり、最初から IPv4 での名前解決を行うことになる。
  4. FireFox を再起動する。多少なりとも軽快になったようだ。・・・おまじないか・・・


これも参考まで:Ubuntu 日本語フォーラム【HowTo】Firefoxを高速化する設定

2009-11-14

Customize Bash, Readline, Nano and Vim With BashStyle-NG

Introduce you to this usefull issues quoted from the following post.
Customize Bash, Readline, Nano and Vim With BashStyle-NG

BashStyle-NG


"BashStyle-NG is a graphical Tool for changing the look and feel for Bash, Readline, Nano and Vim.
It comes with 15 pre-defined styles that you can change as well as creating your own. You can also control the type and amount of commands in history to remember, use a welcome message, change the startup path and lots of other options."
Download:
Posted by Andrew | 21 September, 2009

2009-09-20

Ubuntu 10.04 Code Name Announced: Lucid Lynx

2010年4月にリリースされる予定の、Ubuntu 10.04 の "コードネーム" についてのアナウンスがあった。
" Lucid Lynx " ・・・ " 明晰な?ヤマネコ " だ。 このヴァージョンは LTS (サポート期間は5年間)となる予定で GNOME 3.0 が採用されるそうだ。 

ちなみに、目下αバージョンで開発中の、2009年10月にリリースされる予定の Ubuntu 9.10 の コードネームは "Karmic Koala" ・・・ " 宿命的な?コアラ " 、サンスクリット哲学するコアラ なのかな?

Ubuntu の 正式リリース版の命名について:
"Ubuntu X.YY" :  ここで X は "年号ー2000"、YY は "月名" となる。 それぞれのリリースに対応するコードネームは "Adjective Animal" ・・・形容句を付けた動物名 が採用されていて、 Adjective と Animal の頭文字には 同じ文字が当てられている。 たとえば、 intrepid Ibex, Jaunty Jackalope, Karmic Koala といった具合に。 詳しくは Ubuntu wiki で。

この Ubuntu wiki の末尾には、将来にわたってリリースされる Ubuntu のコードネーム候補の一覧表が掲載されている。  これはファンキー&ファニーな名前だ! と思い付いたユーザの方々は このコードネームのリストに書き加えてはいかが?
Ubuntu is known for having the funkiest release code names around. From time to time users suggest potential names, so if you have a magical idea, please add it to the table at the bottom of this page.
Quoted Issues: Ubuntu 10.04 Cod Name Announced: Lucid Lynx:
Lynx

"Ubuntu
is known for having the funkiest release code names around. Version 10.04 (to be released in April, 2010) will be named 'Lucid Lynx', points out the Ubuntu wiki.
In case you don't know, the 2 words in the Ubuntu cod names follow this pattern: 'Adjective Animal', so that's where Intrepid Ibex, Jaunty Jackalope, Karmic Koala and now Lucid Lynx came from (notice that the 2 words always start with the same letter).

On the same Ubuntu wiki page, there are already sugestions for future versions, some of which are very funny. For instance, here are some suggestions for Ubuntu 10.10: Marauding Macaque, Majestic Manatee, Merry Meerkat, Modest Mouse, Maudlin Manatee, Magnificent Mara, Mysterious Mockingbird, Mutinous Mouse. And that's just for 10.10; there are suggestions for even later Ubuntu versions.

[image via wikipedia]

2009-09-18

Ubuntu – Mint cheat sheet

Ubuntu と Linux Mint のバージョン毎の対比表:カンニングシート?が The Linux Mint Blog に寄稿されている。投稿は Clem さん。 Ubuntu と Linux Mint のリリース・タイムランやバージョン毎のコードネームも一目瞭然で参考になる。

拙訳しておく。
"スタンダード版と LTS 版との違いや、Ubuntu と Linux  Mint との互換性、あるいは、Mint のバージョンが どの Ubuntu のリリース版にもとづいて(開発されて)いるのか、また、サポート期間はどのくらいなのか?など・・・ときどき混乱してしまうことがあります。
それで、これらの事柄をスッキリさせるためとわからなくなったときに思い出すことができるように、今回は皆さんのために、以下にカンニング・シート(対比表)を提示します。"

Ubuntu – Mint cheat sheet :

Written by Clem on Monday, September 14th, 2009 @ 4:28 pm:
"I sense a lot of confusion sometimes when it comes to the difference between LTS and standard releases, or the compatibility between Ubuntu and Linux Mint. Which Mint release is based on which Ubuntu release? How long is it supported for?


So here’s a cheat sheet for everyone, to clear things up and make it easy to remember:"


Fig: Ubuntu - Mint cheat sheet by Clem

2009-09-17

Linux Mint 7 ‘Gloria’ XFCE released!

先にリリースされている 'KDE'Community Edition に続いて、Linux Mint 7 'Gloria' XFCE Community Edition がリリースされた。以下は引用記事である。
ベースは Xbuntu 9.04 Jaunty だそうだ。Linux Mint のエレガントなデザインは癒される? 
Window Manager は XFce 4.6 を採用したそうで、非力な Legacy Machine でも軽快な動作が期待できるか、のちほど My Notebook にインストールして試してみませう。 
Linux Mint 7 'Gloria' XFCE released on Sunday, 13 Sep 2009.
Quoted issues as follows,
"The team is proud to announce the release of Linux Mint 7 "Gloria" XFCE.


Quick steps:
Download the ISO or the torrent.
While it’s downloading look at the overview of the new features and make sure to quickly go through the known issues.
After the ISO is downloaded verify the MD5.
Burn the ISO at low speed and enjoy testing Linux Mint 7 XFCE.

Introduction to Linux Mint 7 XFCE:
The XFCE Community Edition aims to provide a version of Linux Mint which uses the XFCE desktop.
For a detailed overview of the new features and improvements included in Linux Mint 7 XFCE, please read “What’s new in Gloria XFCE?“.
Linux Mint 7 XFCE is based on Xubuntu 9.04 Jaunty Jackalope, Linux 2.6.28, XFCE 4.6 and Xorg 7.4.
Linux Mint 7 "Gloria" XFCE CE features a lot of improvements and the latest software from the Open Source World.

About Xfce
"Xfce is a lightweight desktop environment for various *NIX systems. Designed for productivity, it loads and executes applications fast, while conserving system resources."- Olivier Fourdan, creator of Xfce.
Xfce 4.6 embodies the traditional UNIX philosophy of modularity and re-usability. It consists of a number of components that together provide the full functionality of the desktop environment. They are packaged separately and you can pick and choose from the available packages to create the best personal working environment.

XFCE 4.6
Linux Mint 7 Gloria XFCE CE is now using XFCE 4.6. Have a look at the tour for more information.

System requirements:
A minimum of 3GB of free space and 256MB RAM are needed. For a comfortable experience we recommended to have at least 512MB RAM and 10GB of free space.

Important information and known issues:
For a complete list of known issues read the Release Notes.
The root password is now set as the same as the one chosen during the installation.
If you’re using Mint tools in other distributions, make sure to turn off the adjustment system by editing /etc/linuxmint/mintSystem.conf.

Download Linux Mint 7 XFCE:
You can download the XFCE Edition via torrent or via HTTP:
Size: 694MB LiveCD
MD5Sum: cee9c5fe119d749cf30b82e0a53b5a75

Torrent download: http://www.linuxmint.com/torrent/LinuxMint-7-XFCE.iso.torrent
HTTP download: http://www.linuxmint.com/edition.php?id=43


Asia:
http://ftp.jaist.ac.jp/pub/Linux/LinuxMint-ISO/stable/7/community/ (Japan)
http://ftp.riken.jp/pub/Linux/linuxmint/stable/7/community/ (Japan)

Europe:
http://gd.tuwien.ac.at/linux/mint/isos/stable/7/community/ (Austria)
http://mint.nano-box.net/iso/stable/7/community/ (Bulgaria)
http://mirrors.cytanet.com.cy/linux/mint/stable/7/community/ (Cyprus)
http://ftp.klid.dk/ftp/linuxmint/stable/7/community/ (Denmark)
ftp://ftp.linuxmint-fr.org/pub/linuxmint.com/stable/7/community/ (France)
http://ftp.cc.uoc.gr/mirrors/linux/linuxmint/stable/7/community/ (Greece)
http://ftp.heanet.ie/pub/linuxmint.com/stable/7/community/ (Ireland)
http://cesium.di.uminho.pt/pub/linuxmint/stable/7/community/ (Portugal)
http://ftp.df.lth.se/pub/linuxmint/stable/7/community/ (Sweden)
http://mirror.sov.uk.goscomb.net/linuxmint.com/stable/7/community/ (United Kingdom)

Northern America:
http://mirror.csclub.uwaterloo.ca/linuxmint/stable/7/community/ (Canada)
http://mirror.amarillolinux.com/linuxmint/stable/7/community/ (USA)
http://mint.ez.by/linuxmint.com/stable/7/community/ (USA)
ftp://linuxfreedom.com/linuxmint/linuxmint.com/stable/7/community/ (USA)
http://linuxmint.secsup.org/stable/7/community/ (USA)
ftp://mirrors.secution.com/linuxmint.com/stable/7/community/ (USA)

Oceania:
http://mirror.aarnet.edu.au/pub/linuxmint/stable/7/community/ (Australia)
ftp://mirror.unej.ac.id/pub/iso/linux-mint/stable/7/community/ (Indonesia)

Upgrade instructions:
Upgrade instructions will be published in a few days.

Feedback, ideas, bug reports:
We look forward to reading your reviews and your feedback. If you find bugs, don’t hesitate to report them at https://bugs.launchpad.net/linuxmint and if you have ideas that you would like implemented, don’t hesitate to register blueprints at https://blueprints.launchpad.net/linuxmint


Enjoy!
Enjoy this new version of the XFCE edition and don’t hesitate to send us your feedback. Congratulations and thanks to the maintainer, Merlwiz, for the excellent work done on this release.
Have a lot of fun and thanks for using Linux Mint."

追記項目:参考・引用 Ubuntuの日本語環境
"Ubuntu Japanese Team のパッケージレポジトリを追加する
Linux Mint 7 “Gloria” XFCE の CD でインストールを行った環境に、次の手順で
Ubuntu Japanese Team のリポジトリを追加することができる。"
1. [Menu]-[アクセサリ]-[Terminal]を開く。
2. 以下のコマンドを実行し、GPG鍵とレポジトリを追加する。
% wget -q https://www.ubuntulinux.jp/ubuntu-ja-archive-keyring.gpg -O- |sudo apt-key add -
% wget -q https://www.ubuntulinux.jp/ubuntu-jp-ppa-keyring.gpg -O- | sudo apt-key add -
% sudo wget https://www.ubuntulinux.jp/sources.list.d/jaunty.list -O /etc/apt/sources.list.d/ubuntu-ja.list
% sudo apt-get update
3. 以下のコマンドを実行し、パッケージをアップグレードする。
% sudo apt-get upgrade
4. デスクトップ環境を利用している場合は、[システム]-[システム管理]-[言語サポート]を開く。 標準の言語が設定されていることを確認する。設定されていなければ、利用したい言語のチェックをONにし、標準の言語を選択する。
5. 日本語 Remix CDに追加されているパッケージと同じものをインストールする場合は、
以下のコマンドを実行する。
% sudo apt-get install ubuntu-desktop-ja
LiveUSB の作成:
Create a 'LiveUSB stick for Linux Mint 7 XFCE edition' from the downloaded LiveCD ISO-Image file with "Win32DiskImager" or my previous posted issues on the Windows XP.

Windows XP 上で、前述の方法 (1) または (2) を用いて、ダウンロードした LiveCD ISO.Image から  Linux Mint 7 XFCE edition の "LiveUSB" を作成する。


2009-08-20

Installation of Ulimate Edition 2.2 x86 (32bit) on My Notebook computer

Ubuntuに派手なデスクトップやテーマを追加した「Ultimate Edition」

"今回は、前回のLinux Mintに引き続いて、Ubuntuの派生ディストリビューションとして豊富な追加アプリケーションと刺激的なデザイン性により注目を集める「UltimateEdition」(http://ultimateedition.info/)を紹介しよう。・・・"
という記事を読み、試しに My Notebook にインストールしてみる。すでにインストール済みの Ubuntu 9.04 Desktop を置き換えることになる。

Environment: Triple boot system: OpenSolaris 2009.06 + Ubuntu 9.04 Desktop + Windows XP Professional SP3 
Platform: Dell Latitude D410; Intel Pentium M730 1.6GHz, Intel 915GM Express 128MB,
2048MB SODIMM 533MHz, Hard drive; 45GB-linux/160GB UATA 5400rpm
 
Fig-01: Screenshot /Ultimate Edition 2.2 Desktop
on Dell Latitude D410 LCD 1024x768(24bit)
About Ultimate Edition 2.2
同じ Ubuntu の派生ディストリビューションである Linux Mint がエレガントで落ち着いたデザインを採用しているのに対し、Ultimate Edition の方はその対極にあるといえる、超ド派手なデザインが印象的だ。
2009年6月20日にリリースされた Ultimate Edition 2.2 は Ubuntu 9.04 Jaunty Jackalope をベースにビルドされ、Gnome Desktop を採用している。
This release was built from Ubuntu Jaunty Jackalope with all the goodies
pre-added you have come to love in prior Ultimate Edition releases & all upgrades pre-installed for your convenience.  This release has 2 kernels 2.6.28-13 & 2.6.28-11 selectable at boot time increasing your chances of success.
 Fig-02: Ultimate Edition Home http://ultimateedition.info/
Browser: Firefox 3.5.2 x86 ja

参考; 最新リリース: Ultimate Edition 2.3
2009年7月23日にリリースされた Ultimate Edition 2.3 では、Gnome と KDE の両方の Desktop 環境を得られるし、いくつかの新機能が盛り込まれている。
Ultimate Edition 2.3 was built off Ultimate Edition 2.2 (Ubuntu Jaunty Jackalope based) all upgrades pre-installed as of current. This release was built to satisfy the users of KDE. With this distro you get the best of both worlds Gnome & KDE and the following additional environments user selectable at login window / software (specifically):
KDE Desktop environment (both),
XFCE Desktop environment (x64),XBMC Media center (x64),
Lanshark – Filesharing application for local area networks (x86),
Clamtk – GUI based Virus scanner (x86),
A new theme (both)

1. Download
Ultimate Edition 2.2 の x86 ISO Image を University of Maryland からダウンロードする。
$HOME/[your downloaded file stored directory] に移動して、
  % wget http://home.paulschou.com/pub/ultimate/ultimate-edition-2.2-x86.iso

  Release Name: Ultimate Edition 2.2
  Architecture: x86 (32bit)
  Code base: Jaunty
  File size: 2.0 GB (2,132,037,632 bytes)
  MD5SUM: ea8e75283ab13fcfc90ded4961acc586
  Screencast: Youtube
  Download: Main, University of Maryland, Unixheads, Linux Freedom, Torrent

checksum;
% md5sum ultimate-edition-2.2-x86.iso
ea8e75283ab13fcfc90ded4961acc586 ultimate-edition-2.2-x86.iso ; okey!

2. Burn the iso image file to DVD-R/RW Disc with DVD authoring tools
Brasero, や Nero などの DVD 編集ソフトを利用して Windoz Box 上で DVD-R/RW を作成する。
3.Start-up with Live DVD, Ultimate Edition 2.2 (x86)
4.Install a Ultimate Edition 2.2 (x86) to the selected partition on my Hard drive.
Live CD の Desktop 上の Install icon をクリックすると 表示されるインストール設定画面の問いかけに従って作業を進める。 言語を日本語に、Timezone を日本(Tokyo)に・・・Ubuntu 9.04 Jaunty Desktop と同様である。
# Partitioning: 
$ sudo fdisk -l
ディスク /dev/sda: 160.0 GB, 160041885696 バイト
ヘッド 255, セクタ 63, シリンダ 19457
Units = シリンダ数 of 16065 * 512 = 8225280 バイト
Disk identifier: 0xde27ca4f
デバイス ブート 始点 終点 ブロック Id システム
/dev/sda1 1 5222 41945683+ 7 HPFS/NTFS
/dev/sda2 5223 7833 20972857+ 7 HPFS/NTFS
/dev/sda3 * 7834 13054 41937682+ bf Solaris
/dev/sda4 13056 19457 51424065 5 拡張領域
/dev/sda5 13056 13071 128488+ 83 Linux
/dev/sda6 13072 16183 24997108+ 83 Linux
/dev/sda7 16184 16370 1502046 82 Linux スワップ / Solaris
/dev/sda8 16371 19457 24796296 83 Linux

# システムの起動は OpenSolaris の Grub を利用して Boot Menu の選択肢から適宜選んでおこなう。したがって、ここでは /dev/sda の先頭 MBR にはインストールせず、/dev/sda5 (hd0,4) の先頭にイントールしておく設定とする。
/dev/sda5 は /boot, /dev/sda6 は /, /dev/sda7 は swap としてパーティション・初期化する。
/dev/sda8は /home として、既存データを利用するため、初期化しない。
ただし、Gnome Desktop はデフォルト設定に戻しておくので ・・・事前に $HOME/hoge-user 以下の Gnome, nautilus 関連設定ファイルを削除しておく。

5. Reboot your system.
6. Boot up the OpenSolaris 2009.06
7. Edit the Grub boot menu ;"/boot/grub/menu.lst" on the OpenSolaris 2009.06.

on my environment:
# cat /boot/grub/menu.lst on Ultimate Edition 2.2

copy the following scripts lines to /boot/grub/menu.lst on the OpenSolaris 2009.06
*********************************************************************
title Ubuntu 9.04, kernel 2.6.28-15-generic
# uuid f5bf293a-5b37-464a-b6c0-cdc43b2f02da
root (hd0,4)
kernel /vmlinuz-2.6.28-15-generic root=UUID=008fad63-a243-435a-b71d-8f1c5e078898 ro quiet splash
initrd /initrd.img-2.6.28-15-generic
quiet

title Ubuntu 9.04, kernel 2.6.28-15-generic (recovery mode)
# uuid f5bf293a-5b37-464a-b6c0-cdc43b2f02da
root (hd0,4)
kernel /vmlinuz-2.6.28-15-generic root=UUID=008fad63-a243-435a-b71d-8f1c5e078898 ro single
initrd /initrd.img-2.6.28-15-generic

title Ubuntu 9.04, memtest86+
uuid f5bf293a-5b37-464a-b6c0-cdc43b2f02da
kernel /memtest86+.bin
quiet
*************************************************************************

$ vi /boot/grub/menu.lst
copy the above"Ultimate Edition" boot menu lines to the OpenSolaris one as follows.

# This configured grub menu is available for the triple boot system.
$ cat /boot/grub/menu.lst ( ln -s /rpool/boot/grub/menu.lst /boot/grub/menu.lst)

# ****************************************************
# /boot/grub/menu.lst on OpenSolaris 2009.06 release.
# Last modefied by Baian, Aug/18/2009 18:20 JST
#****************************************************
#
splashimage /boot/grub/splash.xpm.gz
background 215ECA
timeout 15
default 0
#---------- ADDED BY BOOTADM - DO NOT EDIT ----------
# 00 title opensolaris-5 verbose mode
title opensolaris 2009.06 based on snv_111b (verbose mode)
findroot (pool_rpool,2,a)
bootfs rpool/ROOT/opensolaris-5
kernel$ /platform/i86pc/kernel/$ISADIR/unix -B $ZFS-BOOTFS -v
module$ /platform/i86pc/$ISADIR/boot_archive
# 01 title opensolaris-5 graphics splashy mode
title opensolaris 2009.06 based on snv_111b (splashy mode)
findroot (pool_rpool,2,a)
bootfs rpool/ROOT/opensolaris-5
splashimage /boot/solaris.xpm
foreground d25f00
background 115d93
kernel$ /platform/i86pc/kernel/$ISADIR/unix -B $ZFS-BOOTFS,console=graphics
module$ /platform/i86pc/$ISADIR/boot_archive
#============ End of LIBBE entry =============
#02 title opensolaris-6
title opensolaris 2010.02 preview 2nd-release based on snv_118 (verbose mode)
findroot (pool_rpool,2,a)
bootfs rpool/ROOT/opensolaris-6
kernel$ /platform/i86pc/kernel/$ISADIR/unix -B $ZFS-BOOTFS -v
module$ /platform/i86pc/$ISADIR/boot_archive
#---------- ADDED BY BOOTADM - DO NOT EDIT ----------
# 03 title xVM-Xen
title Solaris xVM
findroot (pool_rpool,2,a)
kernel$ /boot/$ISADIR/xen.gz
module$ /platform/i86xpv/kernel/$ISADIR/unix /platform/i86xpv/kernel/$ISADIR/unix -B $ZFS-BOOTFS
module$ /platform/i86pc/$ISADIR/boot_archive
#============ End of LIBBE entry =============
#---------------------END BOOTADM--------------------
#
# Unknown partition of type 5 found on /dev/rdsk/c9d0p0 partition: 4
# It maps to the GRUB device: (hd1,3) .
#
# 04
title Ubuntu 9.04, kernel 2.6.28-15-generic (Ultimate-Edition)
# uuid f5bf293a-5b37-464a-b6c0-cdc43b2f02da
root (hd0,4)
kernel /vmlinuz-2.6.28-15-generic root=UUID=008fad63-a243-435a-b71d-8f1c5e078898 NETWORKING_IPV6=no ro video=vesa:ywrap,mtrr vga=0x317
initrd /initrd.img-2.6.28-15-generic
# 05
title Ubuntu 9.04, kernel 2.6.28-15-generic (recovery mode)
# uuid f5bf293a-5b37-464a-b6c0-cdc43b2f02da
root (hd0,4)
kernel /vmlinuz-2.6.28-15-generic root=UUID=008fad63-a243-435a-b71d-8f1c5e078898 NETWORKING_IPV6=no ro single video=vesa:ywrap,mtrr vga=0x317
initrd /initrd.img-2.6.28-15-generic
# 06
title Ubuntu 9.04, memtest86+
#uuid f5bf293a-5b37-464a-b6c0-cdc43b2f02da
root (hd0,4)
kernel /memtest86+.bin
quiet
#---------------------END BOOTADM--------------------
# 07
title Windows XP professional +SP3
root (hd0,0)
chainloader +1
************************************************************
kernel line : NETWORKING_IPV6=no は IPV6 を Disable にするための、
video=vesa:ywrap,mtrr vga=0x317 は vesa frame buffer を有効にして、
system boot 時の verbos mode の画面サイズを規定する。
ここでは、vga=0x317=1024x768 とした。


baian@saturn:~$ pfexec bootadm list-menu
the location for the active GRUB menu is: /rpool/boot/grub/menu.lst
default 0
timeout 15
0 opensolaris 2009.06 based on snv_111b (verbose mode)
1 opensolaris 2009.06 based on snv_111b (splashy mode)
2 opensolaris 2010.02 preview 2nd-release based on snv_118 (verbose mode)
3 Solaris xVM
4 Ubuntu 9.04, kernel 2.6.28-15-generic (Ultimate-Edition)
5 Ubuntu 9.04, kernel 2.6.28-15-generic (recovery mode)
6 Ubuntu 9.04, memtest86+
7 Windows XP professional +SP3

Screenshots:


2009-08-17

Ubuntu 系ディストリビューション

出典:Ubuntu 系ディストリビューション
Ubuntu そのものは Debian GNU/Linux がベースである。公式なものと非公式なものが存在する。
公式
Ubuntu : Debian GNU/Linuxベースで6ヶ月ごとのリリースと商用サポートを掲げる。
Kubuntu : デスクトップ環境としてGNOMEの代わりにKDEを採用している。
Edubuntu : デスクトップ環境としてGNOMEを採用し、教育用にカスタマイズされている。
Xubuntu : デスクトップ環境としてXfceを採用しており、「軽い」。
Gobuntu : フリーソフトウェアのみを利用している。
Ubuntu Studio : 標準的なUbuntuにマルチメディア機能を追加したもの。
非公式
Linux Mint : デザインやソフトウェア環境を改善し、マルチメディア関係のコーデックを充実させた。
Ultimate Edition:豊富な追加アプリケーションと刺激的なデザイン性により注目を集める。
Ecolinux : デスクトップ環境としてXfceを採用した日本発のディストリビューション。
Elbuntu: ウィンドウマネージャとしてEnlightenmentを採用している。
Fluxbuntu : ウィンドウマネージャとしてFluxboxを採用している。
Freespire : "live"モードとしてCDから直接起動したり、ハードディスクにインストールできる。二つのバージョンが利用可能で、その内の一つは、MP3、 Windows Media、Java、Flash、QuickTime、Realなどをサポートしたドライバ、コーデック、アプリケーションが含まれる。  参考:Freespire 2.0 インストール完全ガイド
Goobuntu : Google がGoobuntuというUbuntu派生ディストリビューションを作成しているという有名な噂があった。GoogleはUbuntuの修正版を作っていることは認めたが、それを社外に公開する予定はないことも明言している。[1][2]
gOS : 2007年11月1日に登場した。アメリカのWal-Martで発売される低価格PCEverex Green gPC TC2502用のOSとして開発された。特徴はGoogleのオンライン・アプリへのアクセスを優先した設計である。デスクトップのデザインはMac OS Xを模されている。
nUbuntu: セキュリティツールを多数含んでいる。
Ubuntu Christian Edition : 標準的なUbuntuに聖書全文とURLフィルタリングを搭載したクリスチャン向け。
U-lite Linux : レガシーデバイスを備えた古いコンピュータ用。
Virtual Appliances: 仮想環境で事前にビルドされたUbuntuベースのアプリケーション集である。
Zubuntu : zaurus用のubuntuをZubuntuと名づけた。
巫女 GNYO/Linux : 3.6以降。openMosixSCoreを利用したPCクラスタが構築可能。CDブート/HDDインストール共可能。日本のクローズドな団体であるProject 巫女ぐにょによって開発されている。Gnyoは"Gnyo is Not Yet Other"の頭字語である。


参考:人気のUbuntuから派生した多種多様なLinuxディストリビューション

2009-05-06

Ubuntu 9.04 Desktop 日本語 Remix CD (x86用) インストール完全ガイド

 Ubuntu Japanese Team では、マン島に拠点を構える Canonical 社が支援するコミュニティ 「Ubuntu Foundation」 が提供する Ubuntu 9.04 Desktop Editon を日本語向けにカスタマイズした 「Ubuntu 9.04 Desktop 日本語 Remix CD」 を公開している。
オープンソース/Linux : ITpro にアクセスすると、 Ubuntu Japan Team から 2009年4月24日 にリリースされた ” Ubuntu 9.04 Desktop 日本語 Remix CD (x86用)” のインストール完全ガイド として、詳しい解説記事が掲載されている。 
                        (ライター 福田 和宏 氏) [2009/04/27]
 
 日本語 Remix CDのダウンロード              : (※ 1) 追記参照
 日本語 Remix VirtualBox用仮想マシンのダウンロード : 旧バージョン
 日本語 Remix VMware用仮想マシンのダウンロード   : 旧バージョン


 (※ 1) 追記 2009-05-13 09:50 JST(Tokyo):[引用元] Ubuntu Japan Team ニュース  (5月12日追記)
     Windowsのファイルシステム上にUbuntuをインストールするプログラム「Wubi」に問題があったため(詳細)、CDイメージを更新し、
  上記のリンクを差し替えました。
    ほとんどのWindows XPおよびVista環境にインストールすることが可能になっていますが、以下の問題については調査中です。
  • Wubiで日本語訳が使われず、英語でメッセージが表示される。
  •  環境によっては、Wubi起動時に「ディスクがありません」というエラーメッセージが表示される(LP#365881)。
  • 環境によっては、「このアプリケーションの構成が正しくないため、アプリケーションを開始できませんでした。」と表示されWubiが起動できない。

2009-05-03

Installing on USBFlash Stick with Ubuntu

Desktop CD をUSBメモリにインストールする方法 : コマンドラインで
引用先: http://old.ubuntulinux.jp/wiki/InstallingOnUSBFlash/

単純にDesktop CDとして動作させるのではなく、変更内容をUSBメモリの別パーティションに保持するようにセットアップする方法である。これにより、電源を切っても作成したファイルやインストールしたアプケーションが消えなくなる。

1.必要なもの

  • 高速起動版のDesktopCDイメージCD-Rなどのメディア
  • USBメモリ
  • USBメモリからの起動に対応したPC
       ダウンロードしたCDイメージをそのまま使うなら1GBytes以上のものが必要。

2.Desktop CDのイメージをCD-Rなどに焼く。 そのCDでPCを起動する。

3.内容を消しても構わないUSBメモリをPCに差し込む。

4.自動的にマウントされた場合、アンマウントする。USBメモリのデバイスはマシンによって異なるので、dhコマンドやdmesgコマンドで調べる。

5.fdiskコマンドでパーティションを切る。1番目のパーティションを700MBytes、残りを2番目のデータ保存用パーティションに割り当てるとよい。
カスタマイズしたCDを使う場合は、1番目のパーティションのサイズをCDのサイズに合わせて作成する。
  $ sudo fdisk [USBメモリのデバイス ]

パーティションの作成例(2GBytesのUSBメモリを使った場合。
Disk /dev/sdb: 2063 MB, 2063597568 bytes
255 heads, 63 sectors/track, 250 cylinders
Units = シリンダ数 of 16065 * 512 = 8225280 bytes
デバイス Boot Start End   Blocks    Id   System
/dev/sdb1    1     86  690763+  83   Linux
/dev/sdb2    87    250 1317330   83   Linux

6. 以下のコマンドを実行する。
  # /cdrom/tools/install_usb.sh [USBメモリのデバイスファイル] [起動パーティション番号] [データパーティション番号]

USBメモリのデバイスファイルが /dev/sda、起動パーティションが 1、データ用パーティションが 2 ならば、以下のようになる。 データパーティション番号を省略すれば、作成されない。
  # /cdrom/tools/install_usb.sh /dev/sda 1 2 

あとは画面の指示に従って入力する。

7. PCを再起動し、BIOSでUSBから起動するよう設定する。

2009-04-24

Ubuntu 9.04, "Jaunty Jackalope", was released

On 23rd April 2009, Ubuntu 9.04 was released. "Jaunty Jackalope" is the code name for Ubuntu 9.04. Ubuntu 9.04 Desktop Edition is free to download from Thursday 23 April.
Also announced were the simultaneous releases of Ubuntu 9.04 Server Edition and Ubuntu 9.04 Netbook Remix (UNR). --- readmore and available to download these iso9660 image files here.

Ubuntu 9.04, コード名 "Jaunty Jackalope" 正式版がリリースされた。 Kubuntu, Xbuntu もしかり。  
My Notebook PC には既に RC 版をインストール済みで、ここ数日来煩雑にアップデートされていたので、本機も正式版と同等になっているのではなかろうかと、勝手に推察。
とりあえず、Desktop Edition の iso image をダウンロードした。Ubuntu 上で ユーティリティ を起動して Live USB を作成しておく。
Ubuntu Japanese Team には このアナウンスはまだない。 日本語版 Remix もそのうちに・・・


2009-01-06

Replace to Dell Lattitude D410 notebook computer

 レガシーノートPC DynaBook Satellite 1800 の LCDパネル/上部筐体をつないでいるヒンジ がついに壊れてしまった。 後学のために、このマシンを分解してみる。・・・後記。
ヤフオクで中古モバイルノートをサーベイして、Dell Lattitude D410 を速攻ゲットした。
ハードウェアスペック
PentiumM 1.6GHz/メモリ512MB/ハードディスク40GB/12.1”TFT/GibaLAN/ワイヤレスLAN内蔵。
WindowsXP インストール済み。OSのリカバリCDが付属。
外部モニタ設置可能なポートリプリ ケータが付属。
付属品: WindowsXP Home+Service Pack2の再インストールCD(DELL正規品)、
ドライバCD(バックアップ品)、アプリケーションCD(RecordNow、PowerDVD
バックアップ品)、外付けUSBドライブベイ、CD-RW&DVD-ROMコンボドライブ
モジュール(着脱式)、フロッピードライブモジュール (着脱式)、USBマウス、
ポートリプリケータキット、AC電源アダプタ(大小2個)、電源コード、
バッテリパック(本体装着済み)。 とても激安にて入手できて余は満足じゃ。
 本機は2005年2月発売の B5サイズ ビジネスノートPCだ。昨今の ULPC よりも操作性で優位か?

コンポーネントパーツのアップグレード・換装;
サービスマニュアルを参照して、ついでにPC内部をクリーニング、CPUファン・ヒートシンクを清掃する。
1.メモリ フル実装: A-Data SODIMM DDR2-PC4200(533MHz) 1GB × 2 = 2 GB
2.ハードドライブ換装: Seagate ST9160821A UTA-100 160GB (バルク品)
3.Dell Latitude D410 用 Li-ion バッテリー(互換品)に新品交換。
1〜3 の調達コストは合わせて約18K円也。DDR2メモリ価格が大幅下落していて大助かりだ。
後日CPUをM760(2GHz)に換装してみやう。
4.BIOSをアップデートしておく。 Delll Japan サイトからドライバ・その他をダウンロードする。
5.OS クリーンインストール: Windows XP professional +SP2, OpenSolaris 2008.11, ubuntu 8.10 Intripid -ja-desktop (日本語 Remix CD) の triple-boot-system を構築する。

2008-07-13

Triple Boot Grub Howto : added the OpenSolaris 2008.05 on My Toshiba Satelle 1800 notebook computer

Note : The OpenSolaris installer overwrites existing MBR with GRUB, it's impossible to have it install GRUB only the root partition. Keep this in mind especially if you have Linux installed, you will need to manually add the Linux boot title line to the OpenSolaris GRUB Menu (/rpool/boot/grub/menu.lst) after the OpenSolaris have been installed.
注記:OpenSolaris のインストーラは GRUB とともに 既存の MBR を root パーティションに上書きする。
それで、特に注意しなければならないのは、Linux が既にインストールされていた場合には、OpenSolaris のインストール後に OpenSolris の GRUB (menu.lst) を編集して Linux の ブートリストを追加する必要がある。

OpenSolaris をインストールする前(Windoz XP Professioal +SP3 と Xubuntu 8.04 Hardy heron との Dualboot System)の GRUB(/boot/grub/menu.lst) を Pendrive (USB Flash memory) やフロッピーディスクに書き出しておく。
また、この GRUB(menu.lst) を次のコマンドを与えて、レスキュー・フロッピー・ディスクを作成しておく。
こうすることで、万が一 OpenSolaris の GRUB が破損してシステムが立ち上がらないときに、このフロッピーディスクを使ってシステムを起動することができる。
以下の操作は、Xubuntu 8.04 (Hardy Heron) 上でおこなう。
$ sudo fdformat /dev/fd0 # フロッピーディスクのフォーマット
$ sudo mke2fs /dev/fd0 # ext2 ファイル作成
$ sudo grub-install --root-directory=/ /dev/fd0 #フロッピーディスクにGRUBを作成
# Xubuntu 8.04 における GRUB Menu (/boot/grub/menu.lst) は以下の通りである。
*******************************************************
# menu.lst - See: grub(8), info grub, update-grub(8)
# grub-install(8), grub-floppy(8),
# grub-md5-crypt, /usr/share/doc/grub
# and /usr/share/doc/grub-doc/.

## default num
# Set the default entry to the entry number NUM. Numbering starts from 0, and
# the entry number 0 is the default if the command is not used.
#
# You can specify 'saved' instead of a number. In this case, the default entry
# is the entry saved with the command 'savedefault'.
# WARNING: If you are using dmraid do not use 'savedefault' or your
# array will desync and will not let you boot your system.
default 0

## timeout
# Set a timeout, in SEC seconds, before automatically booting the default entry
# (normally the first entry defined).
timeout 12

#A splash image for the grub menu
splashimage=(hd0,4)/grub/splashimages/52420-sleekdragon.xpm.gz

title Ubuntu 8.04, kernel 2.6.24-18-generic
root (hd0,4)
kernel /vmlinuz-2.6.24-18-generic root=/dev/hda6 ro vga=791
initrd /initrd.img-2.6.24-18-generic

title Ubuntu 8.04, kernel 2.6.24-18-generic(Rescue / Recovery mode)
root (hd0,4)
kernel /vmlinuz-2.6.24-18-generic root=/dev/hda6 ro single
initrd /initrd.img-2.6.24-18-generic

title Ubuntu 8.04, memtest86+
root (hd0,4)
kernel /memtest86+.bin
quiet

### END DEBIAN AUTOMAGIC KERNELS LIST

# This is a divider, added to separate the menu items below from the Debian
# ones.
title Other operating systems:
root

# This entry automatically added by the Debian installer for a non-linux OS
# on /dev/hda1
title Microsoft Windows XP Professional +SP3
root (hd0,0)
savedefault
makeactive
chainloader +1

# This entry for OpenSolaris 2008.05 release # 以下のエントリーを追記する。
# on /dev/hda3
title OpenSolaris 2008.05 GRUB Boot Menu
root (hd0,2)
savedefault
makeactive
chainloader +1
************************************************
# OpenSolaris 2008.05 の GRUB Menu (/rpool/boot/grub/menu.lst) は次のとおり。
OpenSolaris 2008.05(11)、Xubuntu 8.04、および Windoz XP Professional から成る、
Triple Boot System である。
************************************************
## GRUB Menu (/rpool/boot/rub/menu.lst) scripts as the followings:
splashimage /boot/grub/splash.xpm.gz
timeout 12
default 0
#---------- ADDED BY BOOTADM - DO NOT EDIT -------
title OpenSolaris 2008.11 snv_91 X86
bootfs rpool/ROOT/opensolaris-1
kernel$ /platform/i86pc/kernel/$ISADIR/unix -B $ZFS-BOOTFS
module$ /platform/i86pc/$ISADIR/boot_archive
#---------------------END BOOTADM-----------------
#---------- ADDED BY BOOTADM - DO NOT EDIT -------
title OpenSolaris 2008.05 snv_86_rc3 X86
bootfs rpool/ROOT/opensolaris
kernel$ /platform/i86pc/kernel/$ISADIR/unix -B $ZFS-BOOTFS
module$ /platform/i86pc/$ISADIR/boot_archive
#---------------------END BOOTADM-----------------
title Windows XP Professional +SP3
rootnoverify (hd0,0)
chainloader +1

# Unknown partition of type 5 found on /dev/rdsk/c4d0p0 partition: 4
# It maps to the GRUB device: (hd0,3) .

title Xubuntu 8.04, kernel 2.6.24-18-generic
root (hd0,4)
kernel /vmlinuz-2.6.24-18-generic root=/dev/hda6 ro vga=791
initrd /initrd.img-2.6.24-18-generic

title Xubuntu 8.04, kernel 2.6.24-18-generic (recovery mode)
root (hd0,4)
kernel /vmlinuz-2.6.24-18-generic root=/dev/hda6 ro single
initrd /initrd.img-2.6.24-17-generic

title Xubuntu 8.04, memtest86+
root (hd0,4)
kernel /memtest86+.bin
quiet
************************************************

2008-06-30

ストレージドライブの Volume_UUID 設定値 (ubuntu 8.04)

## ストレージドライブの Volume_UUID 設定値 (ubuntu 8.04)
-------------------------------------
# /dev/hd* Volume_id=UUID detect command:
→ example
# sudo /lib/udev/vol_id /dev/hda* | grep UUID
-----------------------------------------------------
/dev/hda1 : UUID=1E38CCA038CC77F3                       
/dev/hda2 : UUID=468C88558C884183
/dev/hda5 : UUID=4b106813-09da-49f0-a6a7-b8916be77f09
/dev/hda6 : UUID=3a1ac045-4b07-4fb1-a8e8-a17a76b3a549
/dev/hda7 : UUID=8976fbd9-f05a-4208-9ab7-b7f903561585
/dev/hda8 : UUID=22fd8f36-4fd7-45b3-8fda-a17e4c25d0d9
/dev/hda9 : UUID=bea764da-8ebe-4d55-bcf0-607e08d3fc2e


2008-06-02

About My Toshiba Satellite 1800 notebook computer

The followings document describes how I set up an Ubuntu 8.04 (Hardy Heron) LTS system on my Toshiba Satellite 1800 SA70C/4-modified notebook computer.
# About my Toshiba Satellite 1800 SA70C/4 notebook computer :
-------------------------------------------------------------
The Toshiba 1800 SA70C/4 is a mid-range laptop for Domestic model in Japan built in May-23-2001.
# About the Hardware Specification Outline of Basic Model No.PS18070C4418.
-------------------------------------------------------------
* Intel Celeron (coppermine) 700 MHz CPU
* Trident Microsystems Cyber-blade AI1 video chip,8MB Video-RAM
* 1024 x 768 TOS52 LCD screen,14.1(TFT/XGA)
* 128 MB RAM installed (max 512 MB in two PC100 SDRAM SODIMM sockets)
* 10 GB hard drive
* TEAC CD-224E CD-ROM drive
* Ali Corporation M5451 PCI AC-Link controller audio device
* Network Adapter : on board, Intel 82558-integrated Fast Ethernet Adapter
* PC-Card Slot : TYPE II×2 slot or TYPE III×1 slot (PC Card Standard,Cardbus 32bit)
* USB 1.1 port : 2 ports
* Legacy I/O interfaces : 1xSerial COM1, 1xParallel port
-------------------------------------------
1. Components upgrade
1-1. CPU Upgrades: Replaced Celeron 700 MHz to Celeron 1.0 GHz (coppermine).
1-2. Memory Upgrades: Although Linux will operate with the small memory/hard-drive configuration that this machine came with, your performance will be significantly poorer than it can be. It is highly recommended that you purchase a memory upgrade.
The memory SODIMMs slide into a pair of slots accessible through a screwed-on cover on the bottom of the machine.
I got a pair of 256MB PC133 SDRAM modules upgrade to 512MB.
1-3. Hard Drive Upgrades
While your upgrading the memory, you should also get a larger, faster hard drive.
While having more space is helpful, the speed improvement with a more modern hard drive will make a noticeable performance improvement.
The hard drive fits into a carriage on the side of the machine that is released with a single screw. I got a new 40GB Toshiba ATA drive, model MK4025GAS.
1-4. Optical Drive Upgrades: I got a new super multi DVD-RAM drive, model Matshita UJ-850-S (for OEM).
As the default interfaces connection of this optical drive is slave that was not recognised on my pc-system, so PIN47-45 of backport connecter was terminated with solder, then correctly working recognised as secondary master drive.
2. Upgrade Your BIOS
Although I'm not certain this is necessary, you should go to csd.toshiba.com, get a copy of the most recent BIOS for this machine, and flash your BIOS.
This operation must be performed from Windoze. In my case, the upgrade was from v1.90 to v2.20.
3. Dual Boot Install:
This machine came with Windoze 98 pre-installed and I later installed a legit copy of XP on the machine from CD. If you want to be able to run Windoze and Linux on the same machine, you will need to either split your existing Windoze partition or repartition your hard drive and completely reinstall Windoze on one of the new, smaller partitions. Splitting an existing NTFS partition with ntfsresize is not covered in this document. I chose the reinstall path, using the SystemRescue CD to run fdisk and split the partition before reinstalling XP Professiona SP2.
Backup Your Windoze Registration Files: Regardless of whether you chose to reinstall Windoze or split your Windoze partition, you should keep your Windoze XP registration files to avoid having to go through the MS activation procedures. Copy these two files onto a floppy or flash drive. If you have to reinstall Windoze, these files can be copied into the new installation.
c:¥WINDOWS¥system32¥wpa.dbl
c:¥WINDOWS¥system32¥wpa.bak
4. Install Command Line Ubuntu
Ubuntu is a popular and friendly variant of the Debian Linux distribution.
Normally, installation can be accomplished with a handful of mouse clicks. However, because the installer has a bug related to the video chip in this machine, you will need to install a command-line version first. Use of the regular installer will result in a freeze when you get to the point where the installer starts configuring the windowing system (X).
The procedure is a bit cumbersome, but I haven't found an easier way.
The primary issue installing Ubuntu on this machine is the absence of support for DDC video monitor detection, which will cause the default installers to lock up.
So the instructions below are a bit more complicated than a standard Ubuntu installation, which usually involves just a handful of prompts and mouse clicks.
4-1. Download and Burn the Alternate Desktop CD:
You will need to perform a command-line installation which is only available on the "Alternate Desktop CD".
You specify this CD with a checkbox on the Ubuntu download page.
The downloaded file is a CD disk image (ISO) that you should burn it to a Blank CD-R/RW using your CD burning software.
4-2. Boot the Installation CD:
Insert the installation CD in the CD drive and reboot.
If the machine ignores the CD and boots from the hard drive, you need to change your BIOS boot order by holding down the ESC key while rebooting and changing the boot order on the BIOS screen so that the CD drive is first in the order list.
4-3. Install A Command-Line System:
At the Ubuntu boot screen, you should choose the option, "Install a command-line system" and press RETURN.
You will be asked a series of questions...

.... to be continued.

2008-04-25

Ubuntu 8.04 LTS リリース

4月24日 Ubuntu 8.04 (Haedy Heron) LTS デスクトップ版およびサーバ版がリリースされた.

「日本語ローカライズドDesktop CD」は25日中にリリースの予定だそうだ.
xubuntu 8.04 LTS も同時にリリースされていたVisit Xubuntu.org 
さっそく、BitTorrent で alternate CD-iso イメージをダウンロードしてみた. CD-Rを焼いて、自作機・レガシーにインストールする.
※ Ubuntu 8.04 LTSの新機能は、以下のプレスリリースに記載されている(英語).
デスクトップ版: Ubuntu 8.04 LTS Desktop Edition Released 
Integrates the Latest Stable Applications with Long Term Support
サーバ版: Latest Server Release Expands Ubuntu Enterprise Profile
Ubuntu 8.04 LTS Server Edition Combines Advanced Functionality With Five Years of Maintenance and Support

2008-04-17

ubuntu 8.04 LTS (Hardy Heron) Beta on dynabook Satellite 1800 C1000-mod

2008-04-13 ubuntu 8.04 Coming Soon のつづき

Ubuntu 8.04 LTS (Hardy Heron) Beta, Alternate install CD iso-image をここからダウンロードして、CD-R を焼き、My NoteBook PC、dynabook Satellite 1800 C1000-mod. にインストールしてみた.グラフィカルログインにようやく成功した.

<Ubuntu 8.04 LTS (Hardy Heron) Beta グラフィカル起動画面>


Session:Gnome 2.22 /Desktop Style (外観の設定):Nimbus


Michael Minn さんの記事 : Linux on the Toshiba Satellite 1800-S203を参考にして、

1.ブート画面のメニューから "Install a command-line system" を選択して、インストール開始.

2.以後、画面の指示に従って、インストール作業を進める.

3.最後に Grub boot loader を default インストール. ここで、システムを再起動すると、コマンドライン(CUI)バージョンの ubuntu 8.04 LTS Beta が起動する.

補足:システムの再起動 >> インストーラCDをDVDドライブに装着してシステムを再起動し、インストーラメニューから "boot from first hard drive" を選択する.こうすると Grub Boot 画面でリブートするためのオプションを選べる. Grub メニューが表示されたら、デフォルトのトップラインを選択する. こうすることで、CUI モードでログインし、コマンドラインでのシステムの操作ができるようになる.

4.Graphical Interface の設定

 つぎに、グラフィカル・ログイン・・・X Window System (xorg)、Ubuntu Desktop の導入をおこなうまえに、Video Display Driver の設定をDDCのバグに起因する DDC を機能させないように修正した xorg.conf を作成する.

 ここで、"Device" セクション( Video Display Device) の記述で Option ラインに "NoDDC" # このオプションを与えること. こうすることで、グラフィカル・ログインが有効になり、ubuntu Deskktop が正常に機能するようになるそうだ.


My DynaBook の /etc/X11/xorg.conf ファイルを以下に記しておく.>>> Michael Minn さんの記事 からのパクリでありますが ・・・ (~_~;)  キーボード、キーマップをそれぞれ” jp106", "jp" に変更.


----------------------------------------------------------------------------

# xorg.conf (X.Org X Window System server configuration file)

# /etc/X11/xorg.conf

# Custom file by Michael Minn , modified by Baian in Aprl/14/2008.

Section "InputDevice"

Identifier "Generic Keyboard"

Driver "kbd"

Option "XkbRules" "xorg"

Option "XkbModel" "jp106"

Option "XkbLayout" "jp"

EndSection

Section "InputDevice"

Identifier "Configured Mouse"

Driver "mouse"

Option "CorePointer"

Option "Device" "/dev/input/mice"

Option "Protoxol" "ImPS/2"

EndSection

Section "Device"

Identifier "Trident Microsystems CyberBlade Ai1"

Driver "trident"

BusID "PCI:1:0:0"

Option "NoDDC" # このオプションを与えること

EndSection

Section "Monitor"

Identifier "ToshLCD"

Option "DPMS"

HorizSync 30-71

VertRefresh 50-100

EndSection

Section "Screen"

Identifier "Default Screen"

Monitor "ToshLCD"

Device "Trident Microsystems CyberBlade/i1"

DefaultDepth 16


SubSection "Display"

Depth 16

Modes "1024x768"

EndSubSection

SubSection "Display"

Depth 24

Modes "1024x768"

EndSubSection

SubSection "Display"

Depth 16

Modes "800x600"

EndSubSection

SubSection "Display"

Depth 24

Modes "800x600"

EndSubSection

EndSection

Section "ServerLayout"

Identifier "Default Layout"

Screen "Default Screen"

InputDevice "Generic Keyboard"

InputDevice "Configured Mouse"

EndSection

---------------------------------------------------------------------------

5. xorg.conf をコピーする : もしも、Linux のコマンドライン操作に不慣れな方はMS-Windowsの notepad のようなテキストエディタを使って xorg.conf ファイルを作られるとよいでしょう。そして、このファイルを USB フラッシュドライブに格納してから、これを ubuntu system にマウントして xorg.conf ファイルをコピーして、ubuntu のGUI インストールに備えるとよいでしょう.フロッピーディスク・ドライブが使えるのならば、フォーマットしたフロッピーディスクを利用してもよいでしょう。

以上のコマンドラインでの一連のコピー操作例は次のようになります.


$ sudo mount /dev/sda1 /media

$ sudo cp /media/xorg.conf /etc/X11/xorg.conf


$ sudo umount /media


6.X のインストール: 次に Xorg と Ubuntu Desktop をインストールします. ここでは先の xorg.conf ファイルは上書されません.


$sudo mount /media/cdrom

$ sudo apt-get install xorg ubuntu-desktop


の操作をおこなうと、インストールからシステム設定までに約90分前後の時間がかかります.(My dynabook の場合) 就寝前か早朝の仕事に出かける前などにマシンをキックオフさせるとよいでしょう.

7.システムの再起動:  以上のインストール作業が終われば、システムを再起動して、ubuntu 8.04 LTS (Hardy Heron) Beta がグラフィカル・ログイン~ubuntu Desktop (GNOME 2.22) が立ち上がります.

8.グラフィカル・ログイン後の ubuntu 8.04 LTS Beta の初期設定~カスタマイズ

  Network device (eth0) がすでに設定され、インターネット接続が確立されているものとして、システムのアップデート・アップグレード、および希望するパッケージのインストール作業を進めて、適宜システムのカスタマイズをおこなう.

$ sudo apt-get update

$ sudo apt-get upgrade

$ sudo apt-get dist-upgrade

不必要と思われるサービスを停止する:

デスクトップメニューから System->Administration->Services
を選択して、My DynaBook PC では不要と思われる、あるいはセキュリティ保護のために、システムのスタートアップ時の以下の項目のサービスを停止しておく。


  • Automated Crash Reports Support (apport)

  • Bluetooth device management (bluetooth)

  • CPU frequency manager (powernowd)

  • Hotkeys management (hotkey-setup)

  • Multicast DNS service discover (avahi-daemon): Used by bonjour chat and some Apple system


あとは、好みに応じて適宜調整してゆく.


あらためて、Michael Minn さんに感謝. 

My dynabook Note PC について >>>>> (後日公開予定) つづく