Loading...

2009-08-26

How to install Vine Linux 5,0 release on an USB stick From Vine Linux 5.0 DVD

How to Install Vine Linux 5.0 DVD Image on an USB stick from Windows XP, issued as follows.
USB-stick へのインストール作業をWindows XP上で行なうときの手順のメモ。

Step-01: Find the device drive letter
Windows XP を立ち上げて、USB メモリ・スティックを挿したときに、エクスプローラで表示されるドライブレター(ここでは E: ) を覚えておく。
You have to plug your USB stick while Windows XP is running. In the explorer, a new drive letter will appear, and you can access the file of this USB stick. In this howto's, we will suppose your USB stick letter is E:. Don't forget to change this letter in the commands if required.

Step-02: Format the USB stick as FAT (FAT32)
USBメモリを FAT32 でフォーマットする。NTFS では動作しない。
First, format the device. You can just right-click on the USB-device in the Explorer, and then select "Format...", and choose a FAT (FAT32) filesystem (it won't work with NTFS).
フォーマットが完了したら、Step-03 の手順で Vine Linux 5.0 の全ファイルをUSBメモリのルートにコピーする。

Step-03: Download the ISO image file and Copy files from the DVDrom
ここから ISOファイル をダウンロードして DVD-Rメディアを作成する。
ほかにこのメディアを使用する予定がないのであれば、仮想CD-ROMドライブソフトウェアの DAEMON Tools で ISOファイルをドライブとしてマウントする方法もある(注)。
注:DAEMON Toolsの4.xxにはアドウェアが同梱されている。気になる方は、3.xxを使用することをお勧めする。
Now, you have to copy the most important files from the DVDom. If you don't want to burn the DVDom, you can read the files from the ISO by mounting the disc with a tool such as Daemon-tools.

ここでは、Daemon Tools を起動して、ダウンロードした Vine Linux 5.0/i386 DVD/USB ISO ハイブリッドイメージ: Vine50-i386-DVD.iso を 仮想ドライブにマウントする。
ここで、仮想 DVDドライブレターは H: とした。
Vine Linux 5.0 の全ファイルをUSBメモリのルートにコピーする。次に、USBメモリのルートにコピーされた isiolinux ディレクトリの中の、isolinux.cfg ファイルを syslinux.cfg というファイル名に変更する。
次いで、 isiolinux ディレクトリの名前を syslinux に変更する。

With a Daemon Tools, mount the Vine Linux 5.0 x86 DVD ISO image to the virtual DVD drive (H:).   1. Copy all files of the DVDrom release of Vine Linux 5.0 to the root of the USB device
   2. Rename the file in isolinux which is called isolinux.cfg to syslinux.cfg
   3. Rename the directory called isolinux to syslinux

Step-04: Make the disk bootable
まず、SYSLINUX というブートローダを http://syslinux.zytor.com/ からダウンロードする。SYSLINUX は、フロッピーメディア用として開発されたブートローダだが、USBメモリにもインストール可能だ。今回は、Windows 用の SYSLINUX をダウンロードする。

What is SYSLINUX?
SYSLINUX is a boot loader for the Linux operating system which operates off an MS-DOS/Windows FAT filesystem. It is intended to simplify first-time installation of Linux, and for creation of rescue- and other special-purpose boot disks.

SYSLINUX can be used, when properly set up, to completely eliminate the need for distribution of raw diskette images for boot floppies. A SYSLINUX floppy can be manipulated using standard MS-DOS (or any other OS that can access an MS-DOS filesystem) tools once it has been created.

Windows 用の SYSLINUX は、ZIP 形式の圧縮ファイルとなっている。最新版は、syslinux-3.82.zip だ。ダウンロードしたら、このファイルを展開する。

Please, check you have syslinux version 3.52 or newer (Latest version is 3.82).
The Windows version is provided as a ZIP archive. You just need syslinux.exe from the archive.
  • 2009-06-09 : SYSLINUX 3.82 released. This is a bug fix release. 
最後に、Windows XPのコマンドプロンプトを開いて、SYSLINUX を展開したフォルダ内の win32フォルダ(ここでは syslinux-3.82\win32)を移動し、「-ma」オプションを付加してsyslinux.exe を実行する。書式は以下のとおりだ。
Now, you have to make your stick bootable with syslinux. You will have to run this program from a prompt console (cmd.exe). Don't forget to change this letter in the commands if required.
% syslinux -ma USBメモリのドライブレター

例えば、USBメモリが E:に割り当てられている場合は、以下のようになる。
% syslinux -ma E: (USB-stick drive letter)

Users have reported that the option ma may be necessary with syslinux to get it to work. That's why we provides these options in that handbook. It works only on Windows:
    * -m means write mbr
    * -a means make drive partition active (aka bootable).

Step-05: Reboot your system with still remain plug-in your USB stick.

以上で作業は完了だ。BIOSの設定を変更して、起動用デバイスの設定でUSBメモリの優先順位を上げ、システムを起動する。

 参考: 1CD LinuxをUSBメモリから起動するには

2009-08-25

Vine Linux 5 Released

Vine Linux 5 を公開

2009年8月24日、2年ぶりの新メジャーバージョン Vine Linux 5 の正式リリースを公開しました。
なお、ミラーサイトへの伝搬には時間がかかる見込みですが、特別な理由がない限りは 各ミラーサイトを御利用ください。
また、VinePlus/5 も同時に公開され apt や synaptic 等で入手可能になっています。

Vine Linux 5 の特徴
  • 軽量・高速
  • 収録ソフトウエアの大幅な刷新
  • x86_64 アーキテクチャ対応
  • ルック&フィールの改善
  • ユーザフレンドリなツール群
  • USB/DVD 用インストールイメージの提供
その他、詳しくは リリースノートを参照してください。
Distribution Release: Vine Linux 5.0 released
"Daisuke Suzuki has announced release community distribution for desktops, vine linux version 5 since this is a commercial free applications and fonts are not included on the cd instead of proprietary atox japanese ....."

2009-08-21

OpenSolaris 2009.06 pkg Repository Setting Howto

OpenSolaris pkg リポジトリについて


OpenSolaris 2009.06で使用できる主なリポジトリは以下の通り。新しいリポジトリを追加するには、パッケージマネージャのメニューバーの「設定」━→「リポジトリの管理」を使用するか、
 

コマンド行で pkg set-publisher を使用する。
      $ pfexec pkg set-publisher -O origin_uri publisher
 
* http://pkg.opensolaris.org/release/
新規 OpenSolarisユーザにとっての初期設定リポジトリになる。
このリポジトリには、オペレーティングシステムのリリース時点のパッケージのバージョンが含まれており、リリースされた製品内の重大な欠陥またはセキュリティー修正に対処するために必要な新しいバージョンのパッケージのみが含まれている。
サポート契約の要件: サポート契約は必要なし。
* http://pkg.opensolaris.org/dev 
このリポジトリには、開発中の OpenSolaris パッケージが含まれている。
次期バージョンの OpenSolaris 開発用のステージングリポジトリとなる。 開発サイクルに合わせて頻繁にアップデートされるので、最新の技術を評価することが可能である。 
サポート契約の要件: サポート契約は必要なし。
* http://pkg.opensolaris.org/contrib/
コミュニティの会員がバイナリ形式のソフトウエアを配布可能にするリポジトリである。また、将来 release リポジトリから配布される予定のバイナリの評価版なども置かれている。 
サポート契約の要件: サポート契約は必要なし。
* http://pkg.opensolaris.org/pending/ 
このリポジトリには、pkg.opensolaris.org/contrib リポジトリに公開する前に評価する必要があるパッケージが保持さる。このリポジトリに含まれるパッケージにはさらにテストが必要であり、一般に使用することは勧められない。
サポート契約の要件: サポート契約は必要なし。
* https://pkg.sun.com/opensolaris/extra
sun.com がホストする新しいリポジトリで、ライセンスのため再頒布できないソフトウェアを提供している。たとえば、VirtualBox や Firefox 用 Flash プラグインなどがある。
サポート契約の要件: サポート契約は必要ないが、特定のライセンス条件の受け入れが必要。ユーザーは、更新された証明書を自分のパッケージマネージャーに渡して承認を受けることにより、このリポジトリに無償でアクセスすることができる。
(方法については、次の『OpenSolaris extra リポジトリの利用方法』を参照のこと。 ↓)
* https://pkg.sun.com/opensolaris/support
このリポジトリは、リリースされた製品内の欠陥の検出および対処に基づいて、新しいバージョンのパッケージを使用して定期的に更新される。
*このリポジトリには、サポート契約と、アクセスのための SSL 証明書が必要である。
OpenSolaris extra リポジトリの利用方法
ユーザーは、更新された証明書を自分のパッケージマネージャーに渡して承認を受けることにより、このリポジトリに無償でアクセスできる。
手順
   1. キーと証明書をダウンロードするために http://pkg.sun.com/register/  にアクセスし、ログイン画面からログインする。 Sun のオンラインアカウントを取得済みの方は、ID とパスワードを入力する。 (ダウンロードセンター等と同じアカウントである。) もし、アカウントを持っていない場合は、こちらより登録(無料)されたい。

   2.OpenSolaris extra をチェックし、"Sunmit" ボタンをクリックする。
 
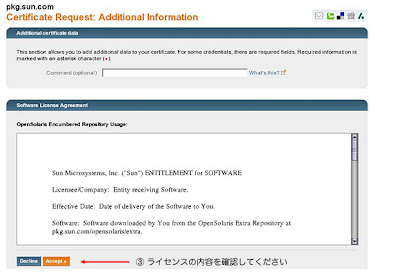
   3.ライセンス内容が表示されるので、内容を確認して "Decline" か "Accept" をクリックする。 ("Decline" した場合は、ここで終了。)
   4.証明書(OpenSolaris_extras.key.pem)とキー(OpenSolaris_extras.certificate.pem)をダウンロードし、指示に従い証明書をインストールする。
キーと証明書をダウンロードしたらターミナルを開いて下記のコマンドを実行する。
(キーと証明書は、$HOME/Desktopにダウンロードされているものとする。)


  $ pfexec mkdir -m 0755 -p /var/pkg/ssl
  $ pfexec chmod 755 /var/pkg/ssl
  $ pfexec cp -i ~/Desktop/OpenSolaris_extras.key.pem /var/pkg/ssl
  $ pfexec cp -i ~/Desktop/OpenSolaris_extras.certificate.pem /var/pkg/ssl


パッケージマネージャのリポジトリに extra を追加する。

  $ pfexec pkg set-publisher \
       -k /var/pkg/ssl/OpenSolaris_extras.key.pem \
       -c /var/pkg/ssl/OpenSolaris_extras.certificate.pem \
       -O https://pkg.sun.com/opensolaris/extra/ extra


pkg コマンドを使って extra の一覧を表示する。

  $ pkg list -a 'pkg://extra/*'
  NAME (PUBLISHER)                              VERSION         STATE      UFIX
  SUNWadmj (extra)                              0.5.11-0.111    known      ----
  SUNWjsnmp (extra)                             0.5.11-0.111    known      ----
  SUNWwbapi (extra)                             0.5.11-0.111    known      ----
  SUNWwbcou (extra)                             0.5.11-0.111    known      ----
  SUNWwbdev (extra)                             0.5.11-0.111    known      ----
  develop/java/javafx-sdk (extra)               1.2.0.233-0.111
known  ----
  service/compute/sungridengine (extra)         6.2.2-0.111     known      ----
  service/compute/sungridengine/arco (extra)    6.2.2-0.111     known      ----
  service/compute/sungridengine/domainmanager (extra) 6.2.2-0.111     known      ----
  system/font/truetype/ttf-fonts-core (extra)   1.0-0.111      
known  ----
  system/iiim/ja/atok (extra)                   17-0.111       
known  ----
  system/iiim/ja/wnn8 (extra)                   8-0.111         known      ----
  virtualbox (extra)                            3.0.4-0.101     known      ----
  virtualbox/kernel (extra)                     3.0.4-0.101     known      ----
  web/firefox/plugin/flash (extra)              10.0.22.87-0.111
known  ----


これで、パッケージマネージャからextraリポジトリを指定しパッケージをインストールすることができる。

On My OpenSolaris 2009.06, Repository Settings as follows:
$ pfexec pkg publisher
発行元                             タイプ 状態   URI
opensolaris.org          (優先)     起点   online   http://pkg.opensolaris.org/release/
extra                                 起点   online   https://pkg.sun.com/opensolaris/extra/
osol.contrib                          起点   online   http://pkg.opensolaris.org/contrib/

Reference:
   User Reference Manual : pkg(1)
   OpenSolaris 2009.06 miniBook (Japanese)
   OpenSolaris 2009.06 Image Packaging System ガイド - 第7章 リポジトリのキーと証明書の使用

2009-08-20

Installation of Ulimate Edition 2.2 x86 (32bit) on My Notebook computer

Ubuntuに派手なデスクトップやテーマを追加した「Ultimate Edition」

"今回は、前回のLinux Mintに引き続いて、Ubuntuの派生ディストリビューションとして豊富な追加アプリケーションと刺激的なデザイン性により注目を集める「UltimateEdition」(http://ultimateedition.info/)を紹介しよう。・・・"
という記事を読み、試しに My Notebook にインストールしてみる。すでにインストール済みの Ubuntu 9.04 Desktop を置き換えることになる。

Environment: Triple boot system: OpenSolaris 2009.06 + Ubuntu 9.04 Desktop + Windows XP Professional SP3 
Platform: Dell Latitude D410; Intel Pentium M730 1.6GHz, Intel 915GM Express 128MB,
2048MB SODIMM 533MHz, Hard drive; 45GB-linux/160GB UATA 5400rpm
 
Fig-01: Screenshot /Ultimate Edition 2.2 Desktop
on Dell Latitude D410 LCD 1024x768(24bit)
About Ultimate Edition 2.2
同じ Ubuntu の派生ディストリビューションである Linux Mint がエレガントで落ち着いたデザインを採用しているのに対し、Ultimate Edition の方はその対極にあるといえる、超ド派手なデザインが印象的だ。
2009年6月20日にリリースされた Ultimate Edition 2.2 は Ubuntu 9.04 Jaunty Jackalope をベースにビルドされ、Gnome Desktop を採用している。
This release was built from Ubuntu Jaunty Jackalope with all the goodies
pre-added you have come to love in prior Ultimate Edition releases & all upgrades pre-installed for your convenience.  This release has 2 kernels 2.6.28-13 & 2.6.28-11 selectable at boot time increasing your chances of success.
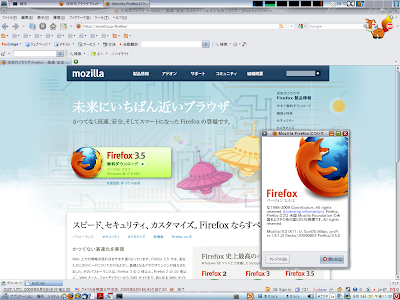
 Fig-02: Ultimate Edition Home http://ultimateedition.info/
Browser: Firefox 3.5.2 x86 ja

参考; 最新リリース: Ultimate Edition 2.3
2009年7月23日にリリースされた Ultimate Edition 2.3 では、Gnome と KDE の両方の Desktop 環境を得られるし、いくつかの新機能が盛り込まれている。
Ultimate Edition 2.3 was built off Ultimate Edition 2.2 (Ubuntu Jaunty Jackalope based) all upgrades pre-installed as of current. This release was built to satisfy the users of KDE. With this distro you get the best of both worlds Gnome & KDE and the following additional environments user selectable at login window / software (specifically):
KDE Desktop environment (both),
XFCE Desktop environment (x64),XBMC Media center (x64),
Lanshark – Filesharing application for local area networks (x86),
Clamtk – GUI based Virus scanner (x86),
A new theme (both)

1. Download
Ultimate Edition 2.2 の x86 ISO Image を University of Maryland からダウンロードする。
$HOME/[your downloaded file stored directory] に移動して、
  % wget http://home.paulschou.com/pub/ultimate/ultimate-edition-2.2-x86.iso

  Release Name: Ultimate Edition 2.2
  Architecture: x86 (32bit)
  Code base: Jaunty
  File size: 2.0 GB (2,132,037,632 bytes)
  MD5SUM: ea8e75283ab13fcfc90ded4961acc586
  Screencast: Youtube
  Download: Main, University of Maryland, Unixheads, Linux Freedom, Torrent

checksum;
% md5sum ultimate-edition-2.2-x86.iso
ea8e75283ab13fcfc90ded4961acc586 ultimate-edition-2.2-x86.iso ; okey!

2. Burn the iso image file to DVD-R/RW Disc with DVD authoring tools
Brasero, や Nero などの DVD 編集ソフトを利用して Windoz Box 上で DVD-R/RW を作成する。
3.Start-up with Live DVD, Ultimate Edition 2.2 (x86)
4.Install a Ultimate Edition 2.2 (x86) to the selected partition on my Hard drive.
Live CD の Desktop 上の Install icon をクリックすると 表示されるインストール設定画面の問いかけに従って作業を進める。 言語を日本語に、Timezone を日本(Tokyo)に・・・Ubuntu 9.04 Jaunty Desktop と同様である。
# Partitioning: 
$ sudo fdisk -l
ディスク /dev/sda: 160.0 GB, 160041885696 バイト
ヘッド 255, セクタ 63, シリンダ 19457
Units = シリンダ数 of 16065 * 512 = 8225280 バイト
Disk identifier: 0xde27ca4f
デバイス ブート 始点 終点 ブロック Id システム
/dev/sda1 1 5222 41945683+ 7 HPFS/NTFS
/dev/sda2 5223 7833 20972857+ 7 HPFS/NTFS
/dev/sda3 * 7834 13054 41937682+ bf Solaris
/dev/sda4 13056 19457 51424065 5 拡張領域
/dev/sda5 13056 13071 128488+ 83 Linux
/dev/sda6 13072 16183 24997108+ 83 Linux
/dev/sda7 16184 16370 1502046 82 Linux スワップ / Solaris
/dev/sda8 16371 19457 24796296 83 Linux

# システムの起動は OpenSolaris の Grub を利用して Boot Menu の選択肢から適宜選んでおこなう。したがって、ここでは /dev/sda の先頭 MBR にはインストールせず、/dev/sda5 (hd0,4) の先頭にイントールしておく設定とする。
/dev/sda5 は /boot, /dev/sda6 は /, /dev/sda7 は swap としてパーティション・初期化する。
/dev/sda8は /home として、既存データを利用するため、初期化しない。
ただし、Gnome Desktop はデフォルト設定に戻しておくので ・・・事前に $HOME/hoge-user 以下の Gnome, nautilus 関連設定ファイルを削除しておく。

5. Reboot your system.
6. Boot up the OpenSolaris 2009.06
7. Edit the Grub boot menu ;"/boot/grub/menu.lst" on the OpenSolaris 2009.06.

on my environment:
# cat /boot/grub/menu.lst on Ultimate Edition 2.2

copy the following scripts lines to /boot/grub/menu.lst on the OpenSolaris 2009.06
*********************************************************************
title Ubuntu 9.04, kernel 2.6.28-15-generic
# uuid f5bf293a-5b37-464a-b6c0-cdc43b2f02da
root (hd0,4)
kernel /vmlinuz-2.6.28-15-generic root=UUID=008fad63-a243-435a-b71d-8f1c5e078898 ro quiet splash
initrd /initrd.img-2.6.28-15-generic
quiet

title Ubuntu 9.04, kernel 2.6.28-15-generic (recovery mode)
# uuid f5bf293a-5b37-464a-b6c0-cdc43b2f02da
root (hd0,4)
kernel /vmlinuz-2.6.28-15-generic root=UUID=008fad63-a243-435a-b71d-8f1c5e078898 ro single
initrd /initrd.img-2.6.28-15-generic

title Ubuntu 9.04, memtest86+
uuid f5bf293a-5b37-464a-b6c0-cdc43b2f02da
kernel /memtest86+.bin
quiet
*************************************************************************

$ vi /boot/grub/menu.lst
copy the above"Ultimate Edition" boot menu lines to the OpenSolaris one as follows.

# This configured grub menu is available for the triple boot system.
$ cat /boot/grub/menu.lst ( ln -s /rpool/boot/grub/menu.lst /boot/grub/menu.lst)

# ****************************************************
# /boot/grub/menu.lst on OpenSolaris 2009.06 release.
# Last modefied by Baian, Aug/18/2009 18:20 JST
#****************************************************
#
splashimage /boot/grub/splash.xpm.gz
background 215ECA
timeout 15
default 0
#---------- ADDED BY BOOTADM - DO NOT EDIT ----------
# 00 title opensolaris-5 verbose mode
title opensolaris 2009.06 based on snv_111b (verbose mode)
findroot (pool_rpool,2,a)
bootfs rpool/ROOT/opensolaris-5
kernel$ /platform/i86pc/kernel/$ISADIR/unix -B $ZFS-BOOTFS -v
module$ /platform/i86pc/$ISADIR/boot_archive
# 01 title opensolaris-5 graphics splashy mode
title opensolaris 2009.06 based on snv_111b (splashy mode)
findroot (pool_rpool,2,a)
bootfs rpool/ROOT/opensolaris-5
splashimage /boot/solaris.xpm
foreground d25f00
background 115d93
kernel$ /platform/i86pc/kernel/$ISADIR/unix -B $ZFS-BOOTFS,console=graphics
module$ /platform/i86pc/$ISADIR/boot_archive
#============ End of LIBBE entry =============
#02 title opensolaris-6
title opensolaris 2010.02 preview 2nd-release based on snv_118 (verbose mode)
findroot (pool_rpool,2,a)
bootfs rpool/ROOT/opensolaris-6
kernel$ /platform/i86pc/kernel/$ISADIR/unix -B $ZFS-BOOTFS -v
module$ /platform/i86pc/$ISADIR/boot_archive
#---------- ADDED BY BOOTADM - DO NOT EDIT ----------
# 03 title xVM-Xen
title Solaris xVM
findroot (pool_rpool,2,a)
kernel$ /boot/$ISADIR/xen.gz
module$ /platform/i86xpv/kernel/$ISADIR/unix /platform/i86xpv/kernel/$ISADIR/unix -B $ZFS-BOOTFS
module$ /platform/i86pc/$ISADIR/boot_archive
#============ End of LIBBE entry =============
#---------------------END BOOTADM--------------------
#
# Unknown partition of type 5 found on /dev/rdsk/c9d0p0 partition: 4
# It maps to the GRUB device: (hd1,3) .
#
# 04
title Ubuntu 9.04, kernel 2.6.28-15-generic (Ultimate-Edition)
# uuid f5bf293a-5b37-464a-b6c0-cdc43b2f02da
root (hd0,4)
kernel /vmlinuz-2.6.28-15-generic root=UUID=008fad63-a243-435a-b71d-8f1c5e078898 NETWORKING_IPV6=no ro video=vesa:ywrap,mtrr vga=0x317
initrd /initrd.img-2.6.28-15-generic
# 05
title Ubuntu 9.04, kernel 2.6.28-15-generic (recovery mode)
# uuid f5bf293a-5b37-464a-b6c0-cdc43b2f02da
root (hd0,4)
kernel /vmlinuz-2.6.28-15-generic root=UUID=008fad63-a243-435a-b71d-8f1c5e078898 NETWORKING_IPV6=no ro single video=vesa:ywrap,mtrr vga=0x317
initrd /initrd.img-2.6.28-15-generic
# 06
title Ubuntu 9.04, memtest86+
#uuid f5bf293a-5b37-464a-b6c0-cdc43b2f02da
root (hd0,4)
kernel /memtest86+.bin
quiet
#---------------------END BOOTADM--------------------
# 07
title Windows XP professional +SP3
root (hd0,0)
chainloader +1
************************************************************
kernel line : NETWORKING_IPV6=no は IPV6 を Disable にするための、
video=vesa:ywrap,mtrr vga=0x317 は vesa frame buffer を有効にして、
system boot 時の verbos mode の画面サイズを規定する。
ここでは、vga=0x317=1024x768 とした。


baian@saturn:~$ pfexec bootadm list-menu
the location for the active GRUB menu is: /rpool/boot/grub/menu.lst
default 0
timeout 15
0 opensolaris 2009.06 based on snv_111b (verbose mode)
1 opensolaris 2009.06 based on snv_111b (splashy mode)
2 opensolaris 2010.02 preview 2nd-release based on snv_118 (verbose mode)
3 Solaris xVM
4 Ubuntu 9.04, kernel 2.6.28-15-generic (Ultimate-Edition)
5 Ubuntu 9.04, kernel 2.6.28-15-generic (recovery mode)
6 Ubuntu 9.04, memtest86+
7 Windows XP professional +SP3

Screenshots:


How to Download Files From The Web Using Wget [Linux CLI Tips]

     This issue has been quoted from the weblog, [Linux CLI Tips] Web Upd8 "How to Download Files From The Web Using Wget " :

In this post: a little about the WGET command:

Reference: man WGET(1)
NAME
Wget - The non-interactive network downloader.
SYNOPSIS
wget [option]... [URL]...
DESCRIPTION GNU Wget is a free utility for non-interactive download of files from the Web.
It supports HTTP, HTTPS, and FTP protocols, as well as retrieval through HTTP proxies.
Wget is non-interactive, meaning that it can work in the background, while the user is not logged on.
This allows you to start a retrieval and disconnect from the system, letting Wget finish the work.
By contrast, most of the Web browsers require constant user's presence, which can be a great hindrance when transferring a lot of data.
Wget can follow links in HTML and XHTML pages and create local versions of remote web sites, fully recreating th directory structure of the original site.
This is sometimes referred to as ``recursive downloading.'' While doing that, Wget respects the Robot Exclusion Standard (/robots.txt).Wget can be instructed to convert the links in downloaded HTML files to the local files for offline viewing.
Wget has been designed for robustness over slow or unstable network connections; if a download fails due to a network problem, it will keep retrying until the whole file has been retrieved. If the server supports regetting, it will instruct the server to continue the download from where it left off.

Download a zip archive:

wget http://website.com/archive.zip
and archive.zip will be downloaded. But we can download files using a lot of parameters. Read on!
wget -r http://website.com
This download all files recursively: images, html files, etc. But this could get us banned by the server for sending too many download requests so to avoid this:
wget --random-wait --limit-rate=20k -r http://website.com
--random-wait means to download a file and then wait for a random period of time, then download the next file and so on.
--limit-rate=20k indicates that you want to download at a maximum speed of 20k so you don't get banned.
Or you could also do:
wget --wait=20 --limit-rate=20K -r -p -U Mozilla http://website.com
--wait=20 to wait 20 seconds between each file download, but I think it's better to download with --random-wait
-p indicates that the files should be displayed as HTML, as if you were actually looking at the page
-U Mozilla will make the website believe you are using a Mozilla browser.
And here is how to download all images, videos or whatever you want, from a website: 
     wget -r -A=.jpg,.png http://website.com 

       With this command, you download all jpg and png files from website.com.
       If you want to download all mp3s, then you would use -A=.mp3 
       You can also use a GUI for wget if you want. It's called Gwget and should
       be in your distribution repositories. For Ubuntu, do:
 sudo apt-get install gwget

Credits: paraisolinux


© webupd8.blogspot.com 2009. | What's New on the World Wide Web
"

2009-08-19

モジラ、「Firefox 3」でアップグレードを促すダイアログ表示を開始

モジラ、「Firefox 3」でアップグレードを促すダイアログ表示を開始:

原文:Stephen Shankland(CNET News)/翻訳校正:CNET Japan 編集部
2009/08/18 11:56
"モジラは、同団体のオープンソースウェブブラウザに対する大幅なアップデートをリリースしてから1カ月半が経過した今、「Firefox 3」ユーザーに対して「Firefox 3.5」をインストールするよう奨励し始めた。"
 ブログ投稿によると、「Firefox 3.0.13」のユーザーに対して、バージョン3.5の最新バージョンである「Firefox 3.5.2」をダウンロードするよう勧めるダイアログが表示されるようになるという。バージョン3.5.2は「Windows」と「Mac」「Linux」に対応している。
 ユーザーは、誘導に従ってアップデートを導入してもいいし、このリマインダを後回しにしてもいい。リマインダを完全に表示しなくすることも可能だ。しかし、これによって、リマインダが今後2度と表示されなくなるわけではないようだ。Firefox 3.0.xに安定性およびセキュリティに関するパッチが提供されるのは、2010年1月までとなっている。従って、アップデートを促す取り組みは、今後も続く可能性が高い。
 Mozillaは、バージョン3.5ではパフォーマンスが改善されているほか、ウェブアプリケーションを実行する土台としてのFirefoxを向上させるさまざまな機能も追加されていると述べている。しかし、ユーザーにアップグレードを実行させるのは、ときとして厄介な問題になる。アップグレードに伴う普遍的な煩わしさを別にすると、Firefoxのアップグレードを妨げる最大の要因の1つは、新バージョンの導入によってFirefoxの拡張機能が使えなくなるという事態がたびたび起きることだ。
 ただし、Mozillaによれば、現在では90%以上のFirefoxアドオンがFirefox 3.5をサポートしているという。その一方で、Mozillaのプログラマーは、「Namoroka」というコードネームの「Firefox 3.6」に取り組んでいる。
 ブラウザのアップグレードは、慎重を要する問題だ。Microsoftは、8年前の製品である「Internet Explorer 6」のユーザーに何とか最新版にアップグレードしてもらおうと努力している。これとは対照的に、より新しいGoogleの「Chrome」ブラウザは、ユーザーが何もしなくても自動的に最新バージョンにアップデートされる。ただし、IT管理者はこうした挙動を抑制することが可能だ。
Mozilla Firefox が OpenSolaris 版でも自動更新できるようだ。
from Masaki Katakai's Weblog by katakai
"Mozilla Firefox 3.5.2 のリリースアナウンスですが、
[desktop-discuss] Firefox 3.5.2/3.0.13 contrib. builds are available for OpenSolaris and Solaris 10
下の方にこんな文章が。
Help Wanted
========
As mentioned earlier, some work has been done to enable the automatic
update for the contributed builds. For Firefox 3.5.1 users on
OpenSolaris x86, simply go to "Help"->"Check for Updates..." could
upgrade your Firefox to 3.5.2. Any problem, please let us know.

-Desktop Beijing Team あ〜とうとう OpenSolaris 版でも自動更新が動くのですね? ということで tar 版ですが、3.5.1 を引っ張り出してきて「ヘルプ」>「ソフトウェアの更新を確認」をやってみました。"

2009-08-18

SQLite Optimizer - Firefox Extension

引用:sqlite 最適化 - Firefox拡張機能 : (SQLite OPtimizer - Firefox Extension)
        author : miyafx (C_sar)


sqlite 最適化 - Firefox拡張機能
Firefox 3.0.0 - 3.5 用
Ver. 0.5.1 ( 2009/07/17 )
Firefoxプロファイルフォルダ直下にある *.sqlite データベースの最適化を行います。

※ Firefox 3.5 からは places と cookie の db が常時ブラウザに掴まれているようなので、この拡張では最適化できません。
これらの db を最適化したい場合は他サイトで紹介されている sqlite3.exe 等を使った方法をご利用ください。
最適化のタイミング:
自動または手動
自動の場合は Firefox を10回終了するたびに1度最適化を実行します( about:config で変更可 )。
sqlite_opt.auto_reindex_per_browser_close (デフォルト 10)
最適化の方法:
# Ver. 0.1
各 sqlite データベースに対して REINDEX を実行します( about:config で VACUUM に変更可 )。
sqlite_opt.use_vacuum_instead_reindex ( デフォルト false )
# Ver. 0.2
Reindex のみ(デフォルト)。
Vacuum 後 Reindex 。
選べるようにしました。
これにともない sqlite_opt.use_vacuum_instead_reindex は廃止。
sqlite_opt.vacuum_before_reindex ( デフォルト false )
を新設。
# Ver.0.5
Firefox 3.5 に対応しました。
エラー処理が甘々だったのを改善。
# Ver.0.5.1
突然 FF 3.5.1 がリリースされたので、install.rdf のみ修正して、再度アップしました。_________________________________________________________

SQLite Optimizer で Firefox の起動が爆速になるclouder
ここに紹介されている SQLite Optimizer という Extension を Firefox に入れて、REINDEX をするとFirefox の起動が爆速になるというもの。

Firefox 3 では、履歴やブックマーク、クッキーなどの他、一部アドオンの利用データも SQLite データベースで管理している。
日々の利用により、このデータベースが大きくなってくると、Firefox の起動に時間がかかったり、動作が緩慢になってくるということなどが考えらる。
このようなとき、データベースの最適化をすることによって、Firefox の動作を軽くするというもの
Firefox プロファイルフォルダから該当データベースを探して [Reindex] を行なう。

Firefox 3.5.2 で SQLite で管理されている情報

ブックマーク・履歴以外にも様々なデータが、SQLite データベースによって管理されている。これらのデータベースは、places.sqlite と同様にプロファイルフォルダ以下に *.sqlite という拡張子のファイルとして保存されている。

 content-prefs.sqlite - サイト毎の文字の拡大・縮小の設定を格納
 cookies.sqlite - クッキーを格納
 downloads.sqlite - ダウンロード履歴
 feedbar.sqlite
 formhistory.sqlite - フォームに入力したデータを、入力フォームの名前とセットで記録
 permissions.sqlite - 画像の読み込み許可やポップアップの制御、クッキーの例外サイトなどの設定を格納
 places.sqlite
 scribefire.sqlite
 search.sqlite - 検索エンジンの登録状況。登録されたエンジンはsearchpluginsフォルダに格納される
 signons.sqlite
 ubiquity_ann.sqlite
 ubiquity_skin_memory.sqlite
 ubiquity_suggestion_memory.sqlite
 urlclassifier3.sqlite
 webappsstore.sqlite- ウェブサイトによって設定されるセッションストレージ

これらの情報は Firefox 3 から SQLiteベースで扱われるように変更されたことで、全て共通の方法でアクセスできるようになった。

効果のほどはさておいて、早速インストールしてみた。

 
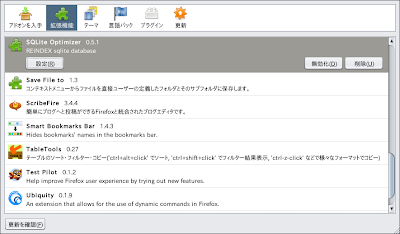
Fig-01: SQLite Optimizer - Firefox 3,5,2 Extension 
 
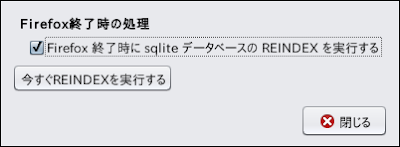
Fig-02: SQLite Optimizer 環境設定 

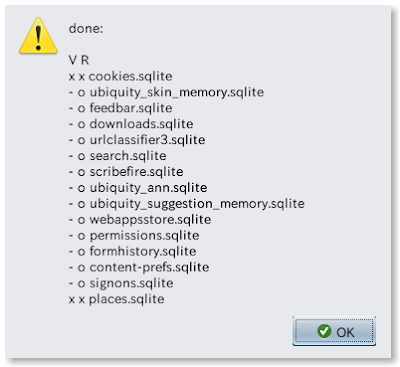
『今すぐREINDEXを実行する』を実行してみる。
作者のコメントにあるように、places と cookie の db が常時ブラウザに掴まれているようなので、この拡張では最適化できないようだ。SQLite Manager 拡張を利用した方がよいのかな?
 
 
Fig-03: SQLite Optimizer REINDEX done

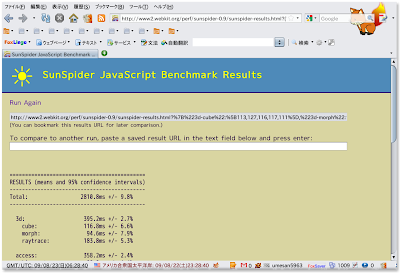
SunSpider JavaScript Benchmark Test を実行してみる。


SunSpider 0.9: 特定のプラットフォームには依存せず、WebブラウザなどJavaScriptの処理系があれば実行可能。
SunSpiderのテスト内容は、3Dレイトレーシングや暗号処理、文字列処理や各種演算処理など9カテゴリ / 26項目におよぶ。テスト対象にDOMやブラウザのAPIは含まれず、3Dオブジェクトの描画など環境に依存する要素は省略されているほか、各項目とも複数回実行されエラー範囲を測定するため、JavaScript処理系の性能を正確に測定することができる。

Start Now!
 
Fig-04: SunSpider JavaScript Benchmark Results

# SunSpider JavaScript Benchmark Results
Test env: Firefisox 3.5.2 on OpenSolaris 2009.06
============================================
RESULTS (means and 95% confidence intervals)
--------------------------------------------
Total: 2810.8ms +/- 9.8%
--------------------------------------------
3d:                   395.2ms +/- 2.7%
    cube:               116.8ms +/- 6.6%
    morph:               94.6ms +/- 7.9%
    raytrace:           183.8ms +/- 5.3%
  access:               358.2ms +/- 2.4%
    binary-trees:        98.8ms +/- 4.4%
    fannkuch:           158.8ms +/- 1.5%
    nbody:               72.8ms +/- 4.1%
    nsieve:              27.8ms +/- 19.8%
  bitops:                93.8ms +/- 9.2%
    3bit-bits-in-byte:    3.0ms +/- 0.0%
    bits-in-byte:        18.0ms +/- 0.0%
    bitwise-and:          3.4ms +/- 20.0%
    nsieve-bits:         69.4ms +/- 11.8%
  controlflow:           92.6ms +/- 2.8%
    recursive:           92.6ms +/- 2.8%
  crypto:               155.2ms +/- 3.9%
    aes:                 88.2ms +/- 5.0%
    md5:                 42.4ms +/- 7.9%
    sha1:                24.6ms +/- 11.6%
  date:                 355.0ms +/- 18.2%
    format-tofte:       183.6ms +/- 5.0%
    format-xparb:       171.4ms +/- 34.3%
  math:                 133.6ms +/- 2.7%
    cordic:              69.8ms +/- 5.5%
    partial-sums:        47.8ms +/- 4.3%
    spectral-norm:       16.0ms +/- 14.5%
  regexp:               255.8ms +/- 63.4%
    dna:                255.8ms +/- 63.4%
  string:               971.4ms +/- 4.5%
    base64:              51.2ms +/- 51.5%
    fasta:              192.2ms +/- 3.9%
    tagcloud:           285.4ms +/- 3.7%
    unpack-code:        316.0ms +/- 3.4%
    validate-input:     126.6ms +/- 19.1%
============================================
このベンチマークテストの結果をどう評価するべきなのか、知見がないので、わからん。
後ほどお勉強してみませう。 
 

Reference:
出典: フリー百科事典『ウィキペディア(Wikipedia)』:SQLite
SQLite Home Page: http://www.sqlite.org/
SQLite is a software library that implements a self-contained, serverless, zero-configuration, transactional SQL database engine. SQLite is the most widely deployed SQL database engine in the world. The source code for SQLite is in the public domain. 
Firefox 3:places.sqliteの最適化について

2009-08-17

Ubuntu 系ディストリビューション

出典:Ubuntu 系ディストリビューション
Ubuntu そのものは Debian GNU/Linux がベースである。公式なものと非公式なものが存在する。
公式
Ubuntu : Debian GNU/Linuxベースで6ヶ月ごとのリリースと商用サポートを掲げる。
Kubuntu : デスクトップ環境としてGNOMEの代わりにKDEを採用している。
Edubuntu : デスクトップ環境としてGNOMEを採用し、教育用にカスタマイズされている。
Xubuntu : デスクトップ環境としてXfceを採用しており、「軽い」。
Gobuntu : フリーソフトウェアのみを利用している。
Ubuntu Studio : 標準的なUbuntuにマルチメディア機能を追加したもの。
非公式
Linux Mint : デザインやソフトウェア環境を改善し、マルチメディア関係のコーデックを充実させた。
Ultimate Edition:豊富な追加アプリケーションと刺激的なデザイン性により注目を集める。
Ecolinux : デスクトップ環境としてXfceを採用した日本発のディストリビューション。
Elbuntu: ウィンドウマネージャとしてEnlightenmentを採用している。
Fluxbuntu : ウィンドウマネージャとしてFluxboxを採用している。
Freespire : "live"モードとしてCDから直接起動したり、ハードディスクにインストールできる。二つのバージョンが利用可能で、その内の一つは、MP3、 Windows Media、Java、Flash、QuickTime、Realなどをサポートしたドライバ、コーデック、アプリケーションが含まれる。  参考:Freespire 2.0 インストール完全ガイド
Goobuntu : Google がGoobuntuというUbuntu派生ディストリビューションを作成しているという有名な噂があった。GoogleはUbuntuの修正版を作っていることは認めたが、それを社外に公開する予定はないことも明言している。[1][2]
gOS : 2007年11月1日に登場した。アメリカのWal-Martで発売される低価格PCEverex Green gPC TC2502用のOSとして開発された。特徴はGoogleのオンライン・アプリへのアクセスを優先した設計である。デスクトップのデザインはMac OS Xを模されている。
nUbuntu: セキュリティツールを多数含んでいる。
Ubuntu Christian Edition : 標準的なUbuntuに聖書全文とURLフィルタリングを搭載したクリスチャン向け。
U-lite Linux : レガシーデバイスを備えた古いコンピュータ用。
Virtual Appliances: 仮想環境で事前にビルドされたUbuntuベースのアプリケーション集である。
Zubuntu : zaurus用のubuntuをZubuntuと名づけた。
巫女 GNYO/Linux : 3.6以降。openMosixSCoreを利用したPCクラスタが構築可能。CDブート/HDDインストール共可能。日本のクローズドな団体であるProject 巫女ぐにょによって開発されている。Gnyoは"Gnyo is Not Yet Other"の頭字語である。


参考:人気のUbuntuから派生した多種多様なLinuxディストリビューション

2009-08-15

Firefox 3.5.2 security update release for OpenSolaris

Mozillaは米国時間8月3日、重大な脆弱性2件に対処するため、Firefoxの2つの新バージョン「Firefox 3.5.2」と「Firefox 3.0.13」を公開した。
Mozillaはセキュリティ問題に関するブログ投稿の中で、「すべてのFirefoxユーザーに対し、この最新版へのアップグレードを強く推奨する」と記している。
この脆弱性の一つは、攻撃者が、特別に細工した証明書と呼ばれる認証情報を送信することにより、ユーザーのコンピュータ上で任意のコードを実行できるというものであった。
先週明らかになった2件目の脆弱性は、証明書を使った認証技術における不具合で、攻撃者が暗号化通信を傍受したり、Firefoxの更新を発行したりすることを可能とするものである。

The following issue was quoted from "Security Advisories for Firefox 3.5"

Impact key:
  • Critical: Vulnerability can be used to run attacker code and install software, requiring no user interaction beyond normal browsing.
  • High: Vulnerability can be used to gather sensitive data from sites in other windows or inject data or code into those sites, requiring no more than normal browsing actions.
  • Moderate: Vulnerabilities that would otherwise be High or Critical except they only work in uncommon non-default configurations or require the user to perform complicated and/or unlikely steps.
  • Low: Minor security vulnerabilities such as Denial of Service attacks, minor data leaks, or spoofs. (Undetectable spoofs of SSL indicia would have "High" impact because those are generally used to steal sensitive data intended for other sites.)
Fixed in Firefox 3.5.2
MFSA 2009-46 Chrome privilege escalation due to incorrectly cached wrapper
MFSA 2009-45 Crashes with evidence of memory corruption (rv:1.9.1.2/1.9.0.13)
MFSA 2009-44 Location bar and SSL indicator spoofing via window.open() on invalid URL
MFSA 2009-38 Data corruption with SOCKS5 reply containing DNS name longer than 15 characters

Reference:

Firefox 3.5.2 と Firefox 3.0.13 がリリースされた: "MozillaZine.jpより引用”
Mozilla は米国時間 2009 年 8 月 3 日、安定性及びセキュリティ問題を修正した Firefox 3.5.2 と Firefox 3.0.13 をリリースした。
 
Firefox 3.5.2
Firefox 3.5.1 のリリースから僅か 18 日でアップデートとなったわけだが、Firefox 3.5.1 が緊急リリース的な公開であったため、Mozilla のアップデートスケジュールでは Firefox 3.5 のリリース (米国太平洋夏時間 6 月 30 日) から見た場合は予定の日程となるのであろう。

このアップデートでのセキュリティ修正は、重要度区分において 2 件の最高、1 件の、1 件のの合計 4 件が修正されている。

  • MFSA 2009-46 誤ってキャッシュされたラッパーによるクローム特権昇格
  • MFSA 2009-45 メモリ破壊の形跡があるクラッシュ (rv:1.9.1.2/1.9.0.13)
  • MFSA 2009-44 不正な URL での window.open() を通じたロケーションバーと SSL 表示の偽装
  • MFSA 2009-38 15 文字以上の DNS 名を含む SOCKS5 応答によるデータ破損 
      追記 2009-08-05:セキュリティ修正一件 (MFSA 2009-44) が追加された。

修正された問題は 66 件となっており、これらは Bugzilla (英語)より確認できる。この中には先日の MozillaZine.jp ニュースURL バーのなりすまし脆弱性でもお伝えした、URL バーでの偽装問題 Bug 451898 – URL spoofing bug involving Firefox’s error pages and document.write に対する修正や、Firefox 3.5.1 の修正に含まれていた Windows システム上で Firefox の起動に時間がかかる問題:Bug 501605 – very slow startup for Firefox 3.5 due to accessing IE Internet Temporary Files and Windows Temp folder に新しいパッチが投入され、追加修正されている。その他では高性能ディスプレーを使用する Windows 7 環境で報告された、ICC プロファイルを含む画像が「暗く」レンダリングされてしまう問題 (Bug 497363 – qcms renders wrong colors on some “good” monitors) への修正も含まれている。

Firefox 3.5.2 での改善や既知の問題などの一般的な情報は Firefox 3.5.2 リリースノート を、修正されたセキュリティ問題の詳細は Firefox 3.5 セキュリティアドバイザリ より、修正されたバグは Bugzilla@Mozilla – Bug List (英語) から確認することができる。

Firefox 3.5.2 は Windows, Mac そして Linux 版が用意され、Mozilla ウェブサイトよりダウンロードできるほか、既存の Firefox 3.5 ユーザには自動アップデート経由で通知されるが、ヘルプメニューの “ソフトウェアの更新を確認” より手動で確認することも可能だ。
ダウンロード :
Mozilla Japan
リリースノート :
Firefox 3.5.2 リリースノート
Mozilla Foundation セキュリティアドバイザリ :
Firefox 3.5 セキュリティアドバイザリ
修正されたバグ :
Bug List (英語)
Firefox 3.0.13
Firefox 3.0.x の安定性及びセキュリティ向上の継続的プロセスの一環である Firefox 3.0.13 もリリースされている。

このアップデートでは、セキュリティ関連では重要度区分において 2 件の最高と 1 件のの合計 3 件について修正が行われており、これらは Firefox 3.5.2 で修正された内容と同じである。
  • MFSA 2009-43 証明書の正規表現パースにおけるヒープオーバーフロー
  • MFSA 2009-42 SSL で保護された通信の情報漏えい
  • MFSA 2009-44 不正な URL での window.open() を通じたロケーションバーと SSL 表示の偽装 
         追記 2009-08-05:セキュリティ修正一件 (MFSA 2009-44) が追加された。

また修正された問題は 4 件で、この中にはURL バーでの偽装問題 Bug 451898 – URL spoofing bug involving Firefox’s error pages and document.write に対する修正も含まれている。


Firefox 3.0.13 での改善や既知の問題などの一般的な情報については Firefox 3 リリースノートFirefox 3.0 セキュリティアドバイザリ より、修正されたバグは Bugzilla@Mozilla Bug List (英語) から確認することができる。 を、修正されたセキュリティ問題の詳細は


Firefox 3.0.13 は Windows, Mac そして Linux 版が用意され、Mozilla ウェブサイトよりダウンロードできるほか、既存の Firefox 3.0.x ユーザには自動アップデート経由で通知されるが、ヘルプメニューの “ソフトウェアの更新を確認” より手動で確認することも可能だ。
なお、Firefox 3.0.x のセキュリティ更新は 2010 年 1 月までの提供と発表されている。Mozilla では Firefox の最新バージョンである Firefox 3.5.2 へのアップデートを勧めている。
ダウンロード :
Firefox 旧バージョンのダウンロード
リリースノート :
Firefox 3 リリースノート
Mozilla Foundation セキュリティアドバイザリ :
Firefox 3.0 セキュリティアドバイザリ
修正されたバグ :
Bug List (英語)
               
 
Firefox 3.5.2 added JLP-xpi with OpenSolaris 2009.06 snv_111b

2009-08-14

OpenSolaris Tips: Howto manage Static IP Wired Network on OpenSolaris 2009.06

OpenSolaris 2009.06上での 固定IP(有線LAN)/Network の設定メモ

動作環境: OpenSolaris 2009.06 Release
$ uname -a
SunOS satellite 5.11 snv_111b i86pc i386 i86pc

Platform: Toshiba dynabook Satellite J50 173L/5X,
CPU: Pentium M740 (1.73GHz), RAM 2048MB(533MHz), Graphics: Intel 915GM Express (128MB shared memory), LCD: 15inch 1440x1050 (24bit), HDD 40GB-osol/80GB SATA 5400rpm.
Wired LAN: Marvel 88E8053 PCI-Express GigaBit Ethertnet (internal)

1. nwamd - Network Auto-Magic Daemon
OpenSolaris 2008.05 以降では、デフォルト状態で nwamd - Network Auto-Magic Daemon - が起動していて、ネットワークの自動設定(無線LAN / 有線LAN / DHCP)が行われる。
ネットワークサービスは、サービス管理機能 smf によって次のサービス識別子で管理される。 svc:/network/physical

有効化、無効化、再起動の要求など、このサービスに関する管理作業は、svcadm コマンドを使用して実行することができる。 また、サービスの状態は、svcs コマンドを使用して照会することができる。
この デーモンが有効になっているかどうかを確認するには、コマンド行で次のコマンドを入力する。

baian@satellite:~$ pfexec svcs svc:/network/physical
STATE   STIME  FMRI
disabled 18:10:46 svc:/network/physical:default # 手動モード
online 18:10:50 svc:/network/physical:nwam # Auto-Magic モード

2つのインスタンスが、一方は無効 (disabled)、他方はオンライン (online) として表示される。nwam インスタンスがオンラインの場合、このデーモン(nwamd)が実行される。
2 つのインスタンスはネットワーク構成の 2 つのモードに対応している。default インスタンスは手動モード、nwam インスタンスは Auto-Magic モードである。

手動モードから Auto-Magic モードに切り替えるには、次のコマンドを実行する。
# svcadm disable svc:/network/physical:default
# svcadm enable svc:/network/physical:nwam

Auto-Magic モードから手動モードに切り替えるには、次のコマンドを実行する。
# svcadm enable svc:/network/physical:default
# svcadm disable svc:/network/physical:nwam

注意: このようにモードを切り替えると、すべてのネットワークインタフェースがいったんダウンしてから再度起動する。したがって、このプロセスで異なる IP アドレスが設定された場合、既存のアプリケーションやセッションは中断される可能性がある

2. nwamの停止
固定IPで稼働させるときには、nwam を停止させる必要がある。
まずは、Auto-Magic モードから手動モードに切り替える。
baian@satellite:~$ pfexec svcadm enable svc:/network/physical:default
baian@satellite:~$ pfexec svcadm disable svc:/network/physical:nwam

baian@satellite:~$ pfexec svcs svc:/network/physical
STATE STIME FMRI
disabled 18:16:19 svc:/network/physical:nwam
online 18:16:24 svc:/network/physical:default

3. 固定IP の設定
3-1. DHCPクライアントに設定
[システム]-[システム管理]-[ネットワーク] で、NIC を DHCPクライアントに設定する。


ひとまず、LAN内の他のマシンへ ping を打つことができるし、nslookup で DNSサーバ も引けるようになる。
しかし、nwam を disable にすると、Firefox も自力では名前解決ができないので、ウェブサイトの閲覧ができない。


3-2. ネットワークの基本的な設定
1. /etc/nsswitch.conf の準備 :名前解決できるように設定
nsswitch.conf は、名前解決の方法を定義しているファイルである。 dns で名前解決を行う雛形が用意されているので、それで上書きする。
# cp /etc/nsswitch.dns /etc/nsswitch.conf
# cat /etc/nsswitch.conf
passwd:     files
group:      files
hosts:      files dns
ipnodes:    files dns
networks: files
protocols: files
rpc: files
ethers: files
netmasks: files
bootparams: files
publickey: files# At present there isn't a 'files' backend for netgroup;  the system will
#   figure it out pretty quickly, and won't use netgroups at all.
netgroup:   files
automount:  files
aliases:    files
services:   files
printers: user files
auth_attr: filesprof_attr:  files
project:    files
tnrhtp:  files
tnrhdb:   files


2. /etc/hosts ( /etc/inet/hosts のシンボリックリンク)
名前解決をするときには、まずこのファイルを見る。
host name: satellite を /etc/hosts に追記する。
baian@satellite:~$ pfexec vi /etc/hosts 
27 ::1 localhost 
28 127.0.0.1 satellite.baian-inc.jp satellite localhost loghost


手動モード (default インスタンス) を再起動させる。

baian@satellite:~$ pfexec svcadm restart svc:/network/physical:default

baian@satellite:~$ ifconfig -a
lo0: flags=2001000849IPv4,VIRTUAL> mtu 8232 index 1
    inet 127.0.0.1 netmask ff000000
vboxnet0: flags=1004843DHCP,IPv4> mtu 1500 index 4
    inet 0.0.0.0 netmask ff000000
myk0: flags=1004843DHCP,IPv4> mtu 1500 index 5
    inet 192.168.1.2 netmask ffffff00 broadcast 192.168.1.255
lo0: flags=2002000849 mtu 8252 index 1
    inet6 ::1/128 
dladm コマンドを与えて、NIC の物理インタフェースのリンク状態をみる。
baian@satellite:~$ dladm show-link
LINK        CLASS    MTU    STATE    OVER
myk0        phys     1500   unknown  --
vboxnet0    phys     1500   unknown  --

baian@satellite:~$ dladm show-phys
LINK         MEDIA                STATE      SPEED  DUPLEX    DEVICE
myk0         Ethernet             unknown    100    full      myk0
vboxnet0     Ethernet             unknown    0      unknown   vboxnet0

有線LAN: myk0 は Full Duplex 100M でリンクアップしている。
----------------------------------------------------------------------
Reference:  man dladm(1M)  - administer data links - System Administration Commands

ひとまずこれで、一通りネットワーク(DHCPで) が使えるようになった。
Firefox を起動してみる。 正常に Web サイトが閲覧できた。


3-2. 固定IPへの移行
[システム]-[システム管理]-[ネットワーク] で、NIC に、固定IPを割り当てる。


4. Networking 関連各設定項目の定義付けされる場所 

IPアドレス(物理インタフェース)
baian@satellite:~$ cat /etc/hostname.myk0
192.168.1.2

ネットマスク
baian@satellite:~$ cat /etc/netmasks
192.168.1.0 255.255.255.0

デフォルト・ゲートウェイ
baian@satellite:~$ cat /etc/defaultrouter
192.168.1.1

ホスト名
baian@satellite:~$ cat /etc/nodename
satellite
※ hostname コマンドは、このファイルの内容を返す

ドメイン名およびDNSサーバ
baian@satellite:~$ cat /etc/resolv.conf
domain baian-inc.jp
nameserver 192.168.1.1

ホスト 
baian@satellite:~$ cat /etc/hosts
# ::1 localhost
127.0.0.1 localhost
192.168.1.2 satellite satellite.baian-inc.jp loghost

※ Open Solaris では、 /etc/hosts は、 /etc/inet/hosts のシンボリックリンクとなっている。
$ ls -l /etc/hosts
lrwxrwxrwx 1 root root 12 2009-08-11 18:58 /etc/hosts -> /etc/inet/hosts

/etc/inet/ipnodes は、 /etc/hosts のシンボリックリンクとなっている。

baian@satellite:~$ ls -l /etc/inet/ipnodes
lrwxrwxrwx 1 root root 7 2009-07-16 12:58 /etc/inet/ipnodes -> ./hosts


5. ネットワーク設定 を確認(ネットワークの状態を表示) するには、
baian@satellite:/etc/inet$ netstat -r
 

Routing Table: IPv4
  Destination           Gateway           Flags  Ref     Use     Interface
-------------------- -------------------- ----- ----- ---------- ---------
default                  setup.html           UG        1        110         
192.168.1.0        satellite.baian-inc.jp U         1       3  myk0    
192.168.56.0      192.168.56.1         U        1            0  vboxnet0
localhost               localhost              UH        1           6  lo0     

Routing Table: IPv6
  Destination/Mask            Gateway                   Flags Ref   Use    If 
--------------------------- --------------------------- ----- --- ------- -----
localhost                         localhost                        UH      1       0  lo0 


baian@satellite:~$ ifconfig -a

lo0: flags=2001000849 mtu 8232 index 1
    inet 127.0.0.1 netmask ff000000
myk0: flags=1000843 mtu 1500 index 2
    inet 192.168.1.2 netmask ffffff00 broadcast 192.168.1.255
vboxnet0: flags=1000843 mtu 1500 index 3
    inet 192.168.56.1 netmask ffffff00 broadcast 192.168.56.255
lo0: flags=2002000849 mtu 8252 index 1
    inet6 ::1/128


アクティブな有線ネットワークが接続されていることを示す「ネットワークモニター」アプレット


デスクトップパネルにデフォルトで表示される、「ネットワークモニター」アプレットは、複数のネットワーク接続を同時に監視する機能がある。 この機能は 固定IP ネットワークを設定している場合に役立つ。 このアイ コンは、ネットワークが現在データを送信または受信しているかどうかが示される。 

ネットワーク・デバイスの状態を表示する監視アプレット (gnome-netstatus-applet)  のプロパティ: 「ネットワークモニター」アプレット アイコンをマウス・右クリックして得られる。 下図参照。
本システムのアクティブ・ネットワークインタフェースは myk0 である。 ここで、前述の固定IP設定値が反映されて表示される。


参考: OpenSolaris 2009.06 入門/ ネットワーク接続のステータスの確認
     crossbow を自在に使いたいなら、nwam は disable だろ - 気になるもの。        
           OpenSolaris 固定IP
           man  nwamd(1M),   ifconfig(1M),  dladm(1M),   netstat(1M)

2009-08-10

Linux Mint 7 KDE community edition Released

" Clement Lefebvre has announced the release of the "KDE" edition of Linux Mint 7: "The team is proud to announce the release of Linux Mint 7 'KDE'. Based on Kubuntu 9.04, Linux 2.6.28, KDE 4.2.4 and X.Org 7.4, Linux Mint 7 'KDE' community edition features a lot of improvements and the latest software from the open source world.
" Highlights: "KDE 4.2.4 and Amarok 2.1 - the latest and shiniest KDE desktop and applications; mintInstall improvements - featured applications, pre-filled information, seamless screenshot downloads, improved GUI layout; mintUpdate improvements - changelogs, package sizes, usability; mintUpload improvements - ads-free, GUI improvements, graphical service manager, SCP/SFTP support; mintWelcome; command-line goodies - APT version, RTFM...."

See the release announcement and release notes for further information.

About Linux Mint
Linux Mint is an Ubuntu-based distribution whose goal is to provide a more complete out-of-the-box experience by including browser plugins, media codecs, support for DVD playback, Java and other components. It also adds a custom desktop and menus, several unique configuration tools, and a web-based package installation interface. Linux Mint is compatible with Ubuntu software repositories.

Linux Mint Summary 
Distribution Linux Mint
Home http://linuxmint.com/
Mailing List
--
Users Forum
http://linuxmint.com/forum/
Documents http://linuxmint.com/wiki/
Screenshots http://www.linuxmint.com/screenshots.phpThe Coding Studio
Download mirror
http://www.linuxmint.com/download.php
Bug Tracker --
Related Web Sites
LinuxMint-ArtLinux Mint FranceLinux Mint GermanyLinux Mint ItalyLinux Mint Spain


For a detailed overview of the new features and improvements included in Linux Mint 7 KDE, please read “What’s new in Gloria KDE?“.

System requirements:
A minimum of 4GB of free space and 256MB RAM are needed. For a comfortable experience we recommended to have at least 512MB RAM and 10GB of free space.

New features
This edition is based on Kubuntu 9.04 Jaunty Jackalope, Linux 2.6.28, Xorg 7.4 and it comes with the latest KDE 4.2.4 and Amarok 2.1. For a complete list of new features read: What's new in Gloria KDE?

Upstream issues
Linux Mint 7 is based on Ubuntu Jaunty Jackalope. Make sure to read the known issues related to this release.
Important links
Download Linux Mint 7 KDE:
You can download the Main Edition via torrent or via HTTP:
Size: 1.1GB LiveDVD
MD5Sum: 60d7b284446b6fdaf58cba91446ff5ff