Loading...
Showing posts with label Linux. Show all posts

2013-03-24

How to install webmin for Linux Mint 14 "Nadia"

ここでは、My Legacy dynabook Satellite J-50 に導入した Linux Mint 14 "nadia" に、Webmin 1.620 をインストールしてみる。

Webmin is a web-based interface for system administration for Unix. Using any modern web browser, you can setup user accounts, Apache, DNS, file sharing and much more. Webmin removes the need to manually edit Unix configuration files like /etc/passwd, and lets you manage a system from the console or remotely.
See the standard modules page for a list of all the functions built into Webmin, or check out the screenshots.

Webmin はGUIでLinuxのシステム管理・各種設定を行うツールだ。Webブラウザでユーザーアカウントの管理やApache、DNS、ファイル共有などのサーバの設定、RAIDといったハードウェア設定などが可能だ。

Webmin は Perl で書かれたCGIプログラム群で構成されており、LinuxだけでなくFreeBSDやMac OS、Solaris、HP-UXなどさまざまなOSで使用できる。
また、Webブラウザがフロントエンドであるため、WindowsやMacOSなどが動作しているほかのPCから操作できる(Webminの設定で、外部からのアクセスを許可する必要がある)。
  ◆ How to install webmin for Linux Mint 14 "nadia"

refer. : http://www.ubuntugeek.com/how-to-install-webmin-on-ubuntu-12-10-quantal-server.html
Now you need to install webmin from APT repository.
APT レポジトリから Webmin をインストールする。
1) Execute some editor and edit the /etc/apt/sources.list file and add the following lines.
適当なエディタを起動して、/etc/apt/sources.list を編集し、以下の二行を追加する。

    deb http://download.webmin.com/download/repository sarge contrib
    deb http://webmin.mirror.somersettechsolutions.co.uk/repository sarge contrib

2) Save and exit the file.
ファイルを保存し、終了する。

3) Now you need to download GPG key.
以下のコマンドを与えて、GPG鍵をダウンロードする。

$ wget http://www.webmin.com/jcameron-key.asc
$ sudo apt-key add jcameron-key.asc

4) Update source list.
sources.list をアップデートする。 
$ sudo apt-get update

5) Install webmin using the following command
つぎのコマンドによって Webmin をインストールする。

$ sudo apt-get install webmin


--------------------------------------------------------------------------------------
How to Install  webmin for Linux Mint on My dynabook Satellite J50 :
--------------------------------------------------------------------------------------
1) /etc/apt/sources.list を編集
baian@dynabook-Satellite-J50 ~ $ sudo vi /etc/apt/sources.list
[sudo] password for baian:

deb http://download.webmin.com/download/repository sarge contrib
deb http://webmin.mirror.somersettechsolutions.co.uk/repository sarge contrib
2) GPG鍵をダウンロード
baian@dynabook-Satellite-J50 ~ $ wget http://www.webmin.com/jcameron-key.asc
--2013-03-22 07:54:20--  http://www.webmin.com/jcameron-key.asc

www.webmin.com (www.webmin.com) をDNSに問いあわせています... 216.34.181.97
www.webmin.com (www.webmin.com)|216.34.181.97|:80 に接続しています... 接続しました。
HTTP による接続要求を送信しました、応答を待っています... 200 OK
長さ: 1320 (1.3K) [text/plain]
`jcameron-key.asc' に保存中

100%[======================================>] 1,320       --.-K/s   時間 0.006s

2013-03-22 07:54:21 (226 KB/s) - `jcameron-key.asc' へ保存完了 [1320/1320]

baian@dynabook-Satellite-J50 ~ $ sudo apt-key add jcameron-key.asc
OK
 3)  sources.list をアップデート

baian@dynabook-Satellite-J50 ~ $ sudo apt-get update
 4) Webmin のインストール

baian@dynabook-Satellite-J50 ~ $ sudo apt-get install webmin

パッケージリストを読み込んでいます... 完了
依存関係ツリーを作成しています               
状態情報を読み取っています... 完了
以下の特別パッケージがインストールされます:
  apt-show-versions libauthen-pam-perl
以下のパッケージが新たにインストールされます:
  apt-show-versions libauthen-pam-perl webmin
アップグレード: 0 個、新規インストール: 3 個、 削除: 0 個、保留: 9 個。
21.1 MB のアーカイブを取得する必要があります。
この操作後に追加で 134 MB のディスク容量が消費されます。
続行しますか [Y/n]? y
取得:1 http://download.webmin.com/download/repository/ sarge/contrib webmin all 1.620 [21.0 MB]
取得:2 http://archive.ubuntu.com/ubuntu/ quantal/universe libauthen-pam-perl i386 0.16-2build2 [27.9 kB]
取得:3 http://archive.ubuntu.com/ubuntu/ quantal/universe apt-show-versions all 0.19+nmu1 [33.5 kB]
21.1 MB を 1分 52秒 で取得しました (188 kB/s)                                                                                             
以前に未選択のパッケージ libauthen-pam-perl を選択しています。
(データベースを読み込んでいます ... 現在 299590 個のファイルとディレクトリがインストールされています。)
(.../libauthen-pam-perl_0.16-2build2_i386.deb から) libauthen-pam-perl を展開しています...
以前に未選択のパッケージ apt-show-versions を選択しています。
(.../apt-show-versions_0.19+nmu1_all.deb から) apt-show-versions を展開しています...
以前に未選択のパッケージ webmin を選択しています。
(.../archives/webmin_1.620_all.deb から) webmin を展開しています...
man-db のトリガを処理しています ...
ureadahead のトリガを処理しています ...
ureadahead will be reprofiled on next reboot
libauthen-pam-perl (0.16-2build2) を設定しています ...
apt-show-versions (0.19+nmu1) を設定しています ...
** initializing cache. This may take a while **
webmin (1.620) を設定しています ...
Webmin install complete. You can now login to https://dynabook-Satellite-J50:10000/
as root with your root password, or as any user who can use sudo
to run commands as root.
ureadahead のトリガを処理しています ...

baian@dynabook-Satellite-J50 ~ $

****************************************************************************************************
Succeeded to install webmin 1.620 for Linux Mint 14 on My dynabook Satellite J-50.
無事に、Webmin 1.620 がインストールされた。

Webminの画面を表示するには、Webブラウザを起動して、設定を行うPCのポート10000にSSLでアクセスする。たとえば、

     https://localhost:10000           ローカルからアクセスする場合
     https://dynabook-Satellite-J50:10000/          ホスト名を入力してアクセスする場合
     https://192.168.0.1:10000           IPアドレスを入力してアクセスする場合

 すると、ユーザー名とパスワードを入力する画面が表示される。

 ユーザー名(root)とパスワードを入力して[Login]ボタンをクリックすると、Webminの画面が表示される。


画面左サイドに並ぶ7つのカテゴリのいずれかをクリックすると、各カテゴリに属する詳細な設定項目が表示される。それぞれのカテゴリで設定できる内容は次のようなものだ。

   
カテゴリ 設定の内容
Webmin     Webmin自身やユーザー用モジュール、作業ログ、Webmin用のユーザーアカウントなど
システム     ユーザーパスワードの変更やユーザーアカウントの作成/削除/編集、システムログの表示、RPMパッケージのインストール/アンインストールなど
サーバ     Apacheやインターネットサービス、Postfix、ProFTPD、Samba、PostgreSQL、qmail、DNS、Squidなど
その他     Perlモジュールの管理やコマンドシェルの実行、ファイルマネージャの実行など

ネットワーク     ファイアウォールなど
ハードウェア     RAIDシステムやネットワークインターフェイス、ディスクのパーティション、GRUB、LILOなど
Cluster     クラスタに関する各種設定など

 ここに挙げたのは、Webminで設定可能な項目の一部分である。設定可能な項目の詳細については、Webmin 本家の standard modules page を参照しつつ、実際にWebminを操作して確認してみよう。

 See the standard modules page for a list of all the functions built into Webmin, or check out the screenshots.

 なお、ディストリビューションに含まれているWebminは、バージョンが古い可能性がある。古いバージョンには、セキュリティホールがあることが多いので、実際に使用する前に、最新版にアップデートしよう。Webminには、自分自身をアップデートする機能があるので、それを利用して最新版に更新すると便利だ。

 Webminのアップデート作業は、[Webmin]カテゴリの[Webminの設定]-[Webminのアップグレード]を選択する。次に、表示されるオプションから[www.webmin.comからの最新バージョン]を選択して、[Webminのアップグレード]ボタンをクリックする。画面の指示に従って作業を進めると、アップデート作業は終了だ。

 なお、アップデートを行うと、言語の設定がデフォルト(英語)に戻ってしまう。日本語にするには、[Webmin]カテゴリの[Webmin設定]-[言語とテーマの変更]を選択して、言語の一覧から[Japanese(JA_JP.UTF8)]を選択する。
見た目の[テーマ]についても、ここで選択・変更が可能である。

Webmin -[言語とテーマの変更]
Webmin - デフォルトテーマを選択
Webmin - 古い webmin テーマを選択


2013-02-15

Upgrade to Linux Mint 14 "Nadia" on My Legacy Notebook PC

Fresh upgraded to Linux Mint 14 "Nadia" with linuxmint-14.1-cinnamon-dvd-32bit.iso on My Legacy 32bit Notebook Computer.


Desktop upgraded to Linux Mint 14 "Nadia" 

System Environment: 
Type: Legacy 32bit Notebook Computer
Model: Toshiba dynabook Satellite J50 
・ CPU: Pentium M740 (1.73 GHz) → M760 (2.00 GHz) に換装。
・ メモリ: SODIMM PC2-533 1GB × 2 = 2 GB
・ HDD: 500 GB SATA-II 換装
Linux Mint 13 "Maya" と Windows XP +SP3 との Dual-boot システムで運用中。
Linux Mint 14 "Nadia" に Fresh Upgrade する。

Procedure for Installation - Fresh Upgrades.

See "How to upgrade to a newer release" :  these instructions.

1. Download the ISO for Linux Mint 14 "Nadia": linuxmint-14.1-cinnamon-dvd-32bit.iso from here.

   Check its MD5 signature.
 
Check the 32-bit ISOs of Linux Mint 14 use a PAE kernel. If your processor is not compatible with PAE please use Linux Mint 13 "Maya" LTS instead. Linux Mint 13 is supported until 2017.

Open terminal and give command lines as follows:

baian@dynabook-Satellite-J50 ~ $ cat /proc/cpuinfo | grep pae                                                                                        

[sudo] password for baian: 
flags : fpu vme de pse tsc msr pae mce cx8 apic mtrr pge mca cmov clflush dts acpi mmx fxsr sse sse2 ss tm pbe up bts est tm2
baian@dynabook-Satellite-J50 ~ $                                                                                                                                                  


2. Create a bootable Live USB stick running Linux Mint 14 -cinnamon-32bit.    
Using with LinuxLive USB Creator on Windows XP +SP3, creates portable, bootable and virtualized USB stick running Linux. Available to download here.    
LiLi
LinuxLive USB Creator is a free and open-source software for Windows. It will help you in your journey of discovery with Linux.
Execute LinuxLive USB Creator on Desktop in Windows XP

3. Plug in a bootable Linux MInt 14 Live USB stick to one of USB ports on My Legacy 32 bit Notebook PC.

4. Boot from the live USB stick and select the option "Check disk integrity".

5. Boot from the live USB stick and select "Start Linux Mint".

Once on the live desktop, check that your hardware is properly recognized (graphics card, wireless..etc)

the Linux Mint 14 Cinnamon 32bit live desktop 

6. Once you're happy and confident that this newer release is good for you, click on "Install" on the desktop and proceed with a normal installation.

7. When asked by the installer, choose "Specify partitions manually (advanced)", select the partition that you used for your current installation of Linux Mint, assign "/" to it, and reformat it to "ext4".

8. Installation succeeded then reboot your computer.


2013-02-13

The 32-bit ISOs of Linux Mint 14 use a PAE kernel

The 32-bit ISOs of Linux Mint 14 use a PAE kernel. If your processor is not compatible with PAE please use Linux Mint 13 Maya LTS instead. Linux Mint 13 is supported until 2017.

32ビット版はメモリーの拡張機能「PAE」(Physical Address Extension)対応CPUのみ動作するようになり、非対応のCPUを搭載したPCでは起動もしない。

PentiumMも例外ではなく、PAE非対応なので直接インストールは不可能との情報が有力説のようだ。(旧バージョンからのアップグレードは可能)。 しかし、Ubuntuでは12.04のあと次期リリースから完全に非対応になるとか。

My Legacy Notebook PC に搭載されている、Pentium M760 (2.00 GHz) が PAE対応かどうかチェックしてみる。

◎ Dothan-533 標準電圧版 quated via Pentium M - Wikipedia: 

90nmプロセスで製造された。プロセッサー・ナンバーはBanias同様700番台。
改良版(Dothan-533)が新チップセット Intel 915 シリーズとともに2005年1月19日に発表される。FSBが400MHzから533MHzに向上した以外はDothanと同一。「ソノマ(Sonoma)」というコードネームで呼ばれた第2世代セントリーノ・プラットフォームとともに用いられる。
同時発表されたチップセットIntel 915シリーズ(正式には「モバイルIntel 915 Expressチップセットファミリ」)は、FSB533/400MHzに対応し、PCI Expressが使用可能。DDR2 SDRAMも利用可能になり、消費電力を削減できる。 グラフィックス・メディア・アクセラレータ 900(GMA900)が統合された 915G チップセット・ファミリはグラフィックス性能を従来製品よりも大幅に向上し、T&L にハードウェアレベルで対応していないことなどを除けば、低価格向けのGPUと同程度の性能を有する。なお、GMA900 では Windows Vista の Windows Aero (DWM)は使用できない。GMA900 の後継グラフィックである GMA950 では Windows Aero に対応している。 組み合わされる ICH は ICH6M で、最大32ビット/192 kHz 対応の HD Audio やシリアルATAが使用できる。

◎ Dothan-533 標準電圧版、FSBはいずれも533MHz
プロセッサ・ナンバ 
動作周波数
 2次キャッシュ
 EIST
NX Bit
   ソケット
TDP(最低周波数)
730
1.60 GHz
2MB
○ (~800MHz)
Socket479
27W (10.8W)
740
1.73 GHz
2MB
○ (~800MHz)
Socket479
27W (10.8W)
750
1.86 GHz
2MB
○ (~800MHz)
Socket479
27W (10.8W)
760
2.00 GHz
2MB
○ (~800MHz)
Socket479
27W (10.8W)
770
2.13 GHz
2MB
○ (~800MHz)
Socket479
27W (10.8W)
780
2.26 GHz
2MB
○ (~800MHz)
Socket479
27W (10.8W)


About My Notebook PC:  Toshiba dynabook Satellite J50 

Linux Mint 13 "Maya" をインストールして、 Windoz XP +SP3 と
Dual-boot システムで運用中。 
● CPU: Pentium M740 (1.73 GHz) → M760 (2.00 GHz) に換装。
● メモリ: SODIMM PC2-533 1GB × 2 = 2 GB
● HDD: 500 GB SATA-II 換装


◆ Pentium M760 (2.00 GHz) が PAE対応かどうかチェックしてみる。

● 端末を開いて、以下のコマンドを与えてみる。

baian@dynabook-Satellite-J50 ~ $ cat /proc/cpuinfo | grep pae

[sudo] password for baian: 

flags : fpu vme de pse tsc msr pae mce cx8 apic mtrr pge mca cmov clflush dts acpi mmx fxsr sse sse2 ss tm pbe up bts est tm2

baian@dynabook-Satellite-J50 ~ $

pae (赤字で表示) に対応しているようだ。


ハードウェア構成を GUI 出力してみると…

# sudo lshw -X


Screenshot:  Output for command "lshw -X" 


2010-05-31

Linux Mint 8 "Helena" Xfce CE on My DynaBook Satellite 1800 SA10AP/4

良品在庫の 60GB 2.5inch Hard Drive (UATA) を My legacy notebook PC: Toshiba DynaBook Satellite 1800 SA10AP/4 に換装して、Linux Mint 8 "Helena" Xfce Community Edition をインストールする。軽量かつエレガンスなエディションらしい。
今は昔、2002年1月発売のモデルだが、埃を払ってオーバーホールメンテナンス。CPU は Pentium III 1.0GHz だ。メモリを 512MB フル実装して試用する。
光学ドライブは DVD Super Multi, MATSHITA UJ-850S(OEM バルク品)に換装。Secondary Master として認識させるために小改造済み(コネクタ PIN47-45 をハンダ付けで短絡させる)。
USB2.0 拡張カードとして、ツライチ USB2.0/SD-CBU2-Z1 を調達して装着する。これには、USB フラッシュメモリやハードディスク、光学ドライブなどの外部ストレージデバイスや USB ハブ、プリンタなどを接続する。補助電源供給ケーブル付きだ。ツライチ仕様:挿入したカードがスッポリと搭載できて、出っ張らずジャマにならないという代物。
残念ながら、このマシンは BIOS が対応していないので、USB Device からのシステムブートはできない。
[表-1] に My DynaBook Satellite 1800 SA10AP/4 のハードウェア仕様概要をまとめてみた。

[表-1] Satellite 1800 SA10AP/4 のハードウェア仕様概要(換装済)
CPU Intel Pentium III(Coppermine) 1.0GHz
Chip Set Trident Cyber ALADDiN-T + ALi M1535B
Ext. Memory SODIMM SDRAM(PC133) 256MBx2=512MB, SUMSUNG
Video Graphics Trident Microsystem CyberBlade XP/Ai1
Display TFT 14.1 inch, 1024x768 pixels
Hard Drive ATA66 60GB, SAMSUNG HM060HC
Optical Drive DVD SuperMulti drive, MATSHITA UJ-850S
LAN Intel Ethernet Pro 100
Audio Adapter ALI 5451 PCI AC-Link Controller Audio Device
PC Card Slot TYPE II×2 or TYPE III×1 (PC Card Standard, CardBus 32bit)
CardBus bridge Toshiba America Info Systems ToPIC100 PCI to Cardbus Bridge with ZV Support
ALi Corporation M5229 IDE Primary, Secondary, Master-channel
Universal Serial Bus ALi USB 1.1 Controller, 2-Port
ISA bridge M1533/M1535/M1543 PCI to ISA Bridge [Aladdin IV/V/V+]
USB2.0 PC Card Cardbus, AREA SD-CBUZ2-Z1, Chip: NEC μPD720101

[参考] ハードディスク換装の手引き:写真で見てわかる内蔵ハードディスク取り付け講座 ノートPC用 for TOSHIBA DynaBoook Satellite
   光学ドライブの換装:CD-ROM交換したいんです!

※註:内蔵ドライブの換装作業はパソコンの分解行為に該当するので、これを行うとベンダー・メーカーの保証は一切受けられなくなります。あくまでもユーザーの皆さんの自己責任のもとで作業を行ってください。どうか、ご安全に!

■ Linux Mint 8 "Helena" Xfce Community Edition について

Linux Mint 8 Xfce の紹介 :
Xubuntu 9.10 Karmic Koala, Linux 2.6.31, Xfce 4.6.1 and Xorg 7.4 をベースとして、Linux Mint 8 "Helena" Xfce CE ではたくさんの改善がなされていて、オープンソースの世界で最新のソフトウェアを取り入れています。

Linux Mint 8 Xfce の新機能や改善点の詳細については、“What’s new in Helena Xfce?“ を参照してください。

システム要求項目について:
  • x86 processor
  • 256 MB of system memory (RAM)
  • 3 GB of disk space for installation
  • GA graphics card capable of 800×600 resolution
  • CD-ROM drive or USB port
既知のことがらについてのすべての情報を知りたければ "release notes"を読んでください。

Download Linux Mint 8 Xfce:
このエディションは the download page から HTTP および Torrent 経由でダウンロード可能です。


日本国内でのプライマリ・ミラーサイト:

1.ダウンロード:

OpenSolaris dev. build_134 が稼働する別のマシン上で、端末を開いて、$HOME のダウンロードディレクトリに移動して、

  $ cd ~/src-pkg
  $ wget -c http://ftp.riken.jp/pub/Linux/linuxmint/stable/8/LinuxMint-8-Xfce.iso
  $ md5sum LinuxMint-8-Xfce.iso
   68ae69dfd04262caa6b4bc930b694e58 LinuxMint-8-Xfce.iso
   Checksum Okey!

Brasero を起動して、メニューで "イメージの作成" を選択して、ISOイメージを CD-R(700MB) に焼く。
Windoz を立ち上げて、適当なアプリを利用して CR-R を焼いてもよいでせう。

2.インストール: 

2-1. Start-up Linux Mint 8 XFCE from LiveCD 
スタートアップ:

マシンの電源を入れて、POST 直後に "F12" キーを押下してブートメニューを表示させる。
作成した Linux Mint 8 Xfce CE の CD-R ディスクを光学ドライブに装着して、[C] : CD-ROM ブート 。
[Esc] キーを押して Linux Mint 8 Xfce CE の起動メニューを表示させる。

先頭行:"Start Linux Mint Xfce CE" を選択して、[Enter] で LiveCD が起動する。
あるいはここで、インストールモード、LiveCD の完全性のチェック、メモリテストの実行、または、ローカルなハードドライブからの起動を選択できる。
Linux Mint の Splash 画面が表示されて、しばらくすると自動ログインして liveCD のデスクトップ画面が表示される。

Fig-01: Screenshot - Linux Mint 8 Xfce CE Desktop on LiveCD

2-2. Installation to the hard drive 

ハードドライブにインストール:
Desktop 上の "Install Linux Mint" アイコンをクリックして、インストールを開始する。
初期画面は "English" なので、左ペインの言語選択をスクロールして "日本語" を選択する。


Fig-02: Welcome to install dialogue on Mint 8 XFCE LveCD
Fig-03: ようこそ インストール 画面(日本語)

以降、"進む(F)" ボタンをクリックして、画面の指示に従ってインストール作業をすすめる。


パーティションの準備: Linux Mint 8 XFCE をインストールするため、Linux 用領域を確保する。Windoz XP 用に 20GiB、Linux Mint 8 Xfce CE 用に約 40GiB として分割。

# Linux Mint 8 XFCE 用のパーティションは、以下のとおりに設定した。
なお、Windows XP の C Drive は起動時に FAT32 でマウントされるように、/windows/C_drv として設定した。

/dev/sda1 /windows/C_drv  FAT32   Windoz XP +SP3  20GiB
/dev/sda2  Ext.Partition
/dev/sda5  /boot           EXT4   Linux Mint       128MB
/dev/sda6  /               EXT4   Linux Mint       25GiB
/dev/sda7  swap                   Linux swap      1024MB
/dev/sda8  /home           EXT4   Linux Mint     10.5GiB

3. Reboot the system:システム再起動。

Fig-04: Snapshot - Finished to 1nstall
システムの再起動に際して、表示されるメッセージに従って CD-R を排出させておく。

4. Boot from the hard drive. インストールしたハードディスクから起動する。
無事に起動した。あらかじめ設定しておいたユーザ名とパスワードでグラフィカル・ログインする。

Fig-05: Snapshot - Login Dialog on Linux Mint 8 Xfce

Linux Mint 8 Xfce CE のインストール直後の起動したデスクトップ画面は Fig-06.
  800x600 pixels.
Fig-06: Screenshot - Desktop and Welcome dialog appeared at first time.


5. Configuration of the Resolution for LCD Display. LCD 画面の調整。

Fig-07: Screenshot - Display Layout 800x600 pixels
このマシンに搭載されているビデオチップ "Trident CyberBlade XP/Ai1" は曲者なのだ。
インストール直後のデスクトップ画面は SVGA 800x600/60Hz 以外に変更することができない。システムが X-window を自動設定していて、/etc/X11 以下に xorg.conf がありませぬ。そこで、1024x768 の画面サイズを得るためには、Xorg.conf を作成して /etc/X11 以下に放り込んであげることが必要だ。

xorg.conf ファイルの作成:


# xorg.conf (X.Org X Window System server configuration file)
# /etc/X11/xorg.conf for Toshiba Satellite 1800 model SA10AP/4.
# Custom file by Michael Minn, modified by Baian on May/28/2010.
#
Section "InputDevice"
Identifier "Generic Keyboard"
Driver "kbd"
Option "XkbRules" "xorg"
Option "XkbModel" "jp106"
Option "XkbLayout" "jp"
EndSection

Section "InputDevice"
Identifier "Configured Mouse"
Driver "mouse"
Option "CorePointer"
Option "Device" "/dev/input/mice"
Option "Protoxol" "ImPS/2"
EndSection

Section "Device"
Identifier "Trident Microsystems CyberBladeXP/Ai1"
Driver "trident"
BusID "PCI:1:0:0"
Option "NoDDC"
EndSection

Section "Monitor"
Identifier "ToshLCD"
Option "DPMS"
HorizSync 30-71
VertRefresh 50-100
EndSection

Section "Screen"
Identifier "Default Screen"
Monitor "ToshLCD"
Device "Trident Microsystems CyberBlade XP/Ai1"
DefaultDepth 16

SubSection "Display"
Depth 16
Modes "1024x768"
EndSubSection

SubSection "Display"
Depth 24
Modes "1024x768"
EndSubSection

SubSection "Display"
Depth 16
Modes "800x600"
EndSubSection

SubSection "Display"
Depth 24
Modes "800x600"
EndSubSection
EndSection

Section "ServerLayout"
Identifier "Default Layout"
Screen "Default Screen"
InputDevice "Generic Keyboard"
InputDevice "Configured Mouse"
EndSection


いったんログアウトして、"Ctrl+Alt+[F2]" で仮想端末に切り替える。
ユーザ名・パスワードで仮想端末にログインする。

作成した xorg.conf ファイルを /etc/X11/xorg.conf として格納する。

  $ sudo cp /home/baian/src-pkg/xorg.conf /etc/X11/xorg.conf

ここで、システムを再起動する。

  $ sudo reboot

無事にグラフィカルログインして、所定のデスクトップ画面 1024x768 に設定できた。

Fig-08: Screenshot - Desktop 1024x768 applied xorg.conf
Fig-09: Screenshot - Config. for LCD Display


6. インストール後のシステム環境設定・整備:
 6-1. パッケージのリポジトリを更新し、必要に応じてパッケージをアップデートする。
 6-2. Ubuntu Japanese Team のリポジトリを追加して日本語環境を整える。
 6-3. $HOME 以下のディレクトリ、ファイルの整理、Shell、端末の環境整備。
 6-4. ネットワークの設定・調整、ブラウザ、メールクライアントの設定。
 6-5.
Desktop の環境整備。外観、フォントの設定。
 6-6. アプリケーションの追加インストール: mintinstall, synaptic, apt-get などで。
 6-7. 各種サーバの適宜導入・設定。
 6-8. その他
 

2010-05-16

Linux Tips: How to add the Repository of VirtualBox 3.1.8 for Ubuntu 10.04 Lucid Lynx

引用・抜粋しまくりのパッチワークで、おそれいりヤス。後にまとめるための覚え書きノート・・・デス (Orz).

最新ニュースを追記しました。 by Baian on Fri May/21/2010,
New "May 18, 2010 VirtualBox 3.2.0 released!"

About VirtualBox: Oracle VM VirtualBox is a general-purpose full virtualizer for x86 hardware that originally created by German software company innotek GmbH, purchased by Sun Microsystems, and now developed by Oracle as part of its family of virtualization products.
It is installed on an existing host operating system; within this application, additional guest operating systems, each known as a Guest OS, can be loaded and run, each with its own virtual environment.
Targeted at server, desktop and embedded use, it is now the only professional-quality virtualization solution that is also Open Source Software.

1-1. Features of VirtualBox:

  • Modularity. VirtualBox has an extremely modular design with well-defined internal programming interfaces and a client/server design. This makes it easy to control it from several interfaces at once: for example, you can start a virtual machine in a typical virtual machine GUI and then control that machine from the command line, or possibly remotely. VirtualBox also comes with a full Software Development Kit: even though it is Open Source Software, you don't have to hack the source to write a new interface for VirtualBox.

  • Virtual machine descriptions in XML. The configuration settings of virtual machines are stored entirely in XML and are independent of the local machines. Virtual machine definitions can therefore easily be ported to other computers.

  • Guest Additions for Windows, Linux and Solaris. VirtualBox has special software that can be installed inside Windows, Linux and Solaris virtual machines to improve performance and make integration much more seamless. Among the features provided by these Guest Additions are mouse pointer integration and arbitrary screen solutions (e.g. by resizing the guest window). There are also guest additions for OS/2 with somewhat reduced functionality.

  • Shared folders. Like many other virtualization solutions, for easy data exchange between hosts and guests, VirtualBox allows for declaring certain host directories as "shared folders", which can then be accessed from within virtual machines.
A number of extra features are available with the full VirtualBox release only (see the "Editions" page for details):
  • Virtual USB Controllers. VirtualBox implements a virtual USB controller and allows you to connect arbitrary USB devices to your virtual machines without having to install device specific drivers on the host.

  • Remote Desktop Protocol. Unlike any other virtualization software, VirtualBox fully supports the standard Remote Desktop Protocol (RDP). A virtual machine can act as an RDP server, allowing you to "run" the virtual machine remotely on some thin client that merely displays the RDP data.

  • USB over RDP. With this unique feature, a virtual machine that acts as an RDP server can still access arbitrary USB devices that are connected on the RDP client. This way, a powerful server machine can virtualize a lot of thin clients that merely need to display RDP data and have USB devices plugged in.

1-2. Hardware Requirements:

  In order to run VirtualBox on your machine, you need the following:
  • Reasonably powerful x86 hardware. Any recent Intel or AMD processor should do.

  • Memory. Depending on what guest operating systems you want to run, you will need at least 512 MB of RAM (but probably more, and the more the better).
    Basically, you will need whatever your host operating system needs to run comfortably, plus the amount that the guest operating system needs.
    So, if you want to run Windows XP on Windows XP, you probably won't enjoy the experience much with less than 1 GB of RAM.
    If you want to try out Windows Vista in a guest, it will refuse to install if it is given less than 512 MB RAM, so you'll need that for the guest alone, plus the memory your operating system normally needs.

  • Hard disk space. While VirtualBox itself is very lean (a typical installation will only need about 30 MB of hard disk space), the virtual machines will require fairly huge files on disk to represent their own hard disk storage.
    So, to install Windows XP, for example, you will need a file that will easily grow to several GB in size.

  • A supported host operating system. Presently, we support Windows (primarily XP) and many Linux distributions on 32-bit hosts and on 64-bit hosts. Support for Mac OS X and Solaris and OpenSolaris appeared in 1.6.

  • A supported guest operating system. Besides the "user manual", up-to-date information is available at "Status: Guest OSes".
ScreenShot: "Status: Guest OSes"


2. Download and Install VirtualBox for Linux Hosts


Ubuntu 10.04 LTS (Lucid Lynx) Virtualbox
novelldesktop - 2009年12月28日

2-1. VirtualBox package for Ubuntu 10.04

VirtualBox には以下のように2種類のバージョンがあります。

VirtualBox(Non Free版)

個人や教育あるいは評価目的の製品の利用において無料です。

サードパーティのレポジトリや手動でダウンロードしたパッケージを利用した場合、アップグレード時に特別な操作が必要となる場合があります。

To run VirtualBox 3.1.8, you will need to install the VirtualBox package from the repository. Please choose the appropriate package for Ubuntu 10.04 Lucid Lynx.
Note: The package architecture has to match the Linux kernel architecture, that is, if you are running a 64-bit kernel, install the appropriate AMD64 package (it does not matter if you have an Intel or an AMD CPU). Mixed installations (e.g. Debian/Lenny ships an AMD64 kernel with 32-bit packages) are not supported. To install VirtualBox anyway you need to setup a 64-bit chroot environment.

VirtualBox Open Source Edition(OSE)

オープンソース版です。virtualbox-ose パッケージをインストールしてください。

After several years of intensive development, VirtualBox was released as Open Source in January 2007. innotek has chosen to release its VirtualBox source code under the GNU General Public License (GPL).
  • The VirtualBox Open Source Edition (OSE) is the one that has been released under the GPL and comes with complete source code. It is functionally equivalent to the full VirtualBox package, except for a few features that primarily target enterprise customers. This gives us a chance to generate revenue to fund further development of VirtualBox.
  VirtualBox OSE is also available from the Downloads page.

※ オープンソース版では、次の機能が利用できません。
  • Remote Desktop Protocol(RDP)サーバ機能
  • USBサポート
  • USB over RDP

2-2. How to add the repository for Ubuntu 10.04 "Lucid Lynx"

Add one of the following lines to your /etc/apt/sources.list:

 deb http://download.virtualbox.org/virtualbox/debian lucid non-free


The Sun public key for apt-secure can be downloaded here.
You can add this key with:


 $ sudo apt-key add sun_vbox.asc


or combine downloading and registering:


$ sudo add-apt-repository 'deb http://download.virtualbox.org/virtualbox/debian lucid non-free'
$ wget -q http://download.virtualbox.org/virtualbox/debian/sun_vbox.asc -O- | sudo apt-key add -


The key fingerprint is:

AF45 1228 01DA D613 29EF 9570 DCF9 F87B 6DFB CBAE
Sun Microsystems, Inc. (xVM VirtualBox archive signing key)<info@virtualbox.org>

Then to install VirtualBox, open your terminal and input the following command :


 $ sudo apt-get update
 $ sudo apt-get install virtualbox-3.1


You might want to compare the MD5 SUMS to verify the integrity of downloaded packages.

Note: Ubuntu users might want to install the dkms package (not available on Debian) to ensure that the VirtualBox host kernel modules (vboxdrv, vboxnetflt and vboxnetadp) are properly updated if the linux kernel version changes during the next apt-get upgrade.
The dkms package can be installed through the Synaptic Package manager or through the following command:


 $ sudo apt-get install dkms


Note: about VirtualBox 3.2.0 Beta2:

VirtualBox 3.2 beta 2 is not available in this repository so if you want to download Beta 2, you can do it manually from HERE.
VirtualBox 3.2 Beta 2 comes with support for MacOS X, meaning you can install the original MacOS X in your Linux or Windows VirtualBox.

What's New: May 18, 2010 VirtualBox 3.2.0 released!


"May 18, 2010. The VirtualBox team today released a significant new version of Oracle VM VirtualBox(TM), its high performance, cross-platform virtualization software.
VirtualBox 3.2, the first Oracle branded release since the acquisition of Sun Microsystems, Inc by Oracle Corp. earlier this year, contains many innovative new features which deliver further significant improvements in performance, power and supported guest operating system platforms." Read more ... →  追記:by Baian, on Fri May/21/2010
References

Download and Installation:
Documentation:

2010-05-14

List of Linux distributions

数え切れないほどの OS が世界中にありますネ。
Linux の世界だけでも、こんなにあるの・・・!!
Japanese Distro の Vine Linux がリストアップされているのは喜ばしい限りデス・・・でも Momonga は見あたらない・・・

List of Linux distributions
From Wikipedia, the free encyclopedia

This page provides general information about notable Linux distributions in the form of a categorized list.
Distributions are organized into sections by the major distribution they are based on, or the package management system they are based around.


ScreenShot: List of Linux distributions

External links


2010-05-13

「Ruby on 松江ラーメン・キュービックシリーズ」発売、売り上げの一部で Ruby 支援

Ruby on 松江ラーメン・キュービックシリーズ
引用:松江市の食品会社が「Rubyラーメン」発売、売り上げの一部で Ruby 支援 :
ITPro - オープンソース/Linux ニュース 2010/05/12

松江市の食品会社である中隆(なかたか)は2010年5月12日、パッケージにプログラミング言語Rubyのロゴを配した「Ruby on 松江ラーメン・キュービックシリーズ」を発売した。売り上げの一部を Rubyアソシエーション に寄付し、Ruby の普及を支援する。

中隆 は麺類を中心に食品製造を手がけている。「Ruby on 松江ラーメン」は、地元の食材である しじみ をスープに使用している。

「Ruby on 松江ラーメン」は、同社が運営する「めんぐるめYahoo!ショッピング店」および Amazon を通じインターネットで販売する。

同社のWebサイトは、 Ruby製のオープンソースHTML生成ツール nanoc を利用して作成している。サーバーとして GoogleApp Engine を利用している。


ご当地 しじみラーメン ためしてみたいなw ・・・ ワンパック@500円也 

宍道湖のしじみの秘密-宍道湖のおいしい大和しじみ【彩湖漁業】

宍道湖のしじみ

宍道湖のしじみは、大和しじみという種類です。大和しじみは、汽水湖で育ちます。
淡水で育つしじみは「真シジミ」、琵琶湖で育つしじみは「セタシジミ」、汽水湖で育つしじみは「大和しじみ」と、水質によって育つしじみは違います。

しじみと言えば、宍道湖のしじみ。全国約48%の漁獲量を誇る宍道湖は、「宍道湖しじみ」ブランドで有名です。

宍道湖には、しじみだけでなく、「宍道湖七珍」といって、七つもの珍味が一つの湖にある豊かな湖です。
豊富な魚介類に、おいしい大和しじみ!宍道湖のしじみが有名なのは、その湖に秘密があります。

汽水湖とは、淡水と海水が混じりあった湖です。海と淡水が交わる湖がないと汽水湖はできません。
宍道湖は、斐伊川の淡水と日本海の海水が混ざった汽水湖です。
宍道湖は、もう一つの汽水湖である中海とつながっており、この2つの汽水湖をあわせた大きさは、汽水域としては、日本で最大となります。自然の条件が偶然にも合致してできた汽水湖が2つつながっている、 まさに自然の恩恵を受けた湖。それが宍道湖です。

関連リンク:
日本シジミ研究所
松江市ホームページ : 松江市ホームページはプログラム言語「Ruby」により構築されています。

2010-05-06

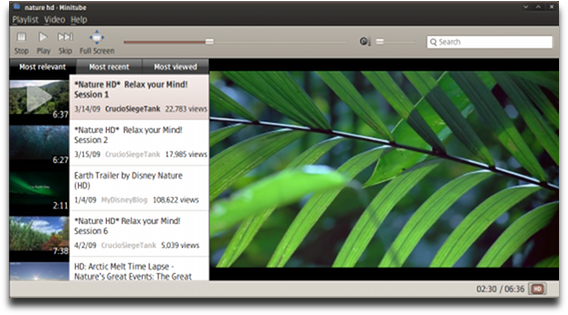
Minitube 1.0 was Released, So what is Minitube?

Minitube 1.0 was released on Tue 04 May, 2010. So what is Minitube?

Minitube is a native YouTube client for Windows, Linux and Mac OS X. With it you can watch YouTube videos in a new way: you type a keyword, Minitube gives you an endless video stream. Minitube does not require the Flash Player.

Minitube 1.0 Released - Play YouTube Videos Without Flash [Ubuntu .deb Download]: Posted by Andrew | 05 May, 2010

minitube 1.0 ubuntu
Photo-01: Screnshot of Minitube 1.0  http://flavio.tordini.org/minitube
Minitube is not about cloning the original YouTube web interface, it aims to create a new TV-like experience.

Version 1.0 finally brings Full HD (1080p) video support, as well as other minor new features such as the ability to copy the YouTube link and the video stream URL to the clipboard.

Download
    Current version is 1.0, released on May 4, 2010. Here are the main changes since version 0.9:

  • Ability to play Full HD (1080p) videos
  • Ability to copy the YouTube link and the video stream URL to the clipboard
  • Fixed videos failing to play
  • Fixed missing caret in the search box
  • Better toolbar and icon theme integration on Linux with Qt >= 4.6
  • Completely removed tooltips
  • Romanian translation by Ovidiu Niţan
  • Greek translation by Giorgos Skettos
  • Dutch translation by Brian Keetman
  • Arabic translation by Sderawi
  • Portuguese translation by Daniel Rodrigues
  • Finnish translation by Jesse Jaara
  • Bulgarian translation by Tsvyatko Makazchiev
Full version history

Minitube comes with an Ubuntu PPA, but unfortunately version 1.0 has not been added to the PPA. However, you can download a .deb file provided by Linux Freedom For Live.

For more info on Minitube 1.0, source file and MacOS X Downloads (Windows builds are not yet ready), visit the Minitube page.

To download and install Minitube 1.0 in Ubuntu, run the following commands in a terminal:

$ wget https://sourceforge.net/projects/linuxfreedomfor/files/Minitube/minitube_1.0_all.deb/download
$ sudo dpkg -i minitube_1.0_all.deb
$ sudo apt-get install -f  #this installs the missing dependencies
$ sudo apt-get install phonon-backend-gstreamer gstreamer0.10-ffmpeg gstreamer0.10-plugins-bad #just in case
  ※ パッケージの依存関係がまだ不安定らしいので,最後の1行を忘れないほうがよい。

Alternatively, you can manually download the .deb from HERE.

Sourcecode: http://flavio.tordini.org/files/minitube/minitube-1.0.tar.gz.
You’re free to build Minitube by yourself, modify it and redistribute it according to the GNU General Public License.

Update: I replaced the download link for the .deb created by Linux Freedom For Live with new packages for Karmic and Lucid created by launchpad (I only uploaded them and used the original Minitube packaging for 0.9) so it should now work for everybody.
And don't forget to also check out Minitunes, another project by Flavio Tordini (the developer of Minitube), which we wrote about 2 weeks ago.


2010年5月6日 LinuxでYouTubeを楽しむならコイツがオススメ! "Minitube 1.0"登場 ── Linux Daily Topics:
"Appleが意地でもiPhone/iPadでのFlashサポートを拒否している件,さすがのAdobeも怒り心頭で,このままだと訴訟にまで発展しかねない状態だが,たしかにFlashってメモリ足りなめなマシンにはちょっと重たいなあ…と感じるときがなきにしもあらず。"