Loading...

2010-05-31

Linux Mint 8 "Helena" Xfce CE on My DynaBook Satellite 1800 SA10AP/4

良品在庫の 60GB 2.5inch Hard Drive (UATA) を My legacy notebook PC: Toshiba DynaBook Satellite 1800 SA10AP/4 に換装して、Linux Mint 8 "Helena" Xfce Community Edition をインストールする。軽量かつエレガンスなエディションらしい。
今は昔、2002年1月発売のモデルだが、埃を払ってオーバーホールメンテナンス。CPU は Pentium III 1.0GHz だ。メモリを 512MB フル実装して試用する。
光学ドライブは DVD Super Multi, MATSHITA UJ-850S(OEM バルク品)に換装。Secondary Master として認識させるために小改造済み(コネクタ PIN47-45 をハンダ付けで短絡させる)。
USB2.0 拡張カードとして、ツライチ USB2.0/SD-CBU2-Z1 を調達して装着する。これには、USB フラッシュメモリやハードディスク、光学ドライブなどの外部ストレージデバイスや USB ハブ、プリンタなどを接続する。補助電源供給ケーブル付きだ。ツライチ仕様:挿入したカードがスッポリと搭載できて、出っ張らずジャマにならないという代物。
残念ながら、このマシンは BIOS が対応していないので、USB Device からのシステムブートはできない。
[表-1] に My DynaBook Satellite 1800 SA10AP/4 のハードウェア仕様概要をまとめてみた。

[表-1] Satellite 1800 SA10AP/4 のハードウェア仕様概要(換装済)
CPU Intel Pentium III(Coppermine) 1.0GHz
Chip Set Trident Cyber ALADDiN-T + ALi M1535B
Ext. Memory SODIMM SDRAM(PC133) 256MBx2=512MB, SUMSUNG
Video Graphics Trident Microsystem CyberBlade XP/Ai1
Display TFT 14.1 inch, 1024x768 pixels
Hard Drive ATA66 60GB, SAMSUNG HM060HC
Optical Drive DVD SuperMulti drive, MATSHITA UJ-850S
LAN Intel Ethernet Pro 100
Audio Adapter ALI 5451 PCI AC-Link Controller Audio Device
PC Card Slot TYPE II×2 or TYPE III×1 (PC Card Standard, CardBus 32bit)
CardBus bridge Toshiba America Info Systems ToPIC100 PCI to Cardbus Bridge with ZV Support
ALi Corporation M5229 IDE Primary, Secondary, Master-channel
Universal Serial Bus ALi USB 1.1 Controller, 2-Port
ISA bridge M1533/M1535/M1543 PCI to ISA Bridge [Aladdin IV/V/V+]
USB2.0 PC Card Cardbus, AREA SD-CBUZ2-Z1, Chip: NEC μPD720101

[参考] ハードディスク換装の手引き:写真で見てわかる内蔵ハードディスク取り付け講座 ノートPC用 for TOSHIBA DynaBoook Satellite
   光学ドライブの換装:CD-ROM交換したいんです!

※註:内蔵ドライブの換装作業はパソコンの分解行為に該当するので、これを行うとベンダー・メーカーの保証は一切受けられなくなります。あくまでもユーザーの皆さんの自己責任のもとで作業を行ってください。どうか、ご安全に!

■ Linux Mint 8 "Helena" Xfce Community Edition について

Linux Mint 8 Xfce の紹介 :
Xubuntu 9.10 Karmic Koala, Linux 2.6.31, Xfce 4.6.1 and Xorg 7.4 をベースとして、Linux Mint 8 "Helena" Xfce CE ではたくさんの改善がなされていて、オープンソースの世界で最新のソフトウェアを取り入れています。

Linux Mint 8 Xfce の新機能や改善点の詳細については、“What’s new in Helena Xfce?“ を参照してください。

システム要求項目について:
  • x86 processor
  • 256 MB of system memory (RAM)
  • 3 GB of disk space for installation
  • GA graphics card capable of 800×600 resolution
  • CD-ROM drive or USB port
既知のことがらについてのすべての情報を知りたければ "release notes"を読んでください。

Download Linux Mint 8 Xfce:
このエディションは the download page から HTTP および Torrent 経由でダウンロード可能です。


日本国内でのプライマリ・ミラーサイト:

1.ダウンロード:

OpenSolaris dev. build_134 が稼働する別のマシン上で、端末を開いて、$HOME のダウンロードディレクトリに移動して、

  $ cd ~/src-pkg
  $ wget -c http://ftp.riken.jp/pub/Linux/linuxmint/stable/8/LinuxMint-8-Xfce.iso
  $ md5sum LinuxMint-8-Xfce.iso
   68ae69dfd04262caa6b4bc930b694e58 LinuxMint-8-Xfce.iso
   Checksum Okey!

Brasero を起動して、メニューで "イメージの作成" を選択して、ISOイメージを CD-R(700MB) に焼く。
Windoz を立ち上げて、適当なアプリを利用して CR-R を焼いてもよいでせう。

2.インストール: 

2-1. Start-up Linux Mint 8 XFCE from LiveCD 
スタートアップ:

マシンの電源を入れて、POST 直後に "F12" キーを押下してブートメニューを表示させる。
作成した Linux Mint 8 Xfce CE の CD-R ディスクを光学ドライブに装着して、[C] : CD-ROM ブート 。
[Esc] キーを押して Linux Mint 8 Xfce CE の起動メニューを表示させる。

先頭行:"Start Linux Mint Xfce CE" を選択して、[Enter] で LiveCD が起動する。
あるいはここで、インストールモード、LiveCD の完全性のチェック、メモリテストの実行、または、ローカルなハードドライブからの起動を選択できる。
Linux Mint の Splash 画面が表示されて、しばらくすると自動ログインして liveCD のデスクトップ画面が表示される。

Fig-01: Screenshot - Linux Mint 8 Xfce CE Desktop on LiveCD

2-2. Installation to the hard drive 

ハードドライブにインストール:
Desktop 上の "Install Linux Mint" アイコンをクリックして、インストールを開始する。
初期画面は "English" なので、左ペインの言語選択をスクロールして "日本語" を選択する。


Fig-02: Welcome to install dialogue on Mint 8 XFCE LveCD
Fig-03: ようこそ インストール 画面(日本語)

以降、"進む(F)" ボタンをクリックして、画面の指示に従ってインストール作業をすすめる。


パーティションの準備: Linux Mint 8 XFCE をインストールするため、Linux 用領域を確保する。Windoz XP 用に 20GiB、Linux Mint 8 Xfce CE 用に約 40GiB として分割。

# Linux Mint 8 XFCE 用のパーティションは、以下のとおりに設定した。
なお、Windows XP の C Drive は起動時に FAT32 でマウントされるように、/windows/C_drv として設定した。

/dev/sda1 /windows/C_drv  FAT32   Windoz XP +SP3  20GiB
/dev/sda2  Ext.Partition
/dev/sda5  /boot           EXT4   Linux Mint       128MB
/dev/sda6  /               EXT4   Linux Mint       25GiB
/dev/sda7  swap                   Linux swap      1024MB
/dev/sda8  /home           EXT4   Linux Mint     10.5GiB

3. Reboot the system:システム再起動。

Fig-04: Snapshot - Finished to 1nstall
システムの再起動に際して、表示されるメッセージに従って CD-R を排出させておく。

4. Boot from the hard drive. インストールしたハードディスクから起動する。
無事に起動した。あらかじめ設定しておいたユーザ名とパスワードでグラフィカル・ログインする。

Fig-05: Snapshot - Login Dialog on Linux Mint 8 Xfce

Linux Mint 8 Xfce CE のインストール直後の起動したデスクトップ画面は Fig-06.
  800x600 pixels.
Fig-06: Screenshot - Desktop and Welcome dialog appeared at first time.


5. Configuration of the Resolution for LCD Display. LCD 画面の調整。

Fig-07: Screenshot - Display Layout 800x600 pixels
このマシンに搭載されているビデオチップ "Trident CyberBlade XP/Ai1" は曲者なのだ。
インストール直後のデスクトップ画面は SVGA 800x600/60Hz 以外に変更することができない。システムが X-window を自動設定していて、/etc/X11 以下に xorg.conf がありませぬ。そこで、1024x768 の画面サイズを得るためには、Xorg.conf を作成して /etc/X11 以下に放り込んであげることが必要だ。

xorg.conf ファイルの作成:


# xorg.conf (X.Org X Window System server configuration file)
# /etc/X11/xorg.conf for Toshiba Satellite 1800 model SA10AP/4.
# Custom file by Michael Minn, modified by Baian on May/28/2010.
#
Section "InputDevice"
Identifier "Generic Keyboard"
Driver "kbd"
Option "XkbRules" "xorg"
Option "XkbModel" "jp106"
Option "XkbLayout" "jp"
EndSection

Section "InputDevice"
Identifier "Configured Mouse"
Driver "mouse"
Option "CorePointer"
Option "Device" "/dev/input/mice"
Option "Protoxol" "ImPS/2"
EndSection

Section "Device"
Identifier "Trident Microsystems CyberBladeXP/Ai1"
Driver "trident"
BusID "PCI:1:0:0"
Option "NoDDC"
EndSection

Section "Monitor"
Identifier "ToshLCD"
Option "DPMS"
HorizSync 30-71
VertRefresh 50-100
EndSection

Section "Screen"
Identifier "Default Screen"
Monitor "ToshLCD"
Device "Trident Microsystems CyberBlade XP/Ai1"
DefaultDepth 16

SubSection "Display"
Depth 16
Modes "1024x768"
EndSubSection

SubSection "Display"
Depth 24
Modes "1024x768"
EndSubSection

SubSection "Display"
Depth 16
Modes "800x600"
EndSubSection

SubSection "Display"
Depth 24
Modes "800x600"
EndSubSection
EndSection

Section "ServerLayout"
Identifier "Default Layout"
Screen "Default Screen"
InputDevice "Generic Keyboard"
InputDevice "Configured Mouse"
EndSection


いったんログアウトして、"Ctrl+Alt+[F2]" で仮想端末に切り替える。
ユーザ名・パスワードで仮想端末にログインする。

作成した xorg.conf ファイルを /etc/X11/xorg.conf として格納する。

  $ sudo cp /home/baian/src-pkg/xorg.conf /etc/X11/xorg.conf

ここで、システムを再起動する。

  $ sudo reboot

無事にグラフィカルログインして、所定のデスクトップ画面 1024x768 に設定できた。

Fig-08: Screenshot - Desktop 1024x768 applied xorg.conf
Fig-09: Screenshot - Config. for LCD Display


6. インストール後のシステム環境設定・整備:
 6-1. パッケージのリポジトリを更新し、必要に応じてパッケージをアップデートする。
 6-2. Ubuntu Japanese Team のリポジトリを追加して日本語環境を整える。
 6-3. $HOME 以下のディレクトリ、ファイルの整理、Shell、端末の環境整備。
 6-4. ネットワークの設定・調整、ブラウザ、メールクライアントの設定。
 6-5.
Desktop の環境整備。外観、フォントの設定。
 6-6. アプリケーションの追加インストール: mintinstall, synaptic, apt-get などで。
 6-7. 各種サーバの適宜導入・設定。
 6-8. その他
 

2010-05-27

PeaZip: Cross-platform file and archive manager

@SOURCEFORGE.JP Magazine - オープンソース
tar.gzやisoなど多彩な形式 に対応する圧縮/解凍ツール「PeaZip」:

"現在のPC環境において、なくてはならないソフトの1つが圧縮/展開ツールだ。
圧縮/展開ツールはアーカイバなどとも呼ばれ、代表的なものとして 7-Zip などが挙げられるほか、非常に多くのものが存在す る。しかし、圧縮形式にはたくさんの種類があり、特に解凍時には様々な圧縮形式に出会うことが多いため、普段利用する圧縮/解凍ツールは一 通りの圧縮形式をサポートするものが望ましい。"
about PeaZip

クロスプラットフォームのファイルアーカイブマネージャです。
スパンボリューム、圧縮、暗号化、認証の機能があります。
サポートしているフォーマットは、 7Z, 7-Zip sfx, ACE, ARJ, BZ2, CAB, CHM, CPIO, DEB, GZ, ISO, JAR, LHA/LZH, NSIS, OOo, PAQ/LPAQ, PEA, QUAD, RAR, RPM, split, TAR, Z, ZIP です。

Cross-platform file and archive manager.
Features volume spanning, compression, authenticated encryption.
Supports 7Z, 7-Zip sfx, ACE, ARJ, BZ2, CAB, CHM, CPIO, DEB, GZ, ISO, JAR, LHA/LZH, NSIS, OOo, PAQ/LPAQ, PEA, QUAD, RAR, RPM, split, TAR, Z, ZIP.

Install Howto: PeaZip のインストール方法
Instruction Howto: PeaZip の使い方


PeaZip」は豊富な圧縮形式に対応している点が特徴で、広く普及している zip 形式だけでなく、UNIX/Linux で多く使われる tar や gzip、bzip2 といった形式や arc/wrc 形式、paq /lpaq や split、quad/balz、upx といったマイナーなものもサポートしている。

また、展開については118もの拡張子をサポートしている(リスト1)

リスト1 PeaZipがサポートする圧縮形式(ファイル拡張子別)

7z、bz、bz2、bzip2、tbz2、tbz、gz、gzip、tgz、tpz、tar、zip、z01、smzip、arj、cab、
chm、chi、chq、chw、hxs、hxi、hxr、hxq、hxw、lit、cpio、deb、lzh、lha、rar、r01、
00、rpm、z、taz、tz、iso、jar、ear、war、lha、pet、pup、pak、pk3、pk4、slp、
xpi、wim、u3p、lzma86、lzma、udf、xar、dmg、hfs、part1、split、swm、tpz、
kmz、xz、txz、vhd、mslz、apm、mbr、fat、ntfs、exe、dll、sys、msi、msp、ods、ots、
odm、oth、oxt、odb、odf、odg、otg、odp、otp、odt、ott、gnm、doc、dot、xls、xlt、ppt、
pps、pot、docx、dotx、xlsx、xltx、swf、flv、quad、balz、zpaq、paq8f、paq8jd、paq8l、
paq8o、lpaq1、lpaq5、lpaq8、ace、arc、wrc、001、pea、cbz、cbr、cba、cb7、cbt

"もう1つの特徴は、Windows版だけでなくLinux版も用意されている点だ。WindowsとLinuxで、同じ圧縮/解凍の環境を整えられる。 Linux環境で使われる tar.gz 形式や deb 形式、cpio 形式などもサポートしており、Windows と Linux の両方を利用するユーザーにとっても PeaZip は重宝するだろう。"
PeaZip のダウンロードとインストール:@SourceForge.JP のダウンロードページ

2010-05-23

Replace a New Hard Drive for My Notebook PC - Dell Latitude D410

 My Mobile Notebook: Dell Latitude D410 の Hard Drive (160GB) がヘタレたので換装した。
最近巷では稀少になりつつあるらしい UATA(IDE) ドライブなのだが、バルク・新品をいつものショップで調達する。
今回は静粛性で定評のあるらしい、"WD Scorpio Blue Series" をチョイス。
 換装するにあたって、WDのサイトからお役立ち情報をゲットする。
Note: Photo quoted from WD


Western Digital ® WD1600BEVE

WD Scorpio Blue
Mobile Hard Drives
160 GB, 100 MB/s, 8 MB Cache, 5400 RPM
Specifications Capacity Interface RPM Avg. Seek Buffer Jumper Settings
WD1600BEVE 160 GB PATA 5400 12 ms 8 MB more info

  Technical, Warranty and Support Information

  WD製ハードドライブのバックアップ・フォーマットユーティリティや診断ソフト(無償提供):
ハードドライブの取り外し・取り付け方法については、Dell™ Latitude™ D410 サービスマニュアル を参照して実作業を行なう。

 Reference:

 Dell™ Latitude™ D410 サービスマニュアル
 ハードドライブ

 システムのインストール
  • Raw Format してから、パーティショニング: Windoz 用に 50GiB 、OpenSolaris 用に 100GiB に分割。
  • Data Lifeguard Diagnostic for DOS (Floppy) でハードドライブの診断。
  • Windoz XP SP3 のインストール: TrueImage でバックアップしておいたディスクイメージを復元。システム、アプリをアップデート。
  • OpenSolarisの新規インストール: dev. build_134 を LiveUSB 起動後に。 $HOME、/etc、のバックアップファイルを復元。環境設定、えとせとら ・・・・

2010-05-17

10+ mistakes Linux newbies make

builder ZDNet Japan Linux初心者がやってしまいがちな10+の過ち:

2010/05/17 07:00

"Linuxに慣れていないユーザーを支援できるよう、Linux初心者がおかしがちな過ちを紹介する。"

原文: TechRepublic 10+ mistakes Linux newbies make
Author: Jack Wallen
Date: May 6th, 2010

" Linuxを使い始めて間もない人は、初心者ゆえの過ちをおかしてしまいがちだ。しかし、そういった過ちを避けるための支援を行うことにより、彼らのストレスを大幅に軽減することができるのである。"


"You can make things a lot less frustrating for your new Linux users by helping them avoid these typical rookie mistakes."

" Linuxに慣れていないユーザーは、(誰でもそうであるが)たくさんの過ちをおかすものである。しかし、落とし穴になりそうなところが事前に分かっているのであれば、ストレスの原因を大幅に減らすことができるはずだ。筆者は以前、新米のLinux 管理者がおかしがちな過ちについての記事を執筆したことがあるものの、Linux デスクトップの初心者がおかしがちな過ちについては採り上げたことがなかった。そこで本記事では、Linux デスクトップの初心者にありがちな過ちを紹介する。"


"New desktop users can make plenty of mistakes (as can anyone). But knowing which mistakes to avoid, from the start, helps prevent a LOT of frustration. I’ve handled the topic of mistakes new Linux admins make, but never those of desktop users. Here are some of the most common Linux desktop mistakes I see new users make."

Note: This article is also available as a PDF download.(Require user's registration to TechRepublic)
Overview: You can make things a lot less frustrating for your new Linux users by helping them avoid these typical rookie mistakes."

#1:Windowsを使っていると思い込む
#2:exeファイルを実行しようとする
#3:初心者向きではないディストリビューションを選択する
#4:ソフトウェアを見つけられない
#5:OpenOffice.orgで作成したドキュメントを、デフォルトフォーマットのままで Microsoft Office ユーザーに送信する
#6:コマンドラインを避ける
#7:早々とあきらめる
#8:Windows と同様のディレクトリ階層が Linux にも存在すると考える
#9:アップデートを見送る
#10:root でログインする
#11:知らないうちに Pager 機能を使ってしまい、ウィンドウを見失う
#12:Linux だからという理由でセキュリティをなおざりにする
#13:他の過ちは?

1: Assuming they are using Windows
2: Trying to make exe files work
3: Choosing the wrong distribution
4: Not finding software
5: Sending OpenOffice documents to Microsoft Office users in the default format
6: Avoiding the command line
7: Giving up too quickly
8: Thinking the Windows directory hierarchy translates to Linux
9: Skipping updates
10: Logging in as root
11: Losing windows to the pager
12: Ignoring security because it’s Linux


Been there?
We have all fallen victim to these types of mistakes at one point or another. But you can avoid them, and you can help other new users avoid them as well. Let’s all help to make Linux a better experience! If you’ve encountered other big Linux mistakes, share them with other TechRepublic members.

2010-05-16

Linux Tips: How to add the Repository of VirtualBox 3.1.8 for Ubuntu 10.04 Lucid Lynx

引用・抜粋しまくりのパッチワークで、おそれいりヤス。後にまとめるための覚え書きノート・・・デス (Orz).

最新ニュースを追記しました。 by Baian on Fri May/21/2010,
New "May 18, 2010 VirtualBox 3.2.0 released!"

About VirtualBox: Oracle VM VirtualBox is a general-purpose full virtualizer for x86 hardware that originally created by German software company innotek GmbH, purchased by Sun Microsystems, and now developed by Oracle as part of its family of virtualization products.
It is installed on an existing host operating system; within this application, additional guest operating systems, each known as a Guest OS, can be loaded and run, each with its own virtual environment.
Targeted at server, desktop and embedded use, it is now the only professional-quality virtualization solution that is also Open Source Software.

1-1. Features of VirtualBox:

  • Modularity. VirtualBox has an extremely modular design with well-defined internal programming interfaces and a client/server design. This makes it easy to control it from several interfaces at once: for example, you can start a virtual machine in a typical virtual machine GUI and then control that machine from the command line, or possibly remotely. VirtualBox also comes with a full Software Development Kit: even though it is Open Source Software, you don't have to hack the source to write a new interface for VirtualBox.

  • Virtual machine descriptions in XML. The configuration settings of virtual machines are stored entirely in XML and are independent of the local machines. Virtual machine definitions can therefore easily be ported to other computers.

  • Guest Additions for Windows, Linux and Solaris. VirtualBox has special software that can be installed inside Windows, Linux and Solaris virtual machines to improve performance and make integration much more seamless. Among the features provided by these Guest Additions are mouse pointer integration and arbitrary screen solutions (e.g. by resizing the guest window). There are also guest additions for OS/2 with somewhat reduced functionality.

  • Shared folders. Like many other virtualization solutions, for easy data exchange between hosts and guests, VirtualBox allows for declaring certain host directories as "shared folders", which can then be accessed from within virtual machines.
A number of extra features are available with the full VirtualBox release only (see the "Editions" page for details):
  • Virtual USB Controllers. VirtualBox implements a virtual USB controller and allows you to connect arbitrary USB devices to your virtual machines without having to install device specific drivers on the host.

  • Remote Desktop Protocol. Unlike any other virtualization software, VirtualBox fully supports the standard Remote Desktop Protocol (RDP). A virtual machine can act as an RDP server, allowing you to "run" the virtual machine remotely on some thin client that merely displays the RDP data.

  • USB over RDP. With this unique feature, a virtual machine that acts as an RDP server can still access arbitrary USB devices that are connected on the RDP client. This way, a powerful server machine can virtualize a lot of thin clients that merely need to display RDP data and have USB devices plugged in.

1-2. Hardware Requirements:

  In order to run VirtualBox on your machine, you need the following:
  • Reasonably powerful x86 hardware. Any recent Intel or AMD processor should do.

  • Memory. Depending on what guest operating systems you want to run, you will need at least 512 MB of RAM (but probably more, and the more the better).
    Basically, you will need whatever your host operating system needs to run comfortably, plus the amount that the guest operating system needs.
    So, if you want to run Windows XP on Windows XP, you probably won't enjoy the experience much with less than 1 GB of RAM.
    If you want to try out Windows Vista in a guest, it will refuse to install if it is given less than 512 MB RAM, so you'll need that for the guest alone, plus the memory your operating system normally needs.

  • Hard disk space. While VirtualBox itself is very lean (a typical installation will only need about 30 MB of hard disk space), the virtual machines will require fairly huge files on disk to represent their own hard disk storage.
    So, to install Windows XP, for example, you will need a file that will easily grow to several GB in size.

  • A supported host operating system. Presently, we support Windows (primarily XP) and many Linux distributions on 32-bit hosts and on 64-bit hosts. Support for Mac OS X and Solaris and OpenSolaris appeared in 1.6.

  • A supported guest operating system. Besides the "user manual", up-to-date information is available at "Status: Guest OSes".
ScreenShot: "Status: Guest OSes"


2. Download and Install VirtualBox for Linux Hosts


Ubuntu 10.04 LTS (Lucid Lynx) Virtualbox
novelldesktop - 2009年12月28日

2-1. VirtualBox package for Ubuntu 10.04

VirtualBox には以下のように2種類のバージョンがあります。

VirtualBox(Non Free版)

個人や教育あるいは評価目的の製品の利用において無料です。

サードパーティのレポジトリや手動でダウンロードしたパッケージを利用した場合、アップグレード時に特別な操作が必要となる場合があります。

To run VirtualBox 3.1.8, you will need to install the VirtualBox package from the repository. Please choose the appropriate package for Ubuntu 10.04 Lucid Lynx.
Note: The package architecture has to match the Linux kernel architecture, that is, if you are running a 64-bit kernel, install the appropriate AMD64 package (it does not matter if you have an Intel or an AMD CPU). Mixed installations (e.g. Debian/Lenny ships an AMD64 kernel with 32-bit packages) are not supported. To install VirtualBox anyway you need to setup a 64-bit chroot environment.

VirtualBox Open Source Edition(OSE)

オープンソース版です。virtualbox-ose パッケージをインストールしてください。

After several years of intensive development, VirtualBox was released as Open Source in January 2007. innotek has chosen to release its VirtualBox source code under the GNU General Public License (GPL).
  • The VirtualBox Open Source Edition (OSE) is the one that has been released under the GPL and comes with complete source code. It is functionally equivalent to the full VirtualBox package, except for a few features that primarily target enterprise customers. This gives us a chance to generate revenue to fund further development of VirtualBox.
  VirtualBox OSE is also available from the Downloads page.

※ オープンソース版では、次の機能が利用できません。
  • Remote Desktop Protocol(RDP)サーバ機能
  • USBサポート
  • USB over RDP

2-2. How to add the repository for Ubuntu 10.04 "Lucid Lynx"

Add one of the following lines to your /etc/apt/sources.list:

 deb http://download.virtualbox.org/virtualbox/debian lucid non-free


The Sun public key for apt-secure can be downloaded here.
You can add this key with:


 $ sudo apt-key add sun_vbox.asc


or combine downloading and registering:


$ sudo add-apt-repository 'deb http://download.virtualbox.org/virtualbox/debian lucid non-free'
$ wget -q http://download.virtualbox.org/virtualbox/debian/sun_vbox.asc -O- | sudo apt-key add -


The key fingerprint is:

AF45 1228 01DA D613 29EF 9570 DCF9 F87B 6DFB CBAE
Sun Microsystems, Inc. (xVM VirtualBox archive signing key)<info@virtualbox.org>

Then to install VirtualBox, open your terminal and input the following command :


 $ sudo apt-get update
 $ sudo apt-get install virtualbox-3.1


You might want to compare the MD5 SUMS to verify the integrity of downloaded packages.

Note: Ubuntu users might want to install the dkms package (not available on Debian) to ensure that the VirtualBox host kernel modules (vboxdrv, vboxnetflt and vboxnetadp) are properly updated if the linux kernel version changes during the next apt-get upgrade.
The dkms package can be installed through the Synaptic Package manager or through the following command:


 $ sudo apt-get install dkms


Note: about VirtualBox 3.2.0 Beta2:

VirtualBox 3.2 beta 2 is not available in this repository so if you want to download Beta 2, you can do it manually from HERE.
VirtualBox 3.2 Beta 2 comes with support for MacOS X, meaning you can install the original MacOS X in your Linux or Windows VirtualBox.

What's New: May 18, 2010 VirtualBox 3.2.0 released!


"May 18, 2010. The VirtualBox team today released a significant new version of Oracle VM VirtualBox(TM), its high performance, cross-platform virtualization software.
VirtualBox 3.2, the first Oracle branded release since the acquisition of Sun Microsystems, Inc by Oracle Corp. earlier this year, contains many innovative new features which deliver further significant improvements in performance, power and supported guest operating system platforms." Read more ... →  追記:by Baian, on Fri May/21/2010
References

Download and Installation:
Documentation:

2010-05-14

List of Linux distributions

数え切れないほどの OS が世界中にありますネ。
Linux の世界だけでも、こんなにあるの・・・!!
Japanese Distro の Vine Linux がリストアップされているのは喜ばしい限りデス・・・でも Momonga は見あたらない・・・

List of Linux distributions
From Wikipedia, the free encyclopedia

This page provides general information about notable Linux distributions in the form of a categorized list.
Distributions are organized into sections by the major distribution they are based on, or the package management system they are based around.


ScreenShot: List of Linux distributions

External links


2010-05-13

「Ruby on 松江ラーメン・キュービックシリーズ」発売、売り上げの一部で Ruby 支援

Ruby on 松江ラーメン・キュービックシリーズ
引用:松江市の食品会社が「Rubyラーメン」発売、売り上げの一部で Ruby 支援 :
ITPro - オープンソース/Linux ニュース 2010/05/12

松江市の食品会社である中隆(なかたか)は2010年5月12日、パッケージにプログラミング言語Rubyのロゴを配した「Ruby on 松江ラーメン・キュービックシリーズ」を発売した。売り上げの一部を Rubyアソシエーション に寄付し、Ruby の普及を支援する。

中隆 は麺類を中心に食品製造を手がけている。「Ruby on 松江ラーメン」は、地元の食材である しじみ をスープに使用している。

「Ruby on 松江ラーメン」は、同社が運営する「めんぐるめYahoo!ショッピング店」および Amazon を通じインターネットで販売する。

同社のWebサイトは、 Ruby製のオープンソースHTML生成ツール nanoc を利用して作成している。サーバーとして GoogleApp Engine を利用している。


ご当地 しじみラーメン ためしてみたいなw ・・・ ワンパック@500円也 

宍道湖のしじみの秘密-宍道湖のおいしい大和しじみ【彩湖漁業】

宍道湖のしじみ

宍道湖のしじみは、大和しじみという種類です。大和しじみは、汽水湖で育ちます。
淡水で育つしじみは「真シジミ」、琵琶湖で育つしじみは「セタシジミ」、汽水湖で育つしじみは「大和しじみ」と、水質によって育つしじみは違います。

しじみと言えば、宍道湖のしじみ。全国約48%の漁獲量を誇る宍道湖は、「宍道湖しじみ」ブランドで有名です。

宍道湖には、しじみだけでなく、「宍道湖七珍」といって、七つもの珍味が一つの湖にある豊かな湖です。
豊富な魚介類に、おいしい大和しじみ!宍道湖のしじみが有名なのは、その湖に秘密があります。

汽水湖とは、淡水と海水が混じりあった湖です。海と淡水が交わる湖がないと汽水湖はできません。
宍道湖は、斐伊川の淡水と日本海の海水が混ざった汽水湖です。
宍道湖は、もう一つの汽水湖である中海とつながっており、この2つの汽水湖をあわせた大きさは、汽水域としては、日本で最大となります。自然の条件が偶然にも合致してできた汽水湖が2つつながっている、 まさに自然の恩恵を受けた湖。それが宍道湖です。

関連リンク:
日本シジミ研究所
松江市ホームページ : 松江市ホームページはプログラム言語「Ruby」により構築されています。

OpenSolaris Tips: Webmin Install Howto into OpenSolaris dev. b134

Webmin は GUI でシステムのの各種設定を行うツールだ。Webブラウザ上でユーザーアカウントの管理や Apache などのサーバの設定、RAID といったハードウェア設定などを行うことが可能になる。
Webmin は Perl で書かれた CGI プログラム群で構成されており、さまざまな OS で使用できる。

My Notebook に OpenSolaris dev. b134 をインストールして試用中なのだが、ここで Webmin をインストールしてみる。
Webmin はデフォルトではインストールされないが、IPS パッケージ・リポジトリ(ここでは /dev)にあるので、ここからインストールする。

Webmin is a web based system administration tool that provides a set of CGI files, Perl files, and a specialized web server for administer in various system facilities and applications on the machine where the Webmin server is running.
Webmin consists of a main server daemon, CGI and Perl files to perform the operations, and configuration files to manage site-specific information.


Fig-01: webmin 1.340 ScreenShot on Opensolaris dev. b134
Lang=Japanese(JA_JP.UTF-8), Theme=MISC.Linux
画面上部に並ぶ7つのアイコンのいずれかをクリックすると、各カテゴリに属する詳細な設定項目が表示される。それぞれのカテゴリで設定できる内容は次のようなものだ。

カテゴリ
設定の内容
Webmin Webmin自身やユーザー用モジュール、Webminアクションログ、Webmin用のユーザーアカウントなど
システム ユーザーパスワードの変更やユーザーアカウントの作成/削除/編集、システムログの表示、 ソフトウェアパッケージのインストール/アンインストールなど
サーバ Apacheやインターネットサービス、Postfix、ProFTPD、Samba、PostgreSQL、DNS、Squidなど
ネットワーク ファイアウォール、NFS共有、ネットワーク設定、など
ハードウェア ネットワークインターフェイス、ディスクのパーティション、GRUBブートローダ、システム時間 など
Cluster クラスタに関する各種設定など
その他 Perlモジュールの管理やコマンドシェルの実行、ファイルマネージャの実行など

ここに挙げたのは、Webminで設定可能な項目の一部分である。設定可能な項目の詳細については、実際にWebminを操作して確認されたい。
System Environment:

試用中のシステム環境について:
  • Platform:
  • Toshiba Satellite J50 173L/5X: Intel Pentium M740, Intel 915GM, RAM 2048MB(533MHz), HDD 80GiB, LAN Marvell 88E8053 PCI-E Giga-Ethernet.
  • Operating System:
  • $ uname -a
    SunOS satellite 5.11 snv_134 i86pc i386 i86pc Solaris


■ Installation:
ここでは、インストールする際に必要な手順について説明する。
Here are the steps necessary to install it.

Webmin パッケージはデフォルトのリポジトリにあるので、インストールするには端末を起動して以下のコマンドを与える。
Webmin package exists in the default repository, so to install it, open a terminal and run:

$ pfexec pkg install -v system/management/webmin@1.340-0.134

インストール中の履歴は以下のとおり。

Solver: [ Variables: 1047 Clauses: 7174 Iterations: 1 State: Succeeded]
Timings: [phase 1:  2.156, phase 2:  1.013, phase 3:  8.364, phase 4:  0.000, phase 5:  0.000, phase 6:  0.000, phase 7:  0.066, phase 8:  2.097, phase 9:  0.000, phase 10:  1.688, phase 11:  0.088, phase 12:  0.289]

Maintained incorporations: 
pkg://opensolaris.org/consolidation/gfx/gfx-incorporation@0.5.11,5.11-0.134:20100302T010435Z
pkg://opensolaris.org/consolidation/man/man-incorporation@0.5.11,5.11-0.134:20100302T010603Z
pkg://opensolaris.org/consolidation/SunVTS/SunVTS-incorporation@0.5.11,5.11-0.134:20100302T010332Z
pkg://opensolaris.org/consolidation/ub_javavm/ub_javavm-incorporation@0.5.11,5.11-0.134:20100302T010731Z
pkg://opensolaris.org/consolidation/solaris_re/solaris_re-incorporation@0.5.11,5.11-0.134:20100302T010711Z
pkg://opensolaris.org/consolidation/gnome_l10n/gnome_l10n-incorporation@0.5.11,5.11-0.134:20100302T010458Z
pkg://opensolaris.org/consolidation/cacao/cacao-incorporation@0.5.11,5.11-0.134:20100302T010354Z
pkg://opensolaris.org/consolidation/jdmk/jdmk-incorporation@0.5.11,5.11-0.134:20100302T010540Z
pkg://opensolaris.org/consolidation/dbtg/dbtg-incorporation@0.5.11,5.11-0.134:20100302T010425Z
pkg://opensolaris.org/consolidation/ips/ips-incorporation@0.5.11,5.11-0.134:20100302T010530Z
pkg://opensolaris.org/consolidation/cde/cde-incorporation@0.5.11,5.11-0.134:20100302T010405Z
pkg://opensolaris.org/consolidation/osnet/osnet-incorporation@0.5.11,5.11-0.134:20100302T010625Z
pkg://opensolaris.org/consolidation/vpanels/vpanels-incorporation@0.5.11,5.11-0.134:20100302T010742Z
pkg://opensolaris.org/consolidation/l10n/l10n-incorporation@0.5.11,5.11-0.134:20100302T010551Z
pkg://opensolaris.org/consolidation/X/X-incorporation@0.5.11,5.11-0.134:20100302T010343Z
pkg://opensolaris.org/consolidation/sic_team/sic_team-incorporation@0.5.11,5.11-0.134:20100302T010650Z
pkg://opensolaris.org/consolidation/sunpro/sunpro-incorporation@0.5.11,5.11-0.134:20100302T010721Z
pkg://opensolaris.org/entire@0.5.11,5.11-0.134:20100302T023003Z
pkg://opensolaris.org/consolidation/cns/cns-incorporation@0.5.11,5.11-0.134:20100302T010415Z
pkg://opensolaris.org/consolidation/nspg/nspg-incorporation@0.5.11,5.11-0.134:20100302T010614Z
pkg://opensolaris.org/consolidation/install/install-incorporation@0.5.11,5.11-0.134:20100302T010520Z
pkg://opensolaris.org/consolidation/hcts/hcts-incorporation@0.5.11,5.11-0.134:20100302T010509Z
pkg://opensolaris.org/consolidation/gnome/gnome-incorporation@0.5.11,5.11-0.134:20100302T010446Z
pkg://opensolaris.org/consolidation/xvm/xvm-incorporation@0.5.11,5.11-0.134:20100302T010752Z
pkg://opensolaris.org/consolidation/sfw/sfw-incorporation@0.5.11,5.11-0.134:20100302T010637Z

Package version changes:
None -> pkg://opensolaris.org/system/management/webmin@1.340,5.11-0.134:20100302T064827Z

Actuators:
restart_fmri: svc:/system/manifest-import:default
reboot-needed: false

DOWNLOAD                                  PKGS       FILES    XFER (MB)
Completed                                  1/1 15924/15924    16.3/16.3 

PHASE                                        ACTIONS
インストールフェイズ          17573/17573 


■ インストール後のいくつかの設定手順について:

1. Run the setup utility:

端末を開いて、以下のコマンドを与えて "セットアップユーティリティ" を起動する。
ウエブサーバーポートはデフォルト値:10000 として受諾する。
It only requested one input, web server port, and I just accepted the default of 10000:

$ pfexec /usr/sfw/lib/webmin/setup.sh

セットアップユーティリティ起動後のスクリプト:ウエブサーバーポートをデフォルト値 10000 で受諾すると、ログインユーザとパスワードを入力する間もなく進捗してゆく。

***********************************************************************
*            Welcome to the Webmin setup script, version 1.340        *
***********************************************************************
Webmin is a web-based interface that allows Unix-like operating
systems and common Unix services to be easily administered.

Installing Webmin in /usr/sfw/lib/webmin ... # Webmin のインストールディレクトリ

***********************************************************************
Webmin uses separate directories for configuration files and log files.
Unless you want to run multiple versions of Webmin at the same time
you can just accept the defaults.

# Webmin の設定ファイルの置かれるディレクトリと ログファイルの置かれるディレクトリ: 

Config file directory [/etc/webmin]: Log file directory [/var/webmin]: 

***********************************************************************
Webmin is written entirely in Perl. Please enter the full path to the
Perl 5 interpreter on your system.

Testing Perl ...
Perl seems to be installed ok

***********************************************************************
Operating system name:    Sun Solaris
Operating system version: 11

***********************************************************************
Webmin uses its own password protected web server to provide access
to the administration programs. The setup script needs to know :
 - What port to run the web server on. There must not be another
   web server already using this port.
 - The login name required to access the web server.
 - The password required to access the web server.
 - If the webserver should use SSL (if your system supports it).
 - Whether to start webmin at boot time.

Web server port (default 10000): # ウェブサーバーのポートはデフォルト値 10000 でOK.

# ログイン名とログインパスワードを入力する間がない。
Login name (default admin): Login password: ************************
Creating web server config files..
..done

Creating access control file..
..done

Creating start and stop scripts..
..done

Copying config files..

..done

Changing ownership and permissions ..
..done

Running postinstall scripts ..
..done

Attempting to start Webmin mini web server..
..done

***********************************************************************
Webmin has been installed and started successfully. Use your web
browser to go to

  http://localhost:10000/

and login with the user name and password you entered previously.


セットアップスクリプトの最後の文節にはちょっと困惑する。というのは、ユーザ名とパスワードを入力する暇がないのだ。
The last sentence of the setup script is a bit confusing, because it never did give me a chance to enter a name and password.

デフォルトでは、root として webmin にログインすることになる。けれども、OpenSolaris で root は role として定義づけられているので、root でのログインは失敗する。(この件ついては RBAC の理解を参照されたい。)

By default, you would log into webmin as root, however, since root is only defined as a role in OpenSolaris (see Understanding RBAC for more on this), this fails to work.
This is logged as bug 6780916 - No access to Webmin once IPS package installed in OpenSolaris 2008.05 or 2008.11 due to RBAC.

1-1. workaround:

幸いにも、簡便な回避策がある。
/etc/webmin/niniserv.users を編集して、ユーザID を付け加えるとよい。
Fortunately, there's an easy workaround. Edit /etc/webmin/miniserv.users and add your user id.

たとえば、以下のようにして、
For example, my file now looks like:

baian@satellite:~$ pfexec vi /etc/webmin/minuserv.users
______________________
    root:x:0
    baian:x:101
-----------------------

1-2. Change root to your user id.

root を ユーザID に変更する。

すなわち、 /etc/webmin/webmin.acl を編集するとよい。
Then edit /etc/webmin/webmin.acl.

ここには、root ユーザがアクセスする全てのモジュールを含むシングル(ロング)エントリーが存在する。
It has a single (long) entry containing all the modules to which the root user has access.

For example: 例として

baian@satellite:~$ pfexec vi /etc/webmin/webmin.acl


root: acl adsl-client apache at backup-config bandwidth bind8 bsdexports burner
↓ 
* change root to my user id.
↓
baian: acl adsl-client apache at backup-config bandwidth bind8 bsdexports burner cfengine change-user cluster-copy cluster-cron cluster-passwd cluster-shell cluster-software cluster-useradmin cluster-usermin cluster-webmin cpan cron custom dfsadmin dnsadmin dovecot exports fdisk fetchmail file filter firewall format frox fsdump grub heartbeat hpuxexports htaccess-htpasswd idmapd inetd init inittab ipfilter ipfw ipsec jabber krb5 ldap-client lilo lpadmin lvm mailboxes mailcap majordomo man mon mount mysql net nis openslp pam  passwd phpini postfix postgresql ppp-client pptp-client pptp-server procmail proc proftpd pserver qmailadmin quota raid rbac samba sarg sendmail sentry servers sgiexports shell shorewall smart-status smf software spam squid sshd status stunnel syslog syslog-ng telnet time tunnel updown useradmin usermin vgetty webalizer webminlog webmin wuftpd xinetd zones


1-3. Next, restart the service to pick up the changes:
次に、変更を確定させるために SMF で webmin サービスを再起動する。

baian@satellite:~$ pfexec svcadm restart webmin
baian@satellite:~$ svcs -v webmin
STATE          NSTATE        STIME    CTID   FMRI
online         -             16:03:34    117 svc:/application/management/webmin:default

1-4. Firefox Web Browser を起動して、Webmin にアクセス。
アドレスに http://localhost:10000/ を入力して、OpenSolaris にログインするときと同じユーザ名とパスワードで Webmin にログインする。

Then browse to http://localhost:10000 and log in using the same user name and password that you use the log into OpenSolaris.

もちろん、リモートでシステムを管理する必要がある場合など、ホストの IP アドレスやホスト名を使ってもよい。
Of course you could also use the IP address or host name, which you would need anyhow to administer your system remotely.

Fig-02: Webmin login using user name and password
Fig-03: Webmin 1.304 ScreenShot / default Lang and Theme
Fig-04: Webmin 1.304 ScreenShot change Lang and Theme

※ 注記: リモートアクセスの場合には、SSLログインが望ましい。(要・openssl のインストールと Webmin での設定)


baian@satellite:~$ pkg info openssl
          名前: library/security/openssl
          概要: OpenSSL - a Toolkit for Secure Sockets Layer (SSL v2/v3) and Transport Layer (TLS v1) protocols and general purpose cryptographic library
          説明: OpenSSL is a full-featured toolkit implementing the Secure
                  Sockets Layer (SSL v2/v3) and Transport Layer Security (TLS
                  v1) protocols as well as a full-strength general purpose
                  cryptography library.
      カテゴリ: System/Security
          状態: インストール済み
        発行元: opensolaris.org
    バージョン: 0.9.8.12
ビルドリリース: 5.11
          分岐: 0.134
パッケージ化の日付: 2010年03月02日 04時12分09秒
        サイズ: 9.75 MB
          FMRI: pkg://opensolaris.org/library/security/openssl@0.9.8.12,5.11-0.134:20100302T041209Z


Fig-05: Webmin 1.304 ScreenShot SSL Settings
Webminの画面を表示するには、Webブラウザを起動して、設定を行うPCのポート10000にSSLでアクセスする。

  https://localhost:10000   ローカルからアクセスする場合
  https://hostname:10000   ホスト名を入力してアクセスする場合
  https://192.168.0.2:10000   IPアドレスを入力してアクセスする場合
References:

  • Webmin 1.510 版がリリースされ、ダウンロード可能です。更新日:2010.3.10)


2010-05-11

The Oil Slick Morph Into Letter 'J', the Gulf of Mexico oil spill

メキシコ湾原油流出、海面や海底で目に見えない影響も
NASA has released a very clear shot of the Gulf of Mexico oil spill that was taken yesterday by their Terra Satellite:

NASA's Terra satellite passed over the Gulf of Mexico and the Deepwater Horizon oil slick on May 10 at 16:35 UTC (12:35 p.m. EDT) and captured a visible image with its Moderate Imaging Spectroradiometer Instrument.
The oil slick is located southeast of the Mississippi Delta and appears as a dull gray color, almost in the shape of the letter "J." Directly north of the spill is the Alabama/Mississippi border. The area of the gulf where the slick is situated was virtually cloud-free with the exception of some high clouds (lower left, white).

5月10日 16:35 UTC (12:35 p.m EDT)、NASA の Terra 衛星がメキシコ湾の海洋石油掘削基地「ディープウオーターホライズン(Deepwater Horizon)」の流出油の上空を通過して、受動型画像分光放射計(MODIS)を使って可視画像を撮影した。
流出した油膜は、ミシシッピデルタの南東に位置し、鈍い灰色の、ほとんど文字 'J' のような形として見えている。流出油の北端はアラバマ州/ミシシッピ州の境界線にさしかかっている。油膜が位置する湾のエリアは、いくつかの高雲(左下方、白色)を除いて、実質的に雲はなかった。

Text credit: Rob Gutro, NASA's Goddard Space Flight Center, Greenbelt, Md.
Photo by NASA, Terra Satellite captured.
May 10 at 16:35 UTC (12:35 p.m. EDT)
Image credit: NASA/Goddard/MODIS Rapid Response Team

About MODIS: http://modis.gsfc.nasa.gov/about/

MODIS (or Moderate Resolution Imaging Spectroradiometer) is a key instrument aboard the Terra (EOS AM) and Aqua (EOS PM) satellites.

Fig: About MODIS / NASA MODIS Web
http://modis.gsfc.nasa.gov/about/

2010-05-10

What's New in OpenSolaris 2010.03 (DRAFT)

※ これは、あくまでも Draft なのです。

What's New in OpenSolaris 2010.03 (DRAFT)
http://cr.opensolaris.org/~gman/opensolaris-whats-new-2010-03/

    1. Introduction
    2. What's New for Administrators
    3. What's New for Users
    4. What's New for Developers
    5. Internationalization
    6. New Packages


2010-05-08

Today's Browser Statistics about My Blog reported by StatCounter

Web Browser Statistics reported by StatCounter™ about My Blog,
on Sat May 08, 2010 18:23:06 JST(Tokyo)

Fig-01: Web Browser Statistics by StatCounter™

Netbook Sales Shrivel as Apple Rolls Out iPad

記事引用: ネットブック売上が激減:iPadの登場で(更新版):
"Netbook Sales Shrivel as Apple Rolls Out iPad"
 May 6,2010 by Brian X. Chen, WIRED VISION

"iPadの登場でネットブック売上成長率が激減している。この勢いでは、iPadはモバイル・コンピューターの市場全体を支配するかもしれない。"

アップル、iPadを5月28日に日本でも発売へ--5月10日にオンラインストアで予約販売

アップルは5月7日、iPadを5月28日に日本とオーストラリア、カナダ、フランス、ドイツ、イタリア、スペイン、スイス、英国の計9カ国で発売すると発表した。5月10日にアップルのオンラインストアで予約販売を開始する。


ビックカメラグループ、5月10日より店頭でiPadを予約受付

ビックカメラグループは5月7日、アップル「iPad」の予約受付を、5月10日に各店にて開始すると発表した。iPadは米国に続き、日本でも5月28日に発売される予定だ。

ソフトバンクモバイル、「iPad」を5月28日に発売――専用プランも発表

日本ではソフトバンクモバイルから「iPad」が発売される。同社は5月10日に一部のソフトバンクショップでiPadの予約受付を開始する。あわせて、iPadの本体価格と専用の料金プランも発表した。

Photo: Brian Derballa/ Wired.com
iPadはネットブックとして考えられてはいないが、市場ではネットブックの売上げをかなり喰っているようだ。
Morgan Stanley社アナリスト Katy Huberty氏は、iPadが発表された1月以来、ネットブックの売上げ成長率が劇的に落ち、実際の販売が始まった4月以降はさらに激減していることを示している。
Fortune社のPhilip Elmer-DeWitt氏も、iPadはネットブックの売上を飲み込んでいると結論している。


「(上にあげたグラフが示すように)ネットブック売上げ成長率のピークは昨年の夏だった。前年比で641%という驚くべき成長率だった」と Elmer-DeWitt氏は語る。「それが1月には激減し、4月にもさらに激減している」
グラフを見ると、ネットブックの売上げ成長率は2009年全体を通して減少傾向にあり、それが2010年にも引き継がれただけという見方もできるが、Huberty 氏は Morgan Stanley 社が3月に行なった調査結果もあげている。それは、iPadを買おうとする人の44%が、ネットブックやノートパソコンの代わりに iPad を買うつもりだと答えているというものだ。
軽量で10インチ画面、価格300ドルから600ドルというネットブックは、2008年にはホットなカテゴリーだった。その年には1000万台以上のネットブックが販売され、ABI Research 社は2013年までにはウルトラ・ポータブルデバイスの出荷は2億台にのぼるだろうと予測していた。この数字は現在のノートパソコン市場 の大きさだ。ウルトラ・ポータブルというカテゴリーはネットブックとタブレットの両方を含むが、現在の状況からすると、iPadはモバイルパソコン市場全体を支配する可能性がある。

米Apple社は最初から、ネットブックは「ジャンク」であるとして、これを作ることを拒否していた
iPadを発表したとき、Steve Jobs氏は、iPadはウェブ閲覧、電子メール、映画を見る等に優れていると誇り、ネットブックはこれらの性能が劣ると主張していた。
この売り込みはうまく行っているようだ。iPadはわずか1カ月で100万台売れているのだ。

[更新:本文の「売上げ」という表現を、「売上げ成長率」と変更しました]


2010-05-06

Minitube 1.0 was Released, So what is Minitube?

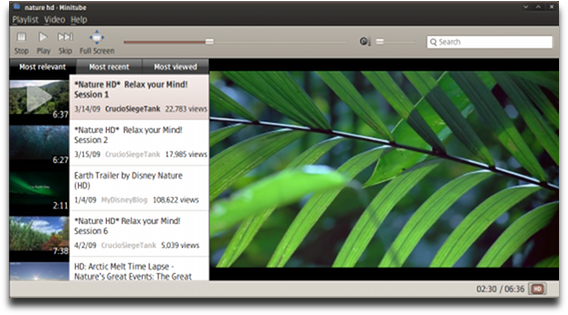
Minitube 1.0 was released on Tue 04 May, 2010. So what is Minitube?

Minitube is a native YouTube client for Windows, Linux and Mac OS X. With it you can watch YouTube videos in a new way: you type a keyword, Minitube gives you an endless video stream. Minitube does not require the Flash Player.

Minitube 1.0 Released - Play YouTube Videos Without Flash [Ubuntu .deb Download]: Posted by Andrew | 05 May, 2010

minitube 1.0 ubuntu
Photo-01: Screnshot of Minitube 1.0  http://flavio.tordini.org/minitube
Minitube is not about cloning the original YouTube web interface, it aims to create a new TV-like experience.

Version 1.0 finally brings Full HD (1080p) video support, as well as other minor new features such as the ability to copy the YouTube link and the video stream URL to the clipboard.

Download
    Current version is 1.0, released on May 4, 2010. Here are the main changes since version 0.9:

  • Ability to play Full HD (1080p) videos
  • Ability to copy the YouTube link and the video stream URL to the clipboard
  • Fixed videos failing to play
  • Fixed missing caret in the search box
  • Better toolbar and icon theme integration on Linux with Qt >= 4.6
  • Completely removed tooltips
  • Romanian translation by Ovidiu Niţan
  • Greek translation by Giorgos Skettos
  • Dutch translation by Brian Keetman
  • Arabic translation by Sderawi
  • Portuguese translation by Daniel Rodrigues
  • Finnish translation by Jesse Jaara
  • Bulgarian translation by Tsvyatko Makazchiev
Full version history

Minitube comes with an Ubuntu PPA, but unfortunately version 1.0 has not been added to the PPA. However, you can download a .deb file provided by Linux Freedom For Live.

For more info on Minitube 1.0, source file and MacOS X Downloads (Windows builds are not yet ready), visit the Minitube page.

To download and install Minitube 1.0 in Ubuntu, run the following commands in a terminal:

$ wget https://sourceforge.net/projects/linuxfreedomfor/files/Minitube/minitube_1.0_all.deb/download
$ sudo dpkg -i minitube_1.0_all.deb
$ sudo apt-get install -f  #this installs the missing dependencies
$ sudo apt-get install phonon-backend-gstreamer gstreamer0.10-ffmpeg gstreamer0.10-plugins-bad #just in case
  ※ パッケージの依存関係がまだ不安定らしいので,最後の1行を忘れないほうがよい。

Alternatively, you can manually download the .deb from HERE.

Sourcecode: http://flavio.tordini.org/files/minitube/minitube-1.0.tar.gz.
You’re free to build Minitube by yourself, modify it and redistribute it according to the GNU General Public License.

Update: I replaced the download link for the .deb created by Linux Freedom For Live with new packages for Karmic and Lucid created by launchpad (I only uploaded them and used the original Minitube packaging for 0.9) so it should now work for everybody.
And don't forget to also check out Minitunes, another project by Flavio Tordini (the developer of Minitube), which we wrote about 2 weeks ago.


2010年5月6日 LinuxでYouTubeを楽しむならコイツがオススメ! "Minitube 1.0"登場 ── Linux Daily Topics:
"Appleが意地でもiPhone/iPadでのFlashサポートを拒否している件,さすがのAdobeも怒り心頭で,このままだと訴訟にまで発展しかねない状態だが,たしかにFlashってメモリ足りなめなマシンにはちょっと重たいなあ…と感じるときがなきにしもあらず。"


2010-05-05

Ubuntu Tips: How To Disable IPv6 in Ubuntu 10.04

Ubuntu 10.04 Lucid Lynx 関連の小技をひとつ。

Reference: How To Disable IPv6 In Ubuntu 10.04 Lucid Lynx:
Posted by Andrew | 03 May, 2010

I'm not sure if IPv6 in Ubuntu 10.04 Lucid Lynx is still causing issues with the Internet connection being slow and so on, but in case it does here's how to disable it.


◆ Ipv6 はデフォルトで有効になっている。チェックするには、端末を起動して、次のコマンドを与えるとよい。
To check if IPv6 is disabled, run the following command:


 baian@lucid-lynx:~$
 cat /proc/sys/net/ipv6/conf/all/disable_ipv6
  0
  0 means it's enabled and 1 - disabled.

This tweak is thanks to an old comment from Stonecut (this way you don't have to edit the GRUB).

◆ 基本的に、Ubuntu 10.04 Lucid Lynx で IPv6 を無効にするためには、/etc/sysctl.conf を編集して、以下に記述した数行を追記するとよい。

Basically, to disable IPv6 in Ubuntu 10.04 Lucid Lynx, you have to add the following lines to /etc/sysctl.conf:


 baian@lucid-lynx:~$ sudo vi /etc/sysctl.conf

# To disable IPv6 in Ubuntu 10.04 Lucid Lynx,
# add the following lines; 
 net.ipv6.conf.all.disable_ipv6 = 1
 net.ipv6.conf.default.disable_ipv6 = 1
 net.ipv6.conf.lo.disable_ipv6 = 1
     ※ typo: Above command line; $ pfexec ; correction -->> $ sudo
        mod.date: Aug/22/2011 06:37 JST.   
◆ 上述の /etc/sysctl.conf の編集作業を コマンドラインで操作するには、端末を開いて以下のスクリプトをコピー&ペーストすればよい。
To do it from the command line, paste this in a terminal:

 baian@lucid-lynx:~$ 
 echo '#disable ipv6' | sudo tee -a /etc/sysctl.conf
 echo 'net.ipv6.conf.all.disable_ipv6 = 1' | sudo tee -a /etc/sysctl.conf
 echo 'net.ipv6.conf.default.disable_ipv6 = 1' | sudo tee -a /etc/sysctl.conf
 echo 'net.ipv6.conf.lo.disable_ipv6 = 1' | sudo tee -a /etc/sysctl.conf


◆ ここで一旦システムを再起動して、本稿のはじめに記述した IPv6 チェックコマンドを与えて、IPv6 が無効になっていることを確認する。
Then reboot and check if IPv6 has been disabled with the command in the beginning of the post.


 baian@lucid-lynx:~$
  cat /proc/sys/net/ipv6/conf/all/disable_ipv6
 1 
  ※ ここで、IPv6 は無効化された。(返り値= 1)
  0 means it's enabled and 1 - disabled.

If for some reason IPv6 still shows up as enabled in Ubuntu 10.04 Lucid Lynx, you can use the method described in THIS post.

This tweak (and others) will go into Ubuntu 10.04 Start script (I don't know why I didn't think of this before).

  • To disable the DNS by IPv6 with Firefox 3.6.3 on Ubuntu 10.04 Lucid Lynx
Ubuntu 10.04 をインストール直後の FireFoxのブラウジングが異様に遅い・・・DNSの名前解決がやたら遅い。
どうやらIPv6での接続を試みて、失敗するとIPv4の接続に切り替えているようだ。

◇ 回避策として、
  1. FireFox のアドレスバーに「about:config」と入力してエンター。
    「動作保証対象外になります」という警告ダイアログのあるページが表示されるので、設定を変更する場合は「細心の注意を払って使用する」ボタンをクリックする。
  2. 設定の一覧画面が表示される。フィルター(F) 窓に IPv6 と入力する。「network.dns.disableIPv6」という設定名が検索表示される。
  3. 表示された「network.dns.disableIPv6」という設定名をダブルクリックして、値を「True」に変更する。
    こうすることで、IPv6 での名前解決が無効となり、最初から IPv4 での名前解決を行うことになる。
  4. FireFox を再起動する。多少なりとも軽快になったようだ。・・・おまじないか・・・


これも参考まで:Ubuntu 日本語フォーラム【HowTo】Firefoxを高速化する設定