Loading...
Showing posts with label OpenSolaris Tips. Show all posts

2010-08-15

OpenSolaris Tips: CUPS - OpenSolaris Printing Howto on my Notebook PC


  My Notbook PC の OpenSolaris snv_134 な環境で、CUPS を動作させて、プリンタ出力する試み。

  ここから CUPS の設定方法の情報を得て、手持ちのプリンタを設定し、出力することができた。
  ↓
  Community Group printing: Documentation > Using CUPS in the Solaris OS:
  http://hub.opensolaris.org/bin/view/Community+Group+printing/Using+CUPS+in+the+Solaris+OS


  システム・ハードウェア環境:


  Environment:
   baian@saturn:~$ uname -a
   SunOS saturn 5.11 snv_134 i86pc i386 i86pc Solaris

  Platform:
   Dell Latitude D410: Intel Pentium M730(1.6GHz), Intel 915GM,
   LCD 12.1inch, SODIMM PC2-5300(533MHz) 2048MB, HDD 100GiB/160GiB
   NIC(Wired): Broadcom NetXtreme BCM5751 Gigabit Ethernet PCI Express
   NIC(Wireless): Intel PRO/Wireless 2200BG Network Connection (802.11b/g)


  # OpenSolaris 次期リリースでは、CUPS がデフォルトの print service になるそうだったのだが、混迷中?なので・・・


 設定手順

  Step-01: My Notbook PC の snv_134 な環境で、CUPS を動作させるに必要なパッケージのインストール:

  # インストール済みの関連パッケージは次のとおり。

  $ pkg list |grep cups

  library/desktop/gtk2/gtk-backend-cups       0.5.11-0.134   インストール済み -----
  library/print/cups-libs                     1.4.2-0.134   インストール済み -----
  library/python-2/pycups                    1.9.46-0.134   インストール済み -----
  print/cups                                  1.4.2-0.134   インストール済み -----
  print/cups/filter/foomatic-db          0.20080903-0.134   インストール済み -----
  print/cups/filter/foomatic-db-engine   0.20080903-0.134   インストール済み -----
  print/cups/hal-cups-utils                  0.6.19-0.134   インストール済み -----
  print/cups/system-config-printer           0.5.11-0.134   インストール済み -----

  $ pkg list |grep hplip

  print/filter/hplip                          3.9.8-0.134   インストール済み -----

  Step-02: アクティブなプリントサービスの確認(クエリ):

  # print-service -q
  active print service: lp ・・・ default で LP が動作中。
  (active print service: cups ・・・ CUPSが動作中。)

  Step-03: プリントサービスを CUPS に切り替える。※ 参照:man print-service(1M)

  # print-service -s cups

  # print-service -q
  active print service: cups   ・・・ # CUPS に切り替わった。


  Step-04: ここで、二つのSMFサービス/デーモンが有効になっていることを確認する。

  # svcs -v svc:/application/cups/scheduler
  # svcs -v svc:/application/cups/in-lpd


  Step-05: CUPS Web interface : http://localhost:631/ からアクセスして、手持ちプリンタの設定を完了させる。

Fig-01: CUPS Web Interface

  Step-06: テストプリントを出力。日本語表記部分が文字化け(豆腐)している。

             実際の日本語文書の出力は問題ない。

  Step-07: 利用可能なプリンタ名を一覧表示させる。

  $ lpstat -p

  プリンター Canon_LBP3800 は待機中です。2010年08月10日 18時39分41秒 以来有効です
  Ready to print.(Default Printer: 100BASE-TX I/F)
  プリンター Photosmart-C5200-series は 2010年08月10日 10時46分25秒 から無効です -
  Unplugged or turned off : Local USB 接続時に使用
  プリンター Photosmart_C5280_LAN は待機中です。2010年08月10日 11時03分34秒 以来有効です
  プリントの準備ができています : プリントサーバ(USB/100BASE-TX)経由、常用。

  # Default Printer: Canon LBP3800(LIPS IV) は GS で出力.

Fig-02: Default Printer: Canon LBP3800(LIPS Ⅳ)

"Dynamic Printer Detection":

CUPS uses the Hardware Abstraction Layer (HAL) to detect directly attached USB printers. For the detection of network printers, CUPS...
CUPS broadcasts the printers that are available on the local system to every system that is on the network.

"Printing to a Windows Hosted Printer From CUPS":

To print to a Windows hosted printer from CUPS, use the following command to create a print queue:

# lpadmin -p queue-name -v smb:~/~/windows-host/queue...

Or, access the CUPS Web interface: http://localhost:631/

The CUPS print service uses smbspool(1M) from Samba to communicate with the Windows SMB print server./print-service


"How to Add a New Attached Printer From the Desktop (GUI)":

Select "System" -> "Administration" -> "Print Manager" from the gnome menus

Fig-03: Print Manager from Gnome menus

Fig-04: Printer Property; Canon LBP3800(LAN-connection)


"Tasks That You Can Perform by Using CUPS":

Common tasks that you can perform by using the CUPS GUI or the Web interface include:
  • Adding a new USB attached printer
  • Adding a new network-attached printer
  • Modifying the properties of an existing print queue
  • Deleting a print queue


  Reference:

  CUPS:

  HPLIP:

  print-service:
  • The print-service command provides a mechanism for switching between LP and CUPS print services.
    Changing the active print service requires that it be run as the root user or a user with "Printer Management" privileges.
    For more information, see the print-service(1M) man page.


2010-05-13

OpenSolaris Tips: Webmin Install Howto into OpenSolaris dev. b134

Webmin は GUI でシステムのの各種設定を行うツールだ。Webブラウザ上でユーザーアカウントの管理や Apache などのサーバの設定、RAID といったハードウェア設定などを行うことが可能になる。
Webmin は Perl で書かれた CGI プログラム群で構成されており、さまざまな OS で使用できる。

My Notebook に OpenSolaris dev. b134 をインストールして試用中なのだが、ここで Webmin をインストールしてみる。
Webmin はデフォルトではインストールされないが、IPS パッケージ・リポジトリ(ここでは /dev)にあるので、ここからインストールする。

Webmin is a web based system administration tool that provides a set of CGI files, Perl files, and a specialized web server for administer in various system facilities and applications on the machine where the Webmin server is running.
Webmin consists of a main server daemon, CGI and Perl files to perform the operations, and configuration files to manage site-specific information.


Fig-01: webmin 1.340 ScreenShot on Opensolaris dev. b134
Lang=Japanese(JA_JP.UTF-8), Theme=MISC.Linux
画面上部に並ぶ7つのアイコンのいずれかをクリックすると、各カテゴリに属する詳細な設定項目が表示される。それぞれのカテゴリで設定できる内容は次のようなものだ。

カテゴリ
設定の内容
Webmin Webmin自身やユーザー用モジュール、Webminアクションログ、Webmin用のユーザーアカウントなど
システム ユーザーパスワードの変更やユーザーアカウントの作成/削除/編集、システムログの表示、 ソフトウェアパッケージのインストール/アンインストールなど
サーバ Apacheやインターネットサービス、Postfix、ProFTPD、Samba、PostgreSQL、DNS、Squidなど
ネットワーク ファイアウォール、NFS共有、ネットワーク設定、など
ハードウェア ネットワークインターフェイス、ディスクのパーティション、GRUBブートローダ、システム時間 など
Cluster クラスタに関する各種設定など
その他 Perlモジュールの管理やコマンドシェルの実行、ファイルマネージャの実行など

ここに挙げたのは、Webminで設定可能な項目の一部分である。設定可能な項目の詳細については、実際にWebminを操作して確認されたい。
System Environment:

試用中のシステム環境について:
  • Platform:
  • Toshiba Satellite J50 173L/5X: Intel Pentium M740, Intel 915GM, RAM 2048MB(533MHz), HDD 80GiB, LAN Marvell 88E8053 PCI-E Giga-Ethernet.
  • Operating System:
  • $ uname -a
    SunOS satellite 5.11 snv_134 i86pc i386 i86pc Solaris


■ Installation:
ここでは、インストールする際に必要な手順について説明する。
Here are the steps necessary to install it.

Webmin パッケージはデフォルトのリポジトリにあるので、インストールするには端末を起動して以下のコマンドを与える。
Webmin package exists in the default repository, so to install it, open a terminal and run:

$ pfexec pkg install -v system/management/webmin@1.340-0.134

インストール中の履歴は以下のとおり。

Solver: [ Variables: 1047 Clauses: 7174 Iterations: 1 State: Succeeded]
Timings: [phase 1:  2.156, phase 2:  1.013, phase 3:  8.364, phase 4:  0.000, phase 5:  0.000, phase 6:  0.000, phase 7:  0.066, phase 8:  2.097, phase 9:  0.000, phase 10:  1.688, phase 11:  0.088, phase 12:  0.289]

Maintained incorporations: 
pkg://opensolaris.org/consolidation/gfx/gfx-incorporation@0.5.11,5.11-0.134:20100302T010435Z
pkg://opensolaris.org/consolidation/man/man-incorporation@0.5.11,5.11-0.134:20100302T010603Z
pkg://opensolaris.org/consolidation/SunVTS/SunVTS-incorporation@0.5.11,5.11-0.134:20100302T010332Z
pkg://opensolaris.org/consolidation/ub_javavm/ub_javavm-incorporation@0.5.11,5.11-0.134:20100302T010731Z
pkg://opensolaris.org/consolidation/solaris_re/solaris_re-incorporation@0.5.11,5.11-0.134:20100302T010711Z
pkg://opensolaris.org/consolidation/gnome_l10n/gnome_l10n-incorporation@0.5.11,5.11-0.134:20100302T010458Z
pkg://opensolaris.org/consolidation/cacao/cacao-incorporation@0.5.11,5.11-0.134:20100302T010354Z
pkg://opensolaris.org/consolidation/jdmk/jdmk-incorporation@0.5.11,5.11-0.134:20100302T010540Z
pkg://opensolaris.org/consolidation/dbtg/dbtg-incorporation@0.5.11,5.11-0.134:20100302T010425Z
pkg://opensolaris.org/consolidation/ips/ips-incorporation@0.5.11,5.11-0.134:20100302T010530Z
pkg://opensolaris.org/consolidation/cde/cde-incorporation@0.5.11,5.11-0.134:20100302T010405Z
pkg://opensolaris.org/consolidation/osnet/osnet-incorporation@0.5.11,5.11-0.134:20100302T010625Z
pkg://opensolaris.org/consolidation/vpanels/vpanels-incorporation@0.5.11,5.11-0.134:20100302T010742Z
pkg://opensolaris.org/consolidation/l10n/l10n-incorporation@0.5.11,5.11-0.134:20100302T010551Z
pkg://opensolaris.org/consolidation/X/X-incorporation@0.5.11,5.11-0.134:20100302T010343Z
pkg://opensolaris.org/consolidation/sic_team/sic_team-incorporation@0.5.11,5.11-0.134:20100302T010650Z
pkg://opensolaris.org/consolidation/sunpro/sunpro-incorporation@0.5.11,5.11-0.134:20100302T010721Z
pkg://opensolaris.org/entire@0.5.11,5.11-0.134:20100302T023003Z
pkg://opensolaris.org/consolidation/cns/cns-incorporation@0.5.11,5.11-0.134:20100302T010415Z
pkg://opensolaris.org/consolidation/nspg/nspg-incorporation@0.5.11,5.11-0.134:20100302T010614Z
pkg://opensolaris.org/consolidation/install/install-incorporation@0.5.11,5.11-0.134:20100302T010520Z
pkg://opensolaris.org/consolidation/hcts/hcts-incorporation@0.5.11,5.11-0.134:20100302T010509Z
pkg://opensolaris.org/consolidation/gnome/gnome-incorporation@0.5.11,5.11-0.134:20100302T010446Z
pkg://opensolaris.org/consolidation/xvm/xvm-incorporation@0.5.11,5.11-0.134:20100302T010752Z
pkg://opensolaris.org/consolidation/sfw/sfw-incorporation@0.5.11,5.11-0.134:20100302T010637Z

Package version changes:
None -> pkg://opensolaris.org/system/management/webmin@1.340,5.11-0.134:20100302T064827Z

Actuators:
restart_fmri: svc:/system/manifest-import:default
reboot-needed: false

DOWNLOAD                                  PKGS       FILES    XFER (MB)
Completed                                  1/1 15924/15924    16.3/16.3 

PHASE                                        ACTIONS
インストールフェイズ          17573/17573 


■ インストール後のいくつかの設定手順について:

1. Run the setup utility:

端末を開いて、以下のコマンドを与えて "セットアップユーティリティ" を起動する。
ウエブサーバーポートはデフォルト値:10000 として受諾する。
It only requested one input, web server port, and I just accepted the default of 10000:

$ pfexec /usr/sfw/lib/webmin/setup.sh

セットアップユーティリティ起動後のスクリプト:ウエブサーバーポートをデフォルト値 10000 で受諾すると、ログインユーザとパスワードを入力する間もなく進捗してゆく。

***********************************************************************
*            Welcome to the Webmin setup script, version 1.340        *
***********************************************************************
Webmin is a web-based interface that allows Unix-like operating
systems and common Unix services to be easily administered.

Installing Webmin in /usr/sfw/lib/webmin ... # Webmin のインストールディレクトリ

***********************************************************************
Webmin uses separate directories for configuration files and log files.
Unless you want to run multiple versions of Webmin at the same time
you can just accept the defaults.

# Webmin の設定ファイルの置かれるディレクトリと ログファイルの置かれるディレクトリ: 

Config file directory [/etc/webmin]: Log file directory [/var/webmin]: 

***********************************************************************
Webmin is written entirely in Perl. Please enter the full path to the
Perl 5 interpreter on your system.

Testing Perl ...
Perl seems to be installed ok

***********************************************************************
Operating system name:    Sun Solaris
Operating system version: 11

***********************************************************************
Webmin uses its own password protected web server to provide access
to the administration programs. The setup script needs to know :
 - What port to run the web server on. There must not be another
   web server already using this port.
 - The login name required to access the web server.
 - The password required to access the web server.
 - If the webserver should use SSL (if your system supports it).
 - Whether to start webmin at boot time.

Web server port (default 10000): # ウェブサーバーのポートはデフォルト値 10000 でOK.

# ログイン名とログインパスワードを入力する間がない。
Login name (default admin): Login password: ************************
Creating web server config files..
..done

Creating access control file..
..done

Creating start and stop scripts..
..done

Copying config files..

..done

Changing ownership and permissions ..
..done

Running postinstall scripts ..
..done

Attempting to start Webmin mini web server..
..done

***********************************************************************
Webmin has been installed and started successfully. Use your web
browser to go to

  http://localhost:10000/

and login with the user name and password you entered previously.


セットアップスクリプトの最後の文節にはちょっと困惑する。というのは、ユーザ名とパスワードを入力する暇がないのだ。
The last sentence of the setup script is a bit confusing, because it never did give me a chance to enter a name and password.

デフォルトでは、root として webmin にログインすることになる。けれども、OpenSolaris で root は role として定義づけられているので、root でのログインは失敗する。(この件ついては RBAC の理解を参照されたい。)

By default, you would log into webmin as root, however, since root is only defined as a role in OpenSolaris (see Understanding RBAC for more on this), this fails to work.
This is logged as bug 6780916 - No access to Webmin once IPS package installed in OpenSolaris 2008.05 or 2008.11 due to RBAC.

1-1. workaround:

幸いにも、簡便な回避策がある。
/etc/webmin/niniserv.users を編集して、ユーザID を付け加えるとよい。
Fortunately, there's an easy workaround. Edit /etc/webmin/miniserv.users and add your user id.

たとえば、以下のようにして、
For example, my file now looks like:

baian@satellite:~$ pfexec vi /etc/webmin/minuserv.users
______________________
    root:x:0
    baian:x:101
-----------------------

1-2. Change root to your user id.

root を ユーザID に変更する。

すなわち、 /etc/webmin/webmin.acl を編集するとよい。
Then edit /etc/webmin/webmin.acl.

ここには、root ユーザがアクセスする全てのモジュールを含むシングル(ロング)エントリーが存在する。
It has a single (long) entry containing all the modules to which the root user has access.

For example: 例として

baian@satellite:~$ pfexec vi /etc/webmin/webmin.acl


root: acl adsl-client apache at backup-config bandwidth bind8 bsdexports burner
↓ 
* change root to my user id.
↓
baian: acl adsl-client apache at backup-config bandwidth bind8 bsdexports burner cfengine change-user cluster-copy cluster-cron cluster-passwd cluster-shell cluster-software cluster-useradmin cluster-usermin cluster-webmin cpan cron custom dfsadmin dnsadmin dovecot exports fdisk fetchmail file filter firewall format frox fsdump grub heartbeat hpuxexports htaccess-htpasswd idmapd inetd init inittab ipfilter ipfw ipsec jabber krb5 ldap-client lilo lpadmin lvm mailboxes mailcap majordomo man mon mount mysql net nis openslp pam  passwd phpini postfix postgresql ppp-client pptp-client pptp-server procmail proc proftpd pserver qmailadmin quota raid rbac samba sarg sendmail sentry servers sgiexports shell shorewall smart-status smf software spam squid sshd status stunnel syslog syslog-ng telnet time tunnel updown useradmin usermin vgetty webalizer webminlog webmin wuftpd xinetd zones


1-3. Next, restart the service to pick up the changes:
次に、変更を確定させるために SMF で webmin サービスを再起動する。

baian@satellite:~$ pfexec svcadm restart webmin
baian@satellite:~$ svcs -v webmin
STATE          NSTATE        STIME    CTID   FMRI
online         -             16:03:34    117 svc:/application/management/webmin:default

1-4. Firefox Web Browser を起動して、Webmin にアクセス。
アドレスに http://localhost:10000/ を入力して、OpenSolaris にログインするときと同じユーザ名とパスワードで Webmin にログインする。

Then browse to http://localhost:10000 and log in using the same user name and password that you use the log into OpenSolaris.

もちろん、リモートでシステムを管理する必要がある場合など、ホストの IP アドレスやホスト名を使ってもよい。
Of course you could also use the IP address or host name, which you would need anyhow to administer your system remotely.

Fig-02: Webmin login using user name and password
Fig-03: Webmin 1.304 ScreenShot / default Lang and Theme
Fig-04: Webmin 1.304 ScreenShot change Lang and Theme

※ 注記: リモートアクセスの場合には、SSLログインが望ましい。(要・openssl のインストールと Webmin での設定)


baian@satellite:~$ pkg info openssl
          名前: library/security/openssl
          概要: OpenSSL - a Toolkit for Secure Sockets Layer (SSL v2/v3) and Transport Layer (TLS v1) protocols and general purpose cryptographic library
          説明: OpenSSL is a full-featured toolkit implementing the Secure
                  Sockets Layer (SSL v2/v3) and Transport Layer Security (TLS
                  v1) protocols as well as a full-strength general purpose
                  cryptography library.
      カテゴリ: System/Security
          状態: インストール済み
        発行元: opensolaris.org
    バージョン: 0.9.8.12
ビルドリリース: 5.11
          分岐: 0.134
パッケージ化の日付: 2010年03月02日 04時12分09秒
        サイズ: 9.75 MB
          FMRI: pkg://opensolaris.org/library/security/openssl@0.9.8.12,5.11-0.134:20100302T041209Z


Fig-05: Webmin 1.304 ScreenShot SSL Settings
Webminの画面を表示するには、Webブラウザを起動して、設定を行うPCのポート10000にSSLでアクセスする。

  https://localhost:10000   ローカルからアクセスする場合
  https://hostname:10000   ホスト名を入力してアクセスする場合
  https://192.168.0.2:10000   IPアドレスを入力してアクセスする場合
References:

  • Webmin 1.510 版がリリースされ、ダウンロード可能です。更新日:2010.3.10)


2009-08-21

OpenSolaris 2009.06 pkg Repository Setting Howto

OpenSolaris pkg リポジトリについて


OpenSolaris 2009.06で使用できる主なリポジトリは以下の通り。新しいリポジトリを追加するには、パッケージマネージャのメニューバーの「設定」━→「リポジトリの管理」を使用するか、
 

コマンド行で pkg set-publisher を使用する。
      $ pfexec pkg set-publisher -O origin_uri publisher
 
* http://pkg.opensolaris.org/release/
新規 OpenSolarisユーザにとっての初期設定リポジトリになる。
このリポジトリには、オペレーティングシステムのリリース時点のパッケージのバージョンが含まれており、リリースされた製品内の重大な欠陥またはセキュリティー修正に対処するために必要な新しいバージョンのパッケージのみが含まれている。
サポート契約の要件: サポート契約は必要なし。
* http://pkg.opensolaris.org/dev 
このリポジトリには、開発中の OpenSolaris パッケージが含まれている。
次期バージョンの OpenSolaris 開発用のステージングリポジトリとなる。 開発サイクルに合わせて頻繁にアップデートされるので、最新の技術を評価することが可能である。 
サポート契約の要件: サポート契約は必要なし。
* http://pkg.opensolaris.org/contrib/
コミュニティの会員がバイナリ形式のソフトウエアを配布可能にするリポジトリである。また、将来 release リポジトリから配布される予定のバイナリの評価版なども置かれている。 
サポート契約の要件: サポート契約は必要なし。
* http://pkg.opensolaris.org/pending/ 
このリポジトリには、pkg.opensolaris.org/contrib リポジトリに公開する前に評価する必要があるパッケージが保持さる。このリポジトリに含まれるパッケージにはさらにテストが必要であり、一般に使用することは勧められない。
サポート契約の要件: サポート契約は必要なし。
* https://pkg.sun.com/opensolaris/extra
sun.com がホストする新しいリポジトリで、ライセンスのため再頒布できないソフトウェアを提供している。たとえば、VirtualBox や Firefox 用 Flash プラグインなどがある。
サポート契約の要件: サポート契約は必要ないが、特定のライセンス条件の受け入れが必要。ユーザーは、更新された証明書を自分のパッケージマネージャーに渡して承認を受けることにより、このリポジトリに無償でアクセスすることができる。
(方法については、次の『OpenSolaris extra リポジトリの利用方法』を参照のこと。 ↓)
* https://pkg.sun.com/opensolaris/support
このリポジトリは、リリースされた製品内の欠陥の検出および対処に基づいて、新しいバージョンのパッケージを使用して定期的に更新される。
*このリポジトリには、サポート契約と、アクセスのための SSL 証明書が必要である。
OpenSolaris extra リポジトリの利用方法
ユーザーは、更新された証明書を自分のパッケージマネージャーに渡して承認を受けることにより、このリポジトリに無償でアクセスできる。
手順
   1. キーと証明書をダウンロードするために http://pkg.sun.com/register/  にアクセスし、ログイン画面からログインする。 Sun のオンラインアカウントを取得済みの方は、ID とパスワードを入力する。 (ダウンロードセンター等と同じアカウントである。) もし、アカウントを持っていない場合は、こちらより登録(無料)されたい。

   2.OpenSolaris extra をチェックし、"Sunmit" ボタンをクリックする。
 
   3.ライセンス内容が表示されるので、内容を確認して "Decline" か "Accept" をクリックする。 ("Decline" した場合は、ここで終了。)
   4.証明書(OpenSolaris_extras.key.pem)とキー(OpenSolaris_extras.certificate.pem)をダウンロードし、指示に従い証明書をインストールする。
キーと証明書をダウンロードしたらターミナルを開いて下記のコマンドを実行する。
(キーと証明書は、$HOME/Desktopにダウンロードされているものとする。)


  $ pfexec mkdir -m 0755 -p /var/pkg/ssl
  $ pfexec chmod 755 /var/pkg/ssl
  $ pfexec cp -i ~/Desktop/OpenSolaris_extras.key.pem /var/pkg/ssl
  $ pfexec cp -i ~/Desktop/OpenSolaris_extras.certificate.pem /var/pkg/ssl


パッケージマネージャのリポジトリに extra を追加する。

  $ pfexec pkg set-publisher \
       -k /var/pkg/ssl/OpenSolaris_extras.key.pem \
       -c /var/pkg/ssl/OpenSolaris_extras.certificate.pem \
       -O https://pkg.sun.com/opensolaris/extra/ extra


pkg コマンドを使って extra の一覧を表示する。

  $ pkg list -a 'pkg://extra/*'
  NAME (PUBLISHER)                              VERSION         STATE      UFIX
  SUNWadmj (extra)                              0.5.11-0.111    known      ----
  SUNWjsnmp (extra)                             0.5.11-0.111    known      ----
  SUNWwbapi (extra)                             0.5.11-0.111    known      ----
  SUNWwbcou (extra)                             0.5.11-0.111    known      ----
  SUNWwbdev (extra)                             0.5.11-0.111    known      ----
  develop/java/javafx-sdk (extra)               1.2.0.233-0.111
known  ----
  service/compute/sungridengine (extra)         6.2.2-0.111     known      ----
  service/compute/sungridengine/arco (extra)    6.2.2-0.111     known      ----
  service/compute/sungridengine/domainmanager (extra) 6.2.2-0.111     known      ----
  system/font/truetype/ttf-fonts-core (extra)   1.0-0.111      
known  ----
  system/iiim/ja/atok (extra)                   17-0.111       
known  ----
  system/iiim/ja/wnn8 (extra)                   8-0.111         known      ----
  virtualbox (extra)                            3.0.4-0.101     known      ----
  virtualbox/kernel (extra)                     3.0.4-0.101     known      ----
  web/firefox/plugin/flash (extra)              10.0.22.87-0.111
known  ----


これで、パッケージマネージャからextraリポジトリを指定しパッケージをインストールすることができる。

On My OpenSolaris 2009.06, Repository Settings as follows:
$ pfexec pkg publisher
発行元                             タイプ 状態   URI
opensolaris.org          (優先)     起点   online   http://pkg.opensolaris.org/release/
extra                                 起点   online   https://pkg.sun.com/opensolaris/extra/
osol.contrib                          起点   online   http://pkg.opensolaris.org/contrib/

Reference:
   User Reference Manual : pkg(1)
   OpenSolaris 2009.06 miniBook (Japanese)
   OpenSolaris 2009.06 Image Packaging System ガイド - 第7章 リポジトリのキーと証明書の使用

2009-08-14

OpenSolaris Tips: Howto manage Static IP Wired Network on OpenSolaris 2009.06

OpenSolaris 2009.06上での 固定IP(有線LAN)/Network の設定メモ

動作環境: OpenSolaris 2009.06 Release
$ uname -a
SunOS satellite 5.11 snv_111b i86pc i386 i86pc

Platform: Toshiba dynabook Satellite J50 173L/5X,
CPU: Pentium M740 (1.73GHz), RAM 2048MB(533MHz), Graphics: Intel 915GM Express (128MB shared memory), LCD: 15inch 1440x1050 (24bit), HDD 40GB-osol/80GB SATA 5400rpm.
Wired LAN: Marvel 88E8053 PCI-Express GigaBit Ethertnet (internal)

1. nwamd - Network Auto-Magic Daemon
OpenSolaris 2008.05 以降では、デフォルト状態で nwamd - Network Auto-Magic Daemon - が起動していて、ネットワークの自動設定(無線LAN / 有線LAN / DHCP)が行われる。
ネットワークサービスは、サービス管理機能 smf によって次のサービス識別子で管理される。 svc:/network/physical

有効化、無効化、再起動の要求など、このサービスに関する管理作業は、svcadm コマンドを使用して実行することができる。 また、サービスの状態は、svcs コマンドを使用して照会することができる。
この デーモンが有効になっているかどうかを確認するには、コマンド行で次のコマンドを入力する。

baian@satellite:~$ pfexec svcs svc:/network/physical
STATE   STIME  FMRI
disabled 18:10:46 svc:/network/physical:default # 手動モード
online 18:10:50 svc:/network/physical:nwam # Auto-Magic モード

2つのインスタンスが、一方は無効 (disabled)、他方はオンライン (online) として表示される。nwam インスタンスがオンラインの場合、このデーモン(nwamd)が実行される。
2 つのインスタンスはネットワーク構成の 2 つのモードに対応している。default インスタンスは手動モード、nwam インスタンスは Auto-Magic モードである。

手動モードから Auto-Magic モードに切り替えるには、次のコマンドを実行する。
# svcadm disable svc:/network/physical:default
# svcadm enable svc:/network/physical:nwam

Auto-Magic モードから手動モードに切り替えるには、次のコマンドを実行する。
# svcadm enable svc:/network/physical:default
# svcadm disable svc:/network/physical:nwam

注意: このようにモードを切り替えると、すべてのネットワークインタフェースがいったんダウンしてから再度起動する。したがって、このプロセスで異なる IP アドレスが設定された場合、既存のアプリケーションやセッションは中断される可能性がある

2. nwamの停止
固定IPで稼働させるときには、nwam を停止させる必要がある。
まずは、Auto-Magic モードから手動モードに切り替える。
baian@satellite:~$ pfexec svcadm enable svc:/network/physical:default
baian@satellite:~$ pfexec svcadm disable svc:/network/physical:nwam

baian@satellite:~$ pfexec svcs svc:/network/physical
STATE STIME FMRI
disabled 18:16:19 svc:/network/physical:nwam
online 18:16:24 svc:/network/physical:default

3. 固定IP の設定
3-1. DHCPクライアントに設定
[システム]-[システム管理]-[ネットワーク] で、NIC を DHCPクライアントに設定する。


ひとまず、LAN内の他のマシンへ ping を打つことができるし、nslookup で DNSサーバ も引けるようになる。
しかし、nwam を disable にすると、Firefox も自力では名前解決ができないので、ウェブサイトの閲覧ができない。


3-2. ネットワークの基本的な設定
1. /etc/nsswitch.conf の準備 :名前解決できるように設定
nsswitch.conf は、名前解決の方法を定義しているファイルである。 dns で名前解決を行う雛形が用意されているので、それで上書きする。
# cp /etc/nsswitch.dns /etc/nsswitch.conf
# cat /etc/nsswitch.conf
passwd:     files
group:      files
hosts:      files dns
ipnodes:    files dns
networks: files
protocols: files
rpc: files
ethers: files
netmasks: files
bootparams: files
publickey: files# At present there isn't a 'files' backend for netgroup;  the system will
#   figure it out pretty quickly, and won't use netgroups at all.
netgroup:   files
automount:  files
aliases:    files
services:   files
printers: user files
auth_attr: filesprof_attr:  files
project:    files
tnrhtp:  files
tnrhdb:   files


2. /etc/hosts ( /etc/inet/hosts のシンボリックリンク)
名前解決をするときには、まずこのファイルを見る。
host name: satellite を /etc/hosts に追記する。
baian@satellite:~$ pfexec vi /etc/hosts 
27 ::1 localhost 
28 127.0.0.1 satellite.baian-inc.jp satellite localhost loghost


手動モード (default インスタンス) を再起動させる。

baian@satellite:~$ pfexec svcadm restart svc:/network/physical:default

baian@satellite:~$ ifconfig -a
lo0: flags=2001000849IPv4,VIRTUAL> mtu 8232 index 1
    inet 127.0.0.1 netmask ff000000
vboxnet0: flags=1004843DHCP,IPv4> mtu 1500 index 4
    inet 0.0.0.0 netmask ff000000
myk0: flags=1004843DHCP,IPv4> mtu 1500 index 5
    inet 192.168.1.2 netmask ffffff00 broadcast 192.168.1.255
lo0: flags=2002000849 mtu 8252 index 1
    inet6 ::1/128 
dladm コマンドを与えて、NIC の物理インタフェースのリンク状態をみる。
baian@satellite:~$ dladm show-link
LINK        CLASS    MTU    STATE    OVER
myk0        phys     1500   unknown  --
vboxnet0    phys     1500   unknown  --

baian@satellite:~$ dladm show-phys
LINK         MEDIA                STATE      SPEED  DUPLEX    DEVICE
myk0         Ethernet             unknown    100    full      myk0
vboxnet0     Ethernet             unknown    0      unknown   vboxnet0

有線LAN: myk0 は Full Duplex 100M でリンクアップしている。
----------------------------------------------------------------------
Reference:  man dladm(1M)  - administer data links - System Administration Commands

ひとまずこれで、一通りネットワーク(DHCPで) が使えるようになった。
Firefox を起動してみる。 正常に Web サイトが閲覧できた。


3-2. 固定IPへの移行
[システム]-[システム管理]-[ネットワーク] で、NIC に、固定IPを割り当てる。


4. Networking 関連各設定項目の定義付けされる場所 

IPアドレス(物理インタフェース)
baian@satellite:~$ cat /etc/hostname.myk0
192.168.1.2

ネットマスク
baian@satellite:~$ cat /etc/netmasks
192.168.1.0 255.255.255.0

デフォルト・ゲートウェイ
baian@satellite:~$ cat /etc/defaultrouter
192.168.1.1

ホスト名
baian@satellite:~$ cat /etc/nodename
satellite
※ hostname コマンドは、このファイルの内容を返す

ドメイン名およびDNSサーバ
baian@satellite:~$ cat /etc/resolv.conf
domain baian-inc.jp
nameserver 192.168.1.1

ホスト 
baian@satellite:~$ cat /etc/hosts
# ::1 localhost
127.0.0.1 localhost
192.168.1.2 satellite satellite.baian-inc.jp loghost

※ Open Solaris では、 /etc/hosts は、 /etc/inet/hosts のシンボリックリンクとなっている。
$ ls -l /etc/hosts
lrwxrwxrwx 1 root root 12 2009-08-11 18:58 /etc/hosts -> /etc/inet/hosts

/etc/inet/ipnodes は、 /etc/hosts のシンボリックリンクとなっている。

baian@satellite:~$ ls -l /etc/inet/ipnodes
lrwxrwxrwx 1 root root 7 2009-07-16 12:58 /etc/inet/ipnodes -> ./hosts


5. ネットワーク設定 を確認(ネットワークの状態を表示) するには、
baian@satellite:/etc/inet$ netstat -r
 

Routing Table: IPv4
  Destination           Gateway           Flags  Ref     Use     Interface
-------------------- -------------------- ----- ----- ---------- ---------
default                  setup.html           UG        1        110         
192.168.1.0        satellite.baian-inc.jp U         1       3  myk0    
192.168.56.0      192.168.56.1         U        1            0  vboxnet0
localhost               localhost              UH        1           6  lo0     

Routing Table: IPv6
  Destination/Mask            Gateway                   Flags Ref   Use    If 
--------------------------- --------------------------- ----- --- ------- -----
localhost                         localhost                        UH      1       0  lo0 


baian@satellite:~$ ifconfig -a

lo0: flags=2001000849 mtu 8232 index 1
    inet 127.0.0.1 netmask ff000000
myk0: flags=1000843 mtu 1500 index 2
    inet 192.168.1.2 netmask ffffff00 broadcast 192.168.1.255
vboxnet0: flags=1000843 mtu 1500 index 3
    inet 192.168.56.1 netmask ffffff00 broadcast 192.168.56.255
lo0: flags=2002000849 mtu 8252 index 1
    inet6 ::1/128


アクティブな有線ネットワークが接続されていることを示す「ネットワークモニター」アプレット


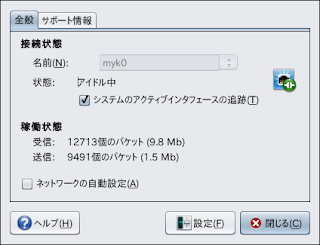
デスクトップパネルにデフォルトで表示される、「ネットワークモニター」アプレットは、複数のネットワーク接続を同時に監視する機能がある。 この機能は 固定IP ネットワークを設定している場合に役立つ。 このアイ コンは、ネットワークが現在データを送信または受信しているかどうかが示される。 

ネットワーク・デバイスの状態を表示する監視アプレット (gnome-netstatus-applet)  のプロパティ: 「ネットワークモニター」アプレット アイコンをマウス・右クリックして得られる。 下図参照。
本システムのアクティブ・ネットワークインタフェースは myk0 である。 ここで、前述の固定IP設定値が反映されて表示される。


参考: OpenSolaris 2009.06 入門/ ネットワーク接続のステータスの確認
     crossbow を自在に使いたいなら、nwam は disable だろ - 気になるもの。        
           OpenSolaris 固定IP
           man  nwamd(1M),   ifconfig(1M),  dladm(1M),   netstat(1M)

2009-07-23

OpenSolaris Tips: Firefox Howto coexist and execute several versions

複数のFirefoxをそのバージョン毎にプロファイルを分けてを共存させる方法についてのメモ。
その手順は次のとおり。多少手間はかかるものの、さほど面倒ではない。
最新版 Firefox 3.5.1 をデフォルトブラウザとする。

動作環境: opensolaris 2009.06: SunOS xxxxxx 5.11 snv_111b i86pc i386 i86pc Solaris
Platform: Dell Latitude D410, Pentium M730(1.6GHz), Intel 915GM, RAM 2048(533MHz) 40GB/160GB

 1. プレインストールされた Firefox 3.1beta3 の格納ディレクトリは /usr/lib/firefox である。
     
  起動は、$ firefox & (/usr/bin/firefox -> /usr/lib/firefox/firefox)

    Firefox の version は
    $ /usr/lib/firefox/firefox -version して、
    Mozilla Firefox 3.1b3, Copyright (c) 1998 - 2009 mozilla.org
            BuildID=20090313163841
            ID={ec8030f7-c20a-464f-9b0e-13a3a9e97384}
            [Gecko] MinVersion=1.9.1b3 MaxVersion=1.9.1b3

  この対象パッケージ SUNWfirefox を削除したいのだが、依存関係があり、単純に削除できないのが悩ましい。
   ただしこれは、デフォルトブラウザにせず、使わない。
   そこで、プレインストールされた Firefox 3.1beta3 の起動用シンボリックリンク /usr/bin/firefox のみ削除する。
   $ pfexec rm -f /usr/bin/firefox

 2.  Firefox プロファイルマネージャを起動。
   $ /usr/lib/firefox/firefox -ProfileManager & 
  Firefox 3.1b3 用プロファイルを "Deafult_31b" として新たに作成しておく。
  これを起動するときには、以下のコマンドを与える。
   $ /usr/lib/firefox/firefox -no-remote -P "Default_31b" & 

 3. これから新たにインストールする Firefox 3.5.1 で使うプロファイルは "default" とする。
 
 4. Firefox 3.5.1 を /usr/lib/firefox-3.5.1 ディレクトリにインストール。
   インストール方法については前述のとおり
   これをデフォルトブラウザにする。

   あらたに、起動ファイルのシンボリックリンクを作成する。
   $ pfexec ln -s /usr/lib/firefox-3.5.1/firefox /usr/bin/firefox

   $ /usr/lib/firefox-3.5.1/firefox -version
    Mozilla Firefox 3.5.1, Copyright (c) 1998 - 2009 mozilla.org
            BuildID=20090721014103
            ID={ec8030f7-c20a-464f-9b0e-13a3a9e97384}
            [Gecko] MinVersion=1.9.1.1  MaxVersion=1.9.1.1

 5. それぞれの Firefox を起動するランチャのコマンド欄(プログラムランチャ)には 

 5-1. デフォルト Firefox 3.5.1 の起動は
   $ firefox &             (普段はこちらで)または、
   $ firefox -no-remote -P "default" &    とする。

  Application → Internet → Firefox 3.5.1 メニュー項目を追加表示させる

   $ pfexec vi /usr/share/applications/firefox-3.5.1.desktop
     [Desktop Entry]
     Encoding=UTF-8
     Name=Firefox 3.5.1 Web Browser
     Name[ja]=Firefox 3.5.1 Web ブラウザ
     GenericName=Web Browser
     Comment=Browse the worldwide web
     Comment[ja]=インターネットのブラウズ
     Exec=/usr/bin/firefox %u
     TryExec=/usr/bin/firefox
     Icon=firefox-icon.xpm
     Terminal=false
     Type=Application
     StartupNotify=true
     Categories=Application;Network;X-Sun-Quick-Start;
     MimeType=text/html;text/xml;application/xhtml+xml;application/vnd.mozilla.xul+xml;text/mml;

  Firefox 3.5.1 のアイコンを /usr/share/pixmaps 以下にコピーしておく。
  $ pfexec cp -p /usr/lib/firefox-3.5.1/icons/mozicon50.xpm /usr/share/pixmaps/firefox-icon.xpm

 5-2. プレインストール版 Firefox を起動する場合には、
      $ /usr/lib/firefox/firefox -no-remote -P "Default_31b" &

  これで、それぞれの Firefox を共存させつつ、個別に、あるいは同時に起動することもできる。
  この方法は、OpenSolaris に限らず、他の OS: Linux, Windows などでも同様に適用できるはずである。

2009-07-22

OpenSolaris Tips: Howto reset your gnome desktop preferences with running "gnome-cleanup" command.

GNOMEの設定をリセットする方法: gnome-cleanup コマンドの実行

gnome-cleanup コマンドを実行すると、gnome-desktop に関するすべてのユーザ設定情報を削除する。GNOMEパネルやセッションマネージャキャプレット などで行ったすべての設定情報が削除される。
すなわち、Gnome Sessionがインストール直後のデフォルト状態に初期化されるので、nautilus file manager ほか Gnome Application の設定をはじめ、Gnome desktop 外観の設定:パネルやフォント、解像度などについても設定し直す必要がある。

gnome-cleanup erases all GNOME user preferences, returning the user to the default look and feel.  This can be used to undo undesired preference settings, or to correct the desktop if the preferences become corrupt.  The GNOME preference files are automatically recreated the next time the user logs  into a GNOME session.

By default this program erases the configuration files for the user running the command.
However, a different user can be specified on the command line. Of course, configuration files are only erased if the user running gnome-cleanup has appropriate file permissions to erase the user's configuration files.

gnome-cleanup will display a listing of all preference files that it will erase before erasing any files, and prompts the user to confirm that they would like to erase these files.
Files are erase only after receiving a positive confirmation from the user.

Procedure to reset your gnome desktop preferences.
1. logout from the current gnome session.
2. login with falesafe terminal session.
3. execute command as the following:
   $ gnome-cleanup

user currently has the following GNOME configuration files:
/export/home/hoge/.dbus
/export/home/hoge/.esd_auth
/export/home/hoge/.gconf
/export/home/hoge/.gconfd
/export/home/hoge/.gnome2
/export/home/hoge/.gnome2_private
/export/home/hoge/.gstreamer-0.10/registry.i386.bin
/export/home/hoge/.local/share
/export/home/hoge/.nautilus
/export/home/hoge/.thumbnails
/var/tmp/gconfd-hoge
/var/tmp/mapping-hoge
/var/tmp/gvfs-hoge*

Do you wish to remove these files (Y/N) Y

4. $ exit
5. Gnome session login with user "hoge" ; passwd "hogehoge"
   New gnome session will be restarted.

Remarks:
gnome-cleanup cannot be run while logged into a GNOME session.  Users should run this program when  logged into another session, for example, the Failsafe session. If the user tries to run this program while already logged into GNOME, an error message is displayed.

user : Specify the user whose configuration files will be erased. The files will only be erased if the user running gnome-cleanup has file permissions to erase the user's configuration files.  This is useful, for example, if you want to run the script as the root user to erase the configuration files for a specific user.  If user is not specified, the user is the same as the user who runs the gnome-cleanup command.

Reference:
man gnome-cleanup(1)


2009-07-20

OpenSolaris Tips: Create ISO Image file ripped from the opensolaris 2009.06 Live CD-ROM

# opensolaris 2009.06 の Live CD から iso Image ファイルを osol0906.iso として作成する。
-----------------------------------------------------------------
reference: $ man lofiadm
           $ which lofiadm    ;    /usr/sbin/lofiadm :
-----------------------------------------------------------------
Platform: Dell Latitude D410 with CDRW/DVD-ROM, Combo optical drive.

dd コマンドを利用する方法についてのメモ
Procedure to apply "dd" comand.

1. Live CD-ROM を Optical Drive に挿入する。
   Insert Live CD-ROM into your Optical Drive.

2. 下記のコマンドを与えて、Optical Dirive の Deviceディスクリプタを調べる。
   Search the device descripor for your Optical Drive to execute command as follows.

$ pfexec rmformat
デバイスを探しています...
     1. Logical Node: /dev/rdsk/c7t0d0p0
        Physical Node: /pci@0,0/pci1028,18f@1d,7/storage@1/disk@0,0
        Connected Device: SAMSUNG  CDRW/DVD SN-324S U306
        Device Type: DVD Reader
    Bus: USB
    Size: 687.6 MB
    Label: <None>
    Access permissions: 媒体は書き込み保護されていません。

  この場合は、/de/dsk/c7t0d0s0   となる。
  In this case on my machine, the device descriptor is /dev/dsk/c7t0d0s0.

3. My DVD_CD_Image 格納ディレクトリに移動して、新たに作成する ISO Image file を格納するディレクトリを作成する。
   Change to your DVD_CD_Image stored directory and make directory to store the new iso-image file.
$ cd ~/Downloads/DVD_CD_Image
$ mkdir osol0906
$ cd osol00906

4. Live CD の中身を吸い出す。
   Rip out all files of opensolaris 2009.06 Live CD-ROM

$ dd if=/dev/dsk/c7t0d0s0 of=osol0906.iso
1387068+0 records in
1387068+0 records out
710178816 bytes (710 MB) copied, 271.927 s, 2.6 MB/s

$ ls -l
total 694152
-rw-r--r-- 1 baian baian 710178816 2009-06-20 16:02 osol0906.iso

5. 下記のコマンドを与えて、作成した iso ファイルをマウントする。
   Mount this iso-image file to execute command as follows.  

$ pfexec lofiadm -a osol0906.iso
  /dev/lofi/1

◎ この返値をメモする。(この場合): /dev/lofi/1
   Make a note of this return value (in this case : /dev/lofi/1)

$ pfexec mount -F hsfs /dev/lofi/1 /media/cdrom

$HOME/Desktop に cdrom アイコンが表示される。

6.マウントされた /media/cdrom の中身を確認する。 
  GUI でファイルマネージャから確認してもよい。
 Desktop の OpenSolaris, cdrom のファイルを閲覧して、正常に iso イメージができたことを確認する。
  Confirm to suceed the iso-image file browsing both files on /media/OpenSolaris and /media/cdrom.
$ ls -l /media/cdrom
total 603088
lrwxrwxrwx  1 root  root          9 2009-05-15 00:48 bin -> ./usr/bin
drwxr-xr-x  6 root  sys        2048 2009-05-15 01:07 boot
drwxr-xr-x 14 root  sys        6144 2009-05-15 00:53 dev
drwxr-xr-x  3 root  sys        2048 2009-05-15 00:48 devices
drwxr-xr-x  5 65432 staff      2048 2009-05-15 00:53 jack
drwxr-xr-x  3 root  sys        2048 2009-05-15 00:53 mnt
drwxr-xr-x  5 root  sys        2048 2009-05-15 00:51 platform
dr-xr-xr-x  2 root  root       2048 2009-05-15 00:48 proc
-rw-r--r--  1 root  root          0 2009-05-15 00:48 reconfigure
drwx------  2 root  root       2048 2009-05-15 00:48 root
drwxr-xr-x  4 root  root       2048 2009-05-15 00:53 save
-rw-r--r--  1 root  root  588066304 2009-05-15 01:31 solaris.zlib
-rw-r--r--  1 root  root   29468672 2009-05-15 01:33 solarismisc.zlib
drwxr-xr-x  4 root  root       2048 2009-05-15 00:48 system
drwxrwxrwt  2 root  sys        2048 2009-05-15 00:48 tmp

$ ls -l /media/OpenSolaris
total 603088
lrwxrwxrwx  1 root  root          9 2009-05-15 00:48 bin -> ./usr/bin
drwxr-xr-x  6 root  sys        2048 2009-05-15 01:07 boot
drwxr-xr-x 14 root  sys        6144 2009-05-15 00:53 dev
drwxr-xr-x  3 root  sys        2048 2009-05-15 00:48 devices
drwxr-xr-x  5 65432 staff      2048 2009-05-15 00:53 jack
drwxr-xr-x  3 root  sys        2048 2009-05-15 00:53 mnt
drwxr-xr-x  5 root  sys        2048 2009-05-15 00:51 platform
dr-xr-xr-x  2 root  root       2048 2009-05-15 00:48 proc
-rw-r--r--  1 root  root          0 2009-05-15 00:48 reconfigure
drwx------  2 root  root       2048 2009-05-15 00:48 root
drwxr-xr-x  4 root  root       2048 2009-05-15 00:53 save
-rw-r--r--  1 root  root  588066304 2009-05-15 01:31 solaris.zlib
-rw-r--r--  1 root  root   29468672 2009-05-15 01:33 solarismisc.zlib
drwxr-xr-x  4 root  root       2048 2009-05-15 00:48 system
drwxrwxrwt  2 root  sys        2048 2009-05-15 00:48 tmp

うまくできた。間違いない。

7. 次のコマンドを与えて、マウントを解除する。
 As a final step, unmount and detach the images:
$ pfexec umount /media/cdrom
$ pfexec lofiadm -d /dev/lofi/1
$ pfexec lofiadm

8. Live CD-ROM を排出させる。
$ pfexec eject /media/OpenSolaris

2009-07-02

OpenSolaris Tips: How to configure Automatic-Login with GDM

How to configure Automatic login on OpenSolaris 2009.06 with GDM
OpenSolaris 2009.06 を LiveCD(LiveUSBでも)でスタートアップしたときに自動的にログインしてGNOME Desktop が表示される。
この一連の動作をハードディスクにインストールした OpenSolaris 2009.06 で実現させるための設定方法についてのメモ。 
この設定は一意のユーザのみに適用される。複数のユーザで一台のマシンを共有する場合には、セキュリティ上お勧めしない。
LiveCD で自動ログインしたときの、GNOME desktop 上の GNOME端末を開いて、/etc/X11/gdm 以下のファイルを覧る。
ここで custom.conf に注目。これが GDM をカスタマイズするための設定ファイルである。
jack@opensolaris:~$ ls /etc/X11/gdm
Init       PostSession    XKeepsCrashing    custom.conf     locale.alias
PostLogin  PreSession    Xsession    gdmprefetchlist  modules
jack@opensolaris:~$ cat /etc/X11/gdm/custom.conf
----------------------------------------------------------------
# GDM Custom Configuration file.
#
# This file is the appropriate place for specifying your customizations to the
# GDM configuration.   If you run gdmsetup, it will automatically edit this
# file for you and will cause the daemon and any running GDM GUI programs to
# automatically update with the new configuration.  Not all configuration
# options are supported by gdmsetup, so to modify some values it may be
# necessary to modify this file directly by hand.
#
# This file overrides the default configuration settings.  These settings
# are stored in the GDM System Defaults configuration file, which is found
# at the following location.
#
# /usr/share/gdm/defaults.conf.
#
# This file contains comments about the meaning of each configuration option,
# so is also a useful reference.  Also refer to the documentation links at
# the end of this comment for further information.  In short, to hand-edit
# this file, simply add or modify the key=value combination in the
# appropriate section in the template below this comment section.
#
# For example, if you want to specify a different value for the Enable key
# in the "[debug]" section of your GDM System Defaults configuration file,
# then add "Enable=true" in the "[debug]" section of this file.  If the
# key already exists in this file, then simply modify it.
#
# Older versions of GDM used the "gdm.conf" file for configuration.  If your
# system has an old gdm.conf file on the system, it will be used instead of
# this file - so changes made to this file will not take effect.  Consider
# migrating your configuration to this file and removing the gdm.conf file.
#
# If you hand edit a GDM configuration file, you can run the following
# command and the GDM daemon will immediately reflect the change.  Any
# running GDM GUI programs will also be notified to update with the new
# configuration.
#
# gdmflexiserver --command="UPDATE_CONFIG "
#
# e.g, the "Enable" key in the "[debug]" section would be "debug/Enable".
#
# You can also run gdm-restart or gdm-safe-restart to cause GDM to restart and
# re-read the new configuration settings.  You can also restart GDM by sending
# a HUP or USR1 signal to the daemon.  HUP behaves like gdm-restart and causes
# any user session started by GDM to exit immediately while USR1 behaves like
# gdm-safe-restart and will wait until all users log out before restarting GDM.
#
# For full reference documentation see the gnome help browser under
# GNOME|System category.  You can also find the docs in HTML form on
# http://www.gnome.org/projects/gdm/
#
# NOTE: Lines that begin with "#" are considered comments.
#
# Have fun!

[daemon]
AutomaticLoginEnable=true     ←自動ログインを有効にする
AutomaticLogin=jack              ←自動ログインするユーザーアカウントを指定
GdmXserverTimeout=30          
←自動ログインするまでの時間(秒)を指定

[security]

[xdmcp]

[gui]

[greeter]

[chooser]

[debug]

# Note that to disable servers defined in the GDM System Defaults
# configuration file (such as 0=Standard, you must put a line in this file
# that says 0=inactive, as described in the Configuration section of the GDM
# documentation.
#
[servers]

# Also note, that if you redefine a [server-foo] section, then GDM will
# use the definition in this file, not the GDM System Defaults configuration
# file.  It is currently not possible to disable a [server-foo] section
# defined in the GDM System Defaults configuration file.
#

----------------------------------------------------------------
ハードディスクにインストールした OpenSolaris を起動して GNOME Desktop が表示されたら、上述と同様に GNOME端末を開いて、コマンドラインで
$ pfexec vi /etc/X11/gdm/custom.conf
-------------------------------------------------------------------------------------------

# GDM Custom Configuration file.
#
# This file is the appropriate place for specifying your customizations to the
# GDM configuration.   If you run gdmsetup, it will automatically edit this
# file for you and will cause the daemon and any running GDM GUI programs to
# automatically update with the new configuration.  Not all configuration
# options are supported by gdmsetup, so to modify some values it may be
# necessary to modify this file directly by hand.
#

-- 中略
#
# 以下の項目 [daemon] の記述がなければ追加・編集する↓

#

[daemon]
# 自動ログインを有効にする↓
AutomaticLoginEnable=true
 
# 自動ログインするユーザーアカウントを指定↓
AutomaticLogin=hogehoge

# 自動ログインまでの時間(秒)を指定・任意、ここでは 15秒↓
GdmXserverTimeout=15

[security]

[xdmcp]
Enable=true
[gui]

[greeter]

[chooser]

[debug]

# Note that to disable servers defined in the GDM System Defaults
# configuration file (such as 0=Standard, you must put a line in this file
# that says 0=inactive, as described in the Configuration section of the GDM
# documentation.
#
[servers]

# Also note, that if you redefine a [server-foo] section, then GDM will
# use the definition in this file, not the GDM System Defaults configuration
# file.  It is currently not possible to disable a [server-foo] section
# defined in the GDM System Defaults configuration file.
#
----------------------------------------------------------
このファイルを保存終了して、システムを再起動させる。

すると、LiveCDから起動したときと同様に、指定した時間が経過すると指定したユーザーアカウントで自動的にログインして、GNOME Desktop 画面が表示される。
ただし、この設定では、自動ログイン後にいったんログアウトした場合には、GDM ログイン画面が表示されて、再ログインする場合にはユーザ名とパスワードを入力する必要がある。

そこで、別法・・・先の設定と同様に GNOME端末を開いて、コマンドラインで赤字部分を編集する。

$ pfexec vi /etc/X11/gdm/custom.conf
--------------------------------------------------------------
# GDM Custom Configuration file.
#
-- 中略 ---

#
[daemon]
# 自動ログインを有効にする
TimedLoginEnable=true
 
# 自動ログインするユーザーアカウントを指定
TimedLogin=hogehoge

# 自動ログインまでの時間(秒)を指定・任意
TimedLoginDelay=15

[security]

[xdmcp]
Enable=true

-- 後略 ---
--------------------------------------------------------------

テキストエディタを保存終了して、システムを再起動させる。
すると、ログイン画面で「ユーザ hogehoge は 15 秒後にログインします」と表示されるようになり、指定した時間が経過すると指定したユーザーアカウントで自動的にログインする。