My Notebook, Dell Latitude D410 に Linux Mint 7 XFCE Community Edition をインストールしたときの覚え書き・メモ
Linux Mint 7 XFCE on Dell Latitude D410 with Compiz
# 動作環境;
Platform: Dell Latitude D410; Intel Pentium M730, SODIMM 2048MB (533MHz),
Hard Drive; Seagate Momentus 5400.3 ST9160821A, 160GB
Multi-boot System: 三種類のオペレーティングシステムを適宜切り換えて運用する。
OpenSolaris 2009.06 (*), Linux Mint 7 XFCE, Windows XP Professional +SP3
(*): ブートパーティション: ブートローダ Grub をインストールして、ブートする。 ここで Grub boot menu を編集する。
1. LiveUSB の作成: CD-R/RW を作らないので。
Create a 'LiveUSB stick for Linux Mint 7 XFCE edition' from the downloaded LiveCD ISO-Image file with "Win32DiskImager" or my previous posted issues (*) on the Windows XP.
Windows XP 上で、前述の方法(*): (1) または (2) を用いて、
ダウンロードした LiveCD ISO.Image から Linux Mint 7 XFCE edition の "LiveUSB" を作成する。
2. Partitioning for Linux Mint 7
パーティションの準備: Linux Mint 7 XFCE をインストールするため、Linux 用領域を確保する。
既にインストール済みの Vine Linux 5.0 を置き換えることにして、同じパーティションニングとする。
すでにインストールされている Vine Linux 5.0 を削除して Linux Mint 7 XFCE をクリーン・インストールすることになる。
ここで、 /home ディレクトリ・パーティションは format せずに、$HOME/user 設定ファイルやデータファイルを Mint 7 XFCE で利用する。
$HOME/dot File(隠しファイル・ディレクトリ)の内、 .mozilla, .thunderbird, .vimrc は再利用する。
$HOME/.config/user-dirs.dirs は再利用する。・・・ $HOME/ディレクトリ・フォルダの日本語表示は避けるため。
ここで、$HOME= /home/login-user ディレクトリ。
# fdisk -l ; (command on Linux)
ディスク /dev/sda: 160.0 GB, 160041885696 バイト
ヘッド 255, セクタ 63, シリンダ 19457
Units = シリンダ数 of 16065 * 512 = 8225280 バイト
Disk identifier: 0xde27ca4f
デバイス ブート 始点 終点 ブロック Id システム
/dev/sda1 1 5222 41945683+ 7 HPFS/NTFS # Windows XP C: drive *don't format
/dev/sda2 5223 7833 20972857+ 7 HPFS/NTFS # Windows XP D: drive *don't format
/dev/sda3 * 7834 13054 41937682+ bf Solaris # OpenSolaris 用 (*) boot from here.
/dev/sda4 13056 19457 51424065 5 拡張領域
/dev/sda5 13056 13071 128488+ 83 Linux # Linux /boot *format
/dev/sda6 13072 16183 24997108+ 83 Linux # Linux / *format
/dev/sda7 16184 16370 1502046 82 Linux スワップ
/dev/sda8 16371 19457 24796296 83 Linux # Linux /home *reuse, don't format
注記 (*): Solaris が Linux swap にアクセスしないためのオマジナイ として 13055 を空けておく。
3. Start-up Linux Mint 7 XFCE from the Live-USB.
先に作成しておいた "Live-USB" Stick を My Notebook の USB2.0 ポートの一つに挿して、電源投入。
POST 直後に "F12" キーを押下、D410 の Boot menu を表示させる。
Fig-01: Device Boot menu on Dell D410, after pressed F12 key
二番目のライン: USB Storage Device を選択して、 [Enter] キー押下、LiveUSB をブートさせる。
Then selecting the second line " USB Storage Device", press [Enter] key to boot Live-USB system.
Step-1-a. Automaticaly booting up a LiveUSB/CD in 10 seconds.[Fig-02-a]
However, press [ESC] key within 10 seconds, it is available for
switching over to the grub boot menu. [Fig-02-b]
まずはじめに [Fig-02-a] の画面が立ち上がる。10秒間経過後に自動的に LiveUSB/CD がブートする。このとき、10秒以内に [ESC] キーを押下すると、Welcome メッセージが付いた Grub ブートメニューに切り換えることができる。[Fig-02-b]
Fig-02-a:Automatic boot on Linux Mint 7 XFCE LiveUSB/CD
Step-1-b. On the Live Grub boot menu select the top line, then press [Enter] key.
It will be able to start the Linux Mint 7 XFCE on a LiveUSB/CD.
ブートメニューの先頭行を選択して、[Enter] キーを押下げるとブートする。
あるいはここで、インストールモード、LiveCD の完全性のチェック、メモリテストの実行、または、ローカルなハードドライブからの起動を選択できる。
Fig-02-b: GRUB boot menu on Linux Mint 7 XFCE LiveUSB/CD
Step-2. A Boot Splash Screen appears ・・・from freedom came elegance.
Fig-03: Boot Splash Screen on LiveUSB/CD
Step-3. automatic login ・・・ Start-up / Xfce Desktop appears.
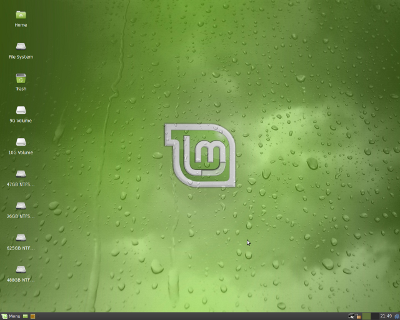
Fig-04: Mint 7 Xfce Desktop on Mint 7 XFCE LiveUSB/CD
Step-4. Installation to the hard drive
Desktop 上の "Install" アイコンをクリックして、インストールを開始する。
Click "Install" icon on the Desktop, then the Installer is executed.
Fig-05: Welcome to install dialogue on Mint 7 XFCE LveUSB/CD
以降、"進む(F)" ボタンをクリックして、画面の指示に従ってインストール作業をすすめる。
Step-5. According to the installation dialogues, go ahead to install to the hard
drive.
Location-date-time settings - keyboard layout settings - partitioning -
Login user account settings - ----- all done, succeeded the installation.
# Linux Mint 7 XFCE 用のパーティションは、上述の 2項で準備したとおりに設定した。
なお、Windows XP の C-drive, D-drive ともに、起動時にNTFS でマウントされるように、
それぞれ /windows/C-drv, および /windows/D-drv として設定した。
注意: パーティションニング・システムインストールの際には、 Mint 7 の Grub は /dev/sda5 の先頭にインストールしておく。
/dev/sda の MBR にインストールすると、既存の OpenSolaris のブートメニューを置き換えてしまい、後始末が面倒となる。
4. Reboot the system, plugged out USB-stick.
システム再起動。
5. Boot from the hard drive. インストールしたハードディスクから起動する。
6. # reboot ( or # init 6) :
7. Login with the added user account. 設定したユーザ・アカウントでログインする。


